A cellphone or mobile phone detector is actually a high gain op amp amplifier which detects slightest of RF disturbance from a mobile phone, and illuminates an LED.

Mobile phones today being the major generator of RF interference is easily picked up by this circuit and can be seen through an LED illumination at the output of the circuit.
Working Concept
The concept behind the working of this simple mobile phone detector is a highly sensitive comparator circuit which is unstable at its input due to high sensitivity, such that it turns ON even with the minutest electrical interference in the atmosphere around it.
Since it is designed to detect mobile phone signals one may misinterpret it to be detecting the GHz signals, actually it's not, and it simply can't.
Even if the mobile phone signals may be oscillating at GHz levels, the signal is still a radio frequency (RF), having the properties of electrical interference.
It is this electrical interference that is picked up by the op amp input, and converted into a DC output, for illuminating the LED.
Basic Design Using a Single IC 741 Op-Amp
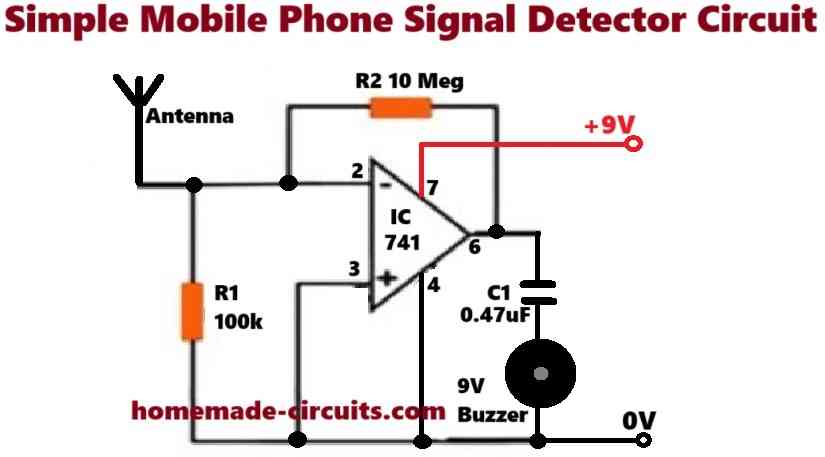
Parts List (BOM)
- Resistors are 1/4 watt CFR 5%
- 100k = 1
- 10M = 1
- Capacitor 0.47uF ceramic Disc = 1
- IC 741 or any standard op-amp = 1
- 9V piezo buzzer = 1
- 9V PP3 Battery = 1
Referring to the above circuit diagram, the working of the basic mobile phone signal detector can be understood through the following description:
Signal Detection
Here is how it all works, When a mobile phone is in action, whether it is making calls, receiving them, or sending texts, it sends out those RF signals.
The antenna catches these signals and sends them right into the op-amp’s inverting input.
Signal Amplification
Once detected, this weak RF signal gets amplified by the op-amp (the IC 741) thanks to its high feedback resistance from R2 and its own high gain.
The result? An amplified signal that is strong enough to get our buzzer buzzing!
Noise Filtering
Meanwhile the Capacitor C1 steps in to filter out any annoying noise or low-frequency bits from that amplified signal.
This way we ensure that our buzzer only reacts to real RF signals coming from mobile phones.
Buzzer Activation
Finally when an RF signal gets detected and amplified enough the buzzer receives just enough current to spring into action.
It then produces an audible tone letting us know there is some RF activity happening nearby.
Formulas and Calculations
Gain of the Op-Amp
The op-amp IC 741 is used in an open-loop configuration meaning its gain is determined by its internal characteristics.
Open-loop gain (AOL):
The typical open-loop gain of a 741 op-amp is approximately 100000 to 200000 (100 dB).
Formula:
Vout = AOL * (V+ - V-)Where:
- Vout = Output voltage of the op-amp
- V+ = Non-inverting input voltage (connected to 0V or ground)
- V- = Inverting input voltage (signal from the antenna)
Since this circuit does not include external gain-setting resistors the op-amp operates with its maximum open-loop gain.
Impedance Considerations
The antenna and the resistors R1 and R2 form a voltage divider for the input signal. The impedance of R1 and R2 affects the sensitivity of the circuit.
Input impedance:
The input impedance (Zin) at the inverting terminal of the op-amp is primarily determined by R2 which is 10 MOhm. This high input impedance ensures minimal loading on the antenna signal.
RC Filtering
The capacitor C1 (0.47 uF) acts as a high-pass filter to block DC and low-frequency signals.
High-pass filter cutoff frequency (fc):
The cutoff frequency is determined by the op-amp output impedance and the capacitor:
fc = 1 / (2 * π * R * C)But as the op-amp output impedance is very low, R can be neglected. For practical purposes the circuit passes signals in the RF range (MHz to GHz).
Current Through the Buzzer
The buzzer operates when sufficient current flows through it. Assuming the output voltage from the op-amp is near saturation (close to 9V):
Current through the buzzer (I):
I = V / Rb- Where:
- V = Output voltage from the op-amp (approximately 9V)
- Rb = Internal resistance of the buzzer (typically around 100 Ohms)
Signal Sensitivity
The smallest signal (Vin) detectable by the circuit is determined by the op-amp's input offset voltage (Vos, typically around 1 mV) and the gain:
Vmin = Vos / AOLFor a gain of 100,000:
Vmin = 10 uVThis is sufficient to detect weak RF signals from a mobile phone.
Design Validation
To confirm the circuit works as intended:
Verify that the op-amp output saturates to near 9V when RF signals are detected.
Ensure that the antenna captures RF frequencies, so you can use simple whip antenna (wire of length around 6 cm) is suitable for GSM frequencies (900 MHz to 1.8 GHz).
Increasing Sensitivity using 4 Op-Amps (LM324)
This circuit is basically a simple high gain inverting amplifier, built around the IC LM 324. Only two of its op amps may be incorporated, however for making the circuit extremely sensitive, all four of its opamps have been rigged in series.
Looking at the figure we see actually the the circuit is a repetition of four identical circuits in series.
So we would only want to study the basic concept of the any one of the stages consisting just one op amp.
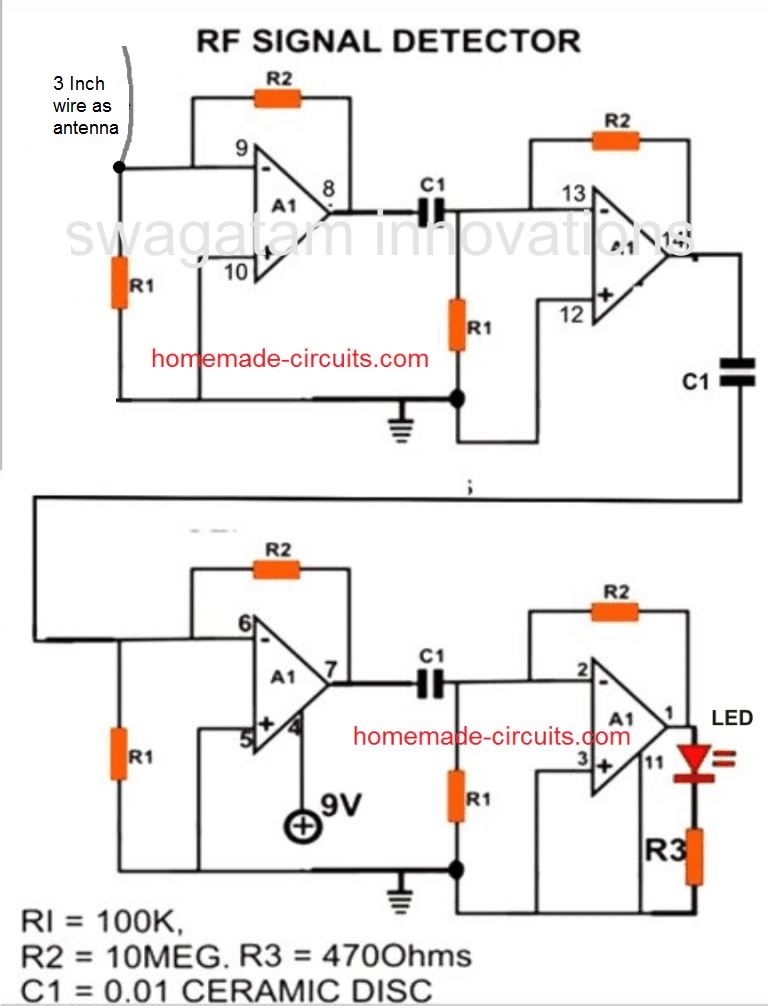
NOTE: Using 4 op amp stages can make the design extremely sensitive and the circuit may start sensing all sorts of RF signal that may be present in the atmosphere. Therefore I recommend using only 2 op amp stages in series for this project.
Parts List
- All R1 = 100K 1/4 watt
- All R2 = 2.2 Meg or any value between 1 Meg and 10 Meg (1/4 watt)
- All C1 = 0.01uF, or 103 ceramic disc or PPC, any type will do.
- A1 --- A4 = LM324 IC
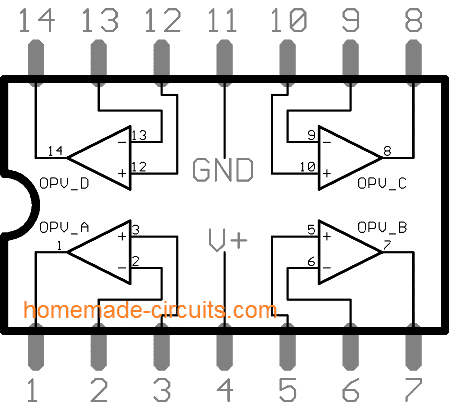
As mentioned in the earlier part of this article, the op amp is configured as a high gain non inverting amplifier, where the input is received at the pin #2 which is the inverting input of the op amp.
The RF disturbances in the air is received by the antenna and fed to the inverting input of the op amp which is amplified by the circuit to some specified level depending on the value of the feed back resistor across the output and the inverting input of the op amp.
Increasing the value of this resistor increases the sensitivity of the circuit, however too much sensitivity can make the circuit unstable and induce oscillations.
The amplified signal is fed to the input of the next stage which is just a replica of the previous stage.
Why it is so Sensitive
It's due to the 4 series op amp stages which helps to make the circuit highly sensitive an this can pick up cellphone RF from a distance of 10 meters.
Here the relatively weaker signals from the first stage is further enhanced and made stronger so that now it may be fed to the third stage for repeating the actions that is for further amplification until the last stage whose output illuminate an LED, displaying the presence of even the minutest possible RF disturbance in the air.
UPDATE:
After a lot of experimentation I finally realized that creating a long range cell phone detector wasn't feasible. It's because the modern phones have a high grade RF shielding, which allows only very little RF to leak out from the phone. Therefore the RF do not reach too far in the atmosphere making it impossible to detect them beyond a few inches from the phone.
To improve the distance I tried making the circuit more sensitive by adding more stages in series, but that didn't work. Because higher sensitivity meant the circuit started detecting many different existing RF disturbances in the air, which kept the LED flickering all the time.
Video Demo
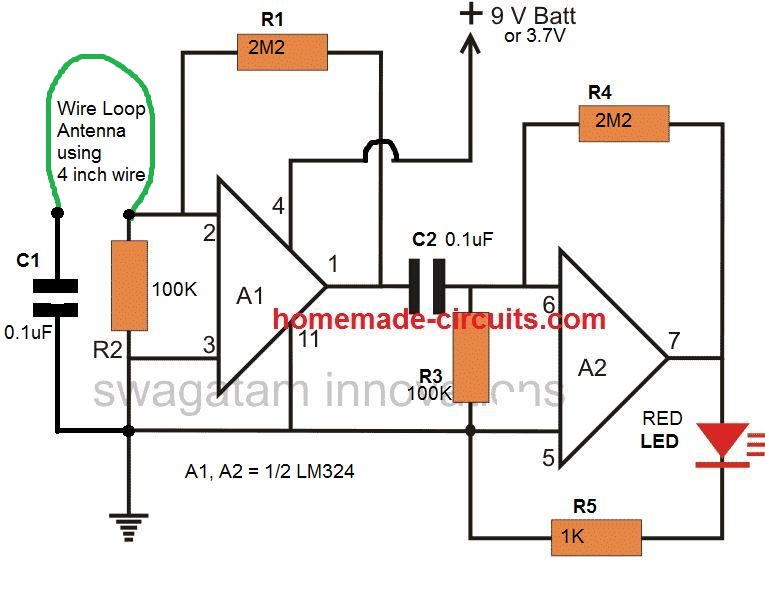
The Finalized Circuit
The finalized tested design can be seen below, it is exactly similar to a WiFi detector circuit
How to Assemble the Circuit
The discussed circuit of cell phone RF signal detector, sensor is very easy to build and requires minimal knowledge of electronic for going about with the procedures. It is built with the following instruction:
After procuring the given components, fix them over the piece of general PCB in the following manner:
Take the IC first, and carefully insert its legs inside the PCB holes through proper alignment.
Solder the leads of the IC.
Now as per the diagram start connecting the resistors and capacitors one by one to the pin outs of the IC, remember that from the component side of the PCB, the pin out will be just the opposite to what it is from the track side, so be careful with the pin out designations and connections.
How to Test
Once it is assembled, it’s all about connecting the board to a 9 volt battery and confirming the results.
For this you may make a call from your cell phone or just call to know your balance report, the LED in the circuit should hopefully start responding to the cell phones generated RF signals.
Alternatively, you may try clicking your kitchen gas lighter very close to the antenna of the circuit; the LED could be seen flashing with the clickings of the gas lighter.
Another way of checking the circuit would be to take it near your mains electric board, the LED should light up when brought even withing a feet near to the board indicating the presence of the mains field and confirming the working of the circuit.
Note: The coil L1 can be made from any gauge wire, just a few turns of any diameter between 5 to 9mm will do.
RF Sniffer using a Single Op Amp
While the RF mobile detector circuit was primarily meant to indicate the existence of RF emissions, this circuit is implemented for several different functions, such as testing car security keys and as a bug detector.
The RF sniffer circuit is so sensitive that it can pick up fields as low as to 1 mW at 1 m distance and from around 100 kHz to 500 MHz signals.
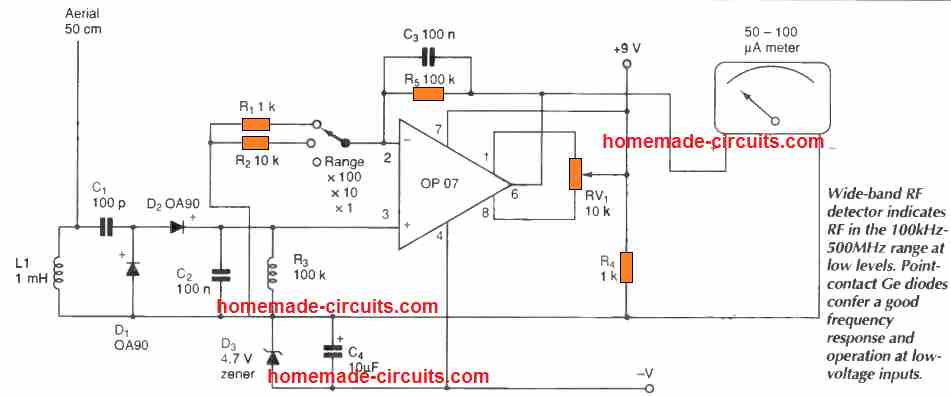
Essentially, it is just a broad -band input circuit, a rectifier and meter, nevertheless for achieving required sensitivity an amplifier is necessary and the diodes should be accurately selected.
Germanium diodes are able to operate even at lower forward voltages compared to the silicon types, and frequency response is bigger using point contact devices, therefore point -contact, germanium 0A90 diodes happen to be the best alternative.
A 1 mH inductor over the input minimizes LF sensitivity, as does the feedback capacitor. Adjusting the meter offset is not important, nonetheless it will enable the nulling of unwanted frequencies.
The meter might require series resistance to fine-tune sensitivity. The display reading may not be linear and will only help to indicate the presence of RF and the relative power of the RF.
Mobile Phone Detector Circuit with Relay
The next mobile detector circuit will not only indicate the mobile RF through an LED, it will also activate a Relay for controlling a desired external load. Thus, this design includes an LED indicator as well as a relay for powering an external load in response to a detected mobile RF signal.
Simply operating a mobile phone near an audio device gives an idea of the strength of the electromagnetic disturbances that a mobile phone is capable of creating.
The strong buzzing at 217 Hz that often occurs is a direct consequence of the communication mode used by the GSM system: short bursts of powerful pulses at 900 or 1800 MHz, repeated at a rate of 4.616 milliseconds. This allows different communications to "pass" simultaneously on the same radio frequency.
The mobile phone does not only emit signals during an active call.
Even in "standby" mode, it periodically responds to network requests so that the network can constantly locate and authenticate it (for better or worse...).
More substantial data exchanges occur when the device is powered on, as well as when it receives a call or a text message (SMS).
Before receiving a call or data, the mobile phone needs to confirm with the network that it is capable of doing so. It is the transmission of this confirmation message that is detected by all standalone "vibrators" sold as accessories, which is why they activate even before the phone rings.
Our circuit operates on the same principle and will therefore react in a very similar way.
The Preamplifier:
To detect the pulse trains emitted by the mobile phone, an approach was conceived to exploit the strong disturbances experienced by audio equipment in the immediate vicinity of operating mobile phones.
It should be noted that with a typical power of 2W (at 900 MHz) or 1W (at 1800 MHz), the mobile phone emits a significant pulsed electromagnetic field in its immediate surroundings.
Some studies suggest that in order to present no risk to health, the phone should be kept at least... twelve meters away from the ear!
At a distance of a few tens of centimeters, the field is sufficient to induce tens or hundreds of millivolts at the terminals of a roughly tuned antenna (for example, a simple unshielded wire, 2, 4, or 8 cm long).
If this conductor is connected to a component acting as a diode, it can capture UHF bursts that reappear as audible impulses. This can cause interference and render amplification ineffective.
In a preamplifier circuit, for example, a rigorous design in terms of electromagnetic compatibility (EMC) allows contemporary (high-quality) products to have an acceptable level of immunity.
Unfortunately, the same cannot be said for older equipment, even if they are still in perfect working condition, and of course, for many low-end devices.
The mobile phone detector circuit diagram in Figure 1 below, relies on a purposely "poor" preamplifier stage, built around a common operational amplifier (half of an LM358).
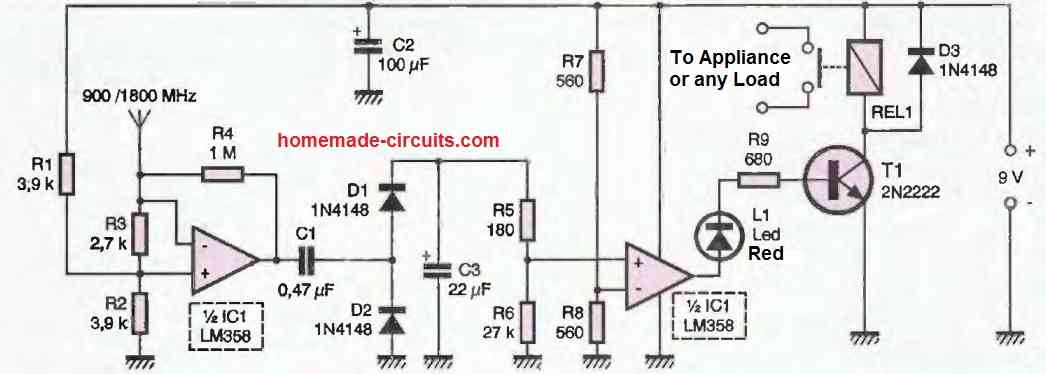
The significant gain and the input configuration deliberately place it in conditions that make it susceptible to electromagnetic disturbances.
The numerous internal junctions of the integrated circuit are responsible for the actual detection of radio impulses, while the discrete component "doubler" voltage rectifier integrates their envelope in a rather smooth manner.
How the Circuit Works
During each detected UHF impulse, the 22 uF capacitor charges a little more through a 180-ohm resistor. However, during the resting periods between impulses, it discharges slowly through a 27 k-ohm resistor.
It is at this level that the choice of values for the RC components allows for the desired triggering selectivity.
The adopted ratio between the charging and discharging time constants, for example, makes the circuit insensitive to the short data bursts periodically emitted by the mobile phone for identification, even though these bursts can be detected with an oscilloscope at the output of the first operational amplifier.
The much longer data block transmitted just before the phone accepts an incoming call (even if the ringtone is deactivated) is sufficient to charge the capacitor to a level that triggers the comparator (second half of the LM358).
Therefore, a simple transistor is enough to activate a small relay and simultaneously light up an indicator LED.
More ambitious projects could involve a microcontroller to analyze the impulse frequency detected by the first operational amplifier more precisely, potentially preceded by a high-gain UHF amplifier.
This principle is used in mobile phone detectors, particularly by security services, which need to be much more sensitive and free from false alarms.
Construction
Although designed to exploit signals at the limit of microwave frequencies, the circuit uses a perfectly conventional wiring technique.
The printed circuit board in Figure 2 is designed exactly like any other audio preamplifier, except that the most basic rules of electromagnetic compatibility (EMC) have been blissfully ignored.
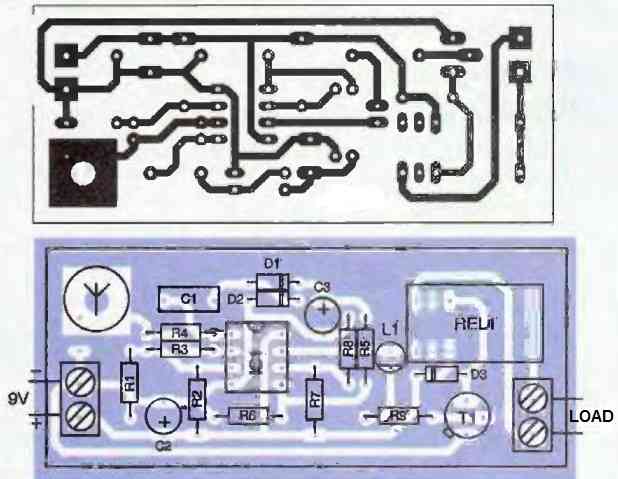
As a result, it is more susceptible to GSM interference, which can be further increased by adding a tuned antenna.
A large center pad allows for direct mounting, perpendicular to the printed circuit board, of a replacement antenna for a mobile phone, but a rigid wire of 4 or 8 cm can work just as well (it's ultimately a matter of aesthetics).
The wiring of the remaining components, according to the layout in the figure above, does not require any particular comments, except that it is strongly recommended to use screw terminals for the connection of the relay contact to its user circuit and for the 9 to 12V power supply (typically a miniature battery).
How to Use
The circuit does not require any connection to the mobile phone since it operates purely through induction.
In principle, triggering is possible up to a distance of 50cm, or even a meter when the mobile phone is using its maximum transmission power.
It should be noted that mobile phones constantly adjust their transmission power to the minimum level necessary for a good connection with the base station.
In areas with excellent coverage, the power can be significantly reduced, which also increases the battery life.
As a result, the ring relay (or any standalone vibrator) may appear less sensitive. To ensure optimal triggering reliability, the closer the distance, the better.
With a standby power consumption of around a milliampere, the circuit can operate for a long time with a simple 9V battery, but it can also be powered by a vehicle's battery.
In such cases, care should be taken not to exceed the current rating of the relay used (for example, using a "special automotive" relay to control a high-power consumer such as a horn).
In many cases of permanent fixed operation, a mains power supply can be used, provided it is carefully filtered and stabilized due to the device's high sensitivity.
It should be noted that the circuit is capable of detecting other pulsed RF fields emitted by devices other than mobile phones.
It will trigger, for example, when brought close to the door of a functioning microwave oven, even if it is sealed.
This type of observation helps to some extent in clarifying concerns about the health effects of mobile phone use.
It has been suggested that twenty minutes of uninterrupted use would cause a local increase of one degree in brain temperature!
It seems that the radiation experienced is of the same order of magnitude as that which would be received from contact with the door of a certain type of oven for the same duration, which is generally recommended to be avoided when it is operating...
On the other hand, one can often find reassurance regarding the potential harmfulness of fixed station antennas that are scattered everywhere.
Outside their main emission lobe (i.e., right in front, where apparent powers of several hundred watts are common), the circuit generally needs to be brought very close to trigger a response.
It seems that being near or behind fixed station antennas is much less harmful than regularly and extensively using a mobile phone...
Perhaps this little circuit will inspire some of our readers to further explore the subject.

Have Questions? Please Comment below to Solve your Queries! Comments must be Related to the above Topic!!