In this article I have explained the construction of 10 interesting yet simple LED chaser circuits, which not only create beautiful running light effect but are also easy to build.
We also discuss how to modify these into a design popularly known as "knight rider" chaser circuit.
These primarily incorporate LEDs as well as mains operated bulbs through triacs. The proposed circuit is transformerless and is thus a lot compact and light weight.
What is a Light Chaser
An LED light chaser circuit is a device which is designed to turn ON and OFF a string of LED lamps so that it creates a "running" light kind of effect.
These look very interesting and are surely eye catching and that’s why these types of lighting arrangement have gained immense popularity in today’s world.
1) Simple LED Chaser Circuit Diagram
Though the more complex lighting might need the incorporation of microcontroller ICs, simpler yet very interesting light effects can be generated through ordinary ICs like IC 4017 and IC 555 as shown below.
This is our first LED chaser design which requires very few components for the configuration.
(The 100K pot can be adjusted to get any desired chasing speed or rate)

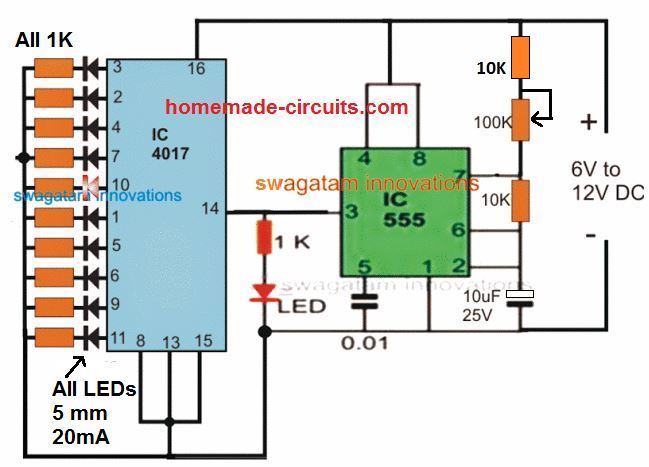
Parts List
All resistors are 1/4 watt 5% unless specified
- 1K = 11nos
- 10K = 2nos
- 100K pot = 1no
Capacitors
- 0.01uF ceramic disc
- 10uF/25V electrolytic
- Semiconductors
- LEDs RED, 5mm High Bright or as desired = 11nos
- IC 4017 = 1no
- IC 555 = 1no
- For learning the pinouts and datasheet of the IC 4017 please refer to this article
- For a detailed explanation regarding IC 555 astable, you can click on this article
As can be seen in this configuration, in response to the pulses from IC 555, the IC 4017 generates a running or chasing light pattern across the connected 10 output LEDs. The chasing pattern goes on repeating itself from start to finish as long as the IC 555 keeps pulsing pin #14 of the IC 4017.
How to Calculate the Chaser Speed
The chaser speed can be easily adjusted by determining the correct frequency rate of the IC 555, as I have explained below:
Formula for IC 555 frequency is = 1/T = 1.44 / (R1 + R2 x 2) x C, where R1 is the resistor between pin#7 and the positive line, R2 is the resistor between pin#7 and pin#6/2. C is the capacitor between pin#6/2 and ground, and should be in Farads.
TL = 0.693 x R2 x C (TL refers to time LOW or the OFF time of the frequency)
TH = 0.693 x (R1 + R2) x C (TH refers to time HIGH or the ON time of the frequency)
D = Duty Cycle= (R1 + R2) / (R1 + 2R2)
Or,
R1 = 1.44 x (2 x D-1) / (F x C)
R2 = 1.44 x (1 - D) / (F x C)
The lights connected are mostly LEDs, however it can be modified for using with mains operated lamps also.
Although the above design looks great, it is possible to create even more complex and interesting light effects using the same IC 4017 and IC 555 combination, through some minor modifications, as described below:
2) LED Knight Rider Chaser Circuit
The second concept presented below is basically a running light effect generator circuit, quite resembling the effect produced over the popular "knight rider" car.

The circuit mainly comprises of IC 555 and the IC 4017 for implementing the required functions. The IC 555 is used to generate the clock pulses which is fed to the clock input of the IC 4017.
These clock pulses received from the IC555 is translated into a sequencing or chasing effect over the LEDs connected across the various outputs of the IC 4017.
In its normal mode the IC 4017 would have generated a simple start to end sequencing of the LEDs wherein the LEDs would have lit up and shut off one after the other in a sequencing pattern with a rate determined by the IC555 cock frequency, this would repeat continuously as long as the unit stays powered.
However in the proposed knight rider LED light chaser circuit, the output of the IC4017 is configured in a special way using a group of diodes which enable the output sequencing to produce a to and fro chasing of the connected LEDs, albiet through 6 LEDs only in contrast to 10 LEDs as in the normal mode.
How it Works
As can be seen in the first circuit diagram, the design produces a reverse forward moving effect of the LEDs in response to the clocks generated by the IC555 which is basically wired as an astable.
The frequency of this astable can be varied by adjusting the associated 500k pot which in turn influences the LED sequencing speed.
The entire circuit is powered via a compact transformerless power supply circuit thus avoiding the need of bulky transformers or costly SMPS.
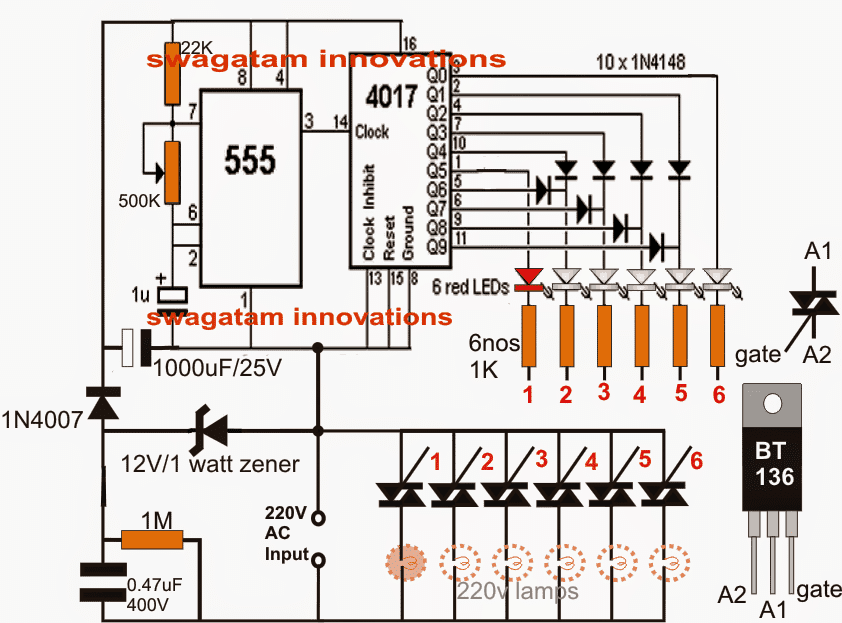
This circuit can be also modified for illuminating mains operated bulbs by incorporating a few triacs in conjunction with the LEDs present at the outputs.
The second figure shows the complete arrangement where we can see 6 triacs being rigged across the output LED ends via 1 K resistors.
Again, this mains operated knight rider light chaser does not depend on bulky power supply stages rather employs a simple capacitive power supply for implementing the proposed running light or chasing LeD effect.
WARNING: THE CIRCUIT IS NOT ISOLATED FROM MAINS AC SUPPLY, THEREFORE IS EXTREMELY DANGEROUS TO TOUCH IN POWERED AND UNCOVERED CONDITION.
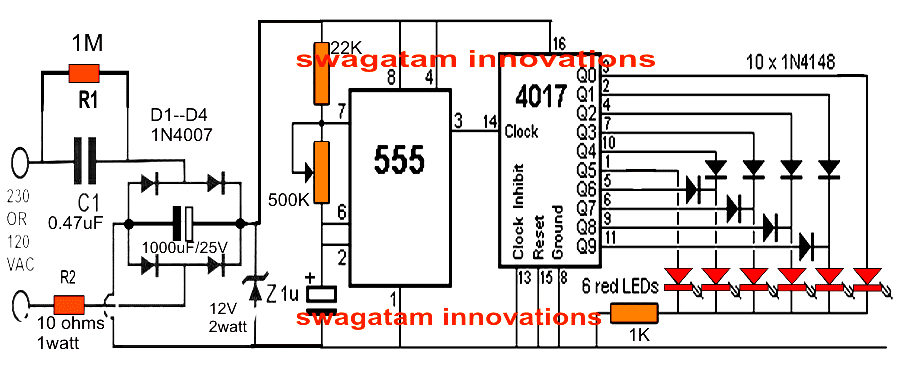
Parts List
- 1K = 1
- 22K = 1
- 1M = 1
- 10 ohms = 1
- 500K pot = 1
- 1uF/25V = 1
- 1000uF/25V = 1
- 0.47uF/400V PPC = 1
- 12V zener 1 watt = 1
- 1N4007 diodes = 4
- 1N4148 diode = 10
- LEDs = 6
- IC 4017 = 1
- IC 555 = 1
Video Clip:
Knight Rider Circuit using 220V Mains Lamps
Knight Rider Chaser using 12V Bulbs
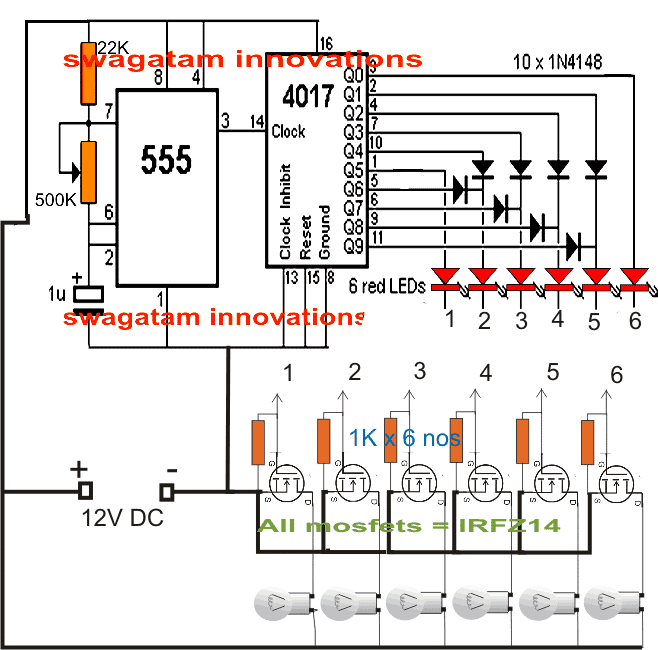
The above circuit can be also as effectively used for car installation by doing the following modifications to the above circuit. The circuit shows how the design can be used for illuminating 12V car automotive lamps.
3) Simple LED Chaser using IC 74C164
Referring to our third chaser circuit diagram below, we can see a low-frequency, astable oscillator circuit, made up of two gates, IC1a and IC1b, from the IC 4011 quad two-input NAND gate.

The operating frequency of this astable is determined by the values of C1 and R11. This circuit configuration works well as a clock-pulse generator for feeding the IC1's 74C164 shift register. The positive output pulses from the clock at pin 4 of IC2 are supplied into the shift register's clock input at pin 8 of IC1.
Each output of the shift register is wired to an LED. Each LED is connected to a 1K current-limiting resistor in series.
The input of gate IC2c is connected to the eighth output of the shift register, located at pin 13, via a time-delay RC configuration comprised of R10 and C3.
The output of the gate is connected to the clear input of the shift register at pin 9 through a capacitor. LED8 is turned on by the eighth clock pulse, and C3 is charged as soon as pin 13 of IC1 becomes positive.
After a little delay, the output of IC2c becomes low, clearing the outputs of the shift register.
The LEDs light up in the following sequence: LED1 is turned on by the first clock pulse, LED2 by the second, and so forth until all eight LEDs are illuminated.
The clear pulse from IC2c shuts off each LED once the eighth LED illuminates, and the process is then repeated.
R10 and C3's values can be changed to make LED8 stay on for the identical amount of time as the remaining LEDs.
For a quicker sequence, the RC time delay circuit must be smaller; and for a slower series, it must be larger. Increasing the value of R10 or C3 will shorten the delay period, and decreasing the value will extend the delay time.
4) LED Scanner Circuit Mustang Type
In next idea which is the 4rth one is also a chaser circuit which produces a LED scanner type illusion through the various sequencing illumination modes over the attached LED arrays. The idea was requested by Mr. Danely Sooknanan.
Technical Specifications
I want to build the new Knight rider mustang light for my car scoop.What i have read is. It's made up out of 480 distinct LEDs, arranged in three rows of 80 in each row, then divided up into two sides.
My question is how you build it. The size i want to work with is 12 inches in length by 1/2 inch in width. How many rows of leds will i get by that dimension. What kind of led to use? What can i use for the diffuser case? What to use for the control box.
The Design
In the actual knight rider LED scanner unit as shown in the video, there are as many as 29 number of functions to be precise, implementing those is virtually impossible using discrete components and without employing MCUs, however here we'll see how a few of these could be possibly made using just a handful of components.
The main two functions of the proposed Mustang LED scanner circuit may be assessed as given in the following description:
1) LEDs light up in a bar mode fashion from the two ends of the strip and meet up at the center, illuminating the whole module brightly.
In the next sequence the LEDs begin shutting off in the same sequence as above from the outer extreme ends until all the LEDs are switched OFF.
The rate or the speed of the above procedures are adjustable through a pot as per individual preferences.
2) The second scanning sequence is similar to the above, except the shutting off procedure which is done for all the LEDs at once instead of one at a time.
The above two functions can be easily implemented using a couple of 74LS164 ICs and a 555 IC oscillator as shown in the following circuit diagram:
Circuit Diagram

Looking for a Meteor Shower LED Effect Circuit? Please check out this article
Using IC 74LS164 as the Controller
In the shown mustang scanner LED light circuit, a couple of 8-bit parallel-out shift register ICs 74LS164 are employed, driven by the IC555 configured as the clock oscillator.
The circuit may be understood by considering the following two modes in the design:
As may be seen in the above circuit diagram, a 3 pole, 9 throw switch is used as the changeover switch for imitating the 2 functions explained in the previous section above.
In mode1 S1 is connected as shown in the circuit diagram, in this position the LEDs illuminate in an sequencing LED bar like fashion with every rising edge of the clocks from the IC555 until all the LED light up and the final "high" reaches pin16, when T1 momentarily resets both the ICs producing in instant shutting off of all the LEDs at once.
In the actual prototype the LEDs from Q9----Q16 must be arranged such that Q16 faces Q8, while Q9 faces the outer end of the relevant strip.
As soon as the above happens, a new cycle initiates afresh and the cycle repeats for so long as the S1 position isn't changed.
Mode#2
In mode 2 let's consider the switch S1 connected with the positive supply, thus S1a gets connected with the +5V line, S1b gets hooked up with the collector of T1 while S1c with R5. Also the reset pin 9 of IC1 and IC2 get connected with the collector of T1 whose base can be seen configured with the last output Q16 of IC2.
On power switch ON, the LEDs begin illuminating in a BAR like mode as before from Q1 to Q8 and from Q9 towards Q16 in response to each clock pulses supplied by the astable IC 555 at pin8 of the two 74LS164 ICs.
Now as soon as the high across the shifting outputs reach pin 16, T1 instantly inverts and renders a low to the serial pins 1, 2 of the ICs so that now the LEDs begin shutting off one by one across the arrays in the same sequence as it illuminated in response to every clock from IC 555.
The LED Sequence Keeps Recycling
The procedure keeps repeating as long the switch S1 position is not changed from its existing position.
The above two functions are pretty easily implemented and we have our LEDs scan the whole array quite in the manner the actual Mustang scanner is supposed to do.
However with the above two functions the features look much limited and we would want to insert a few more of the features as may be witnessed in the original video.
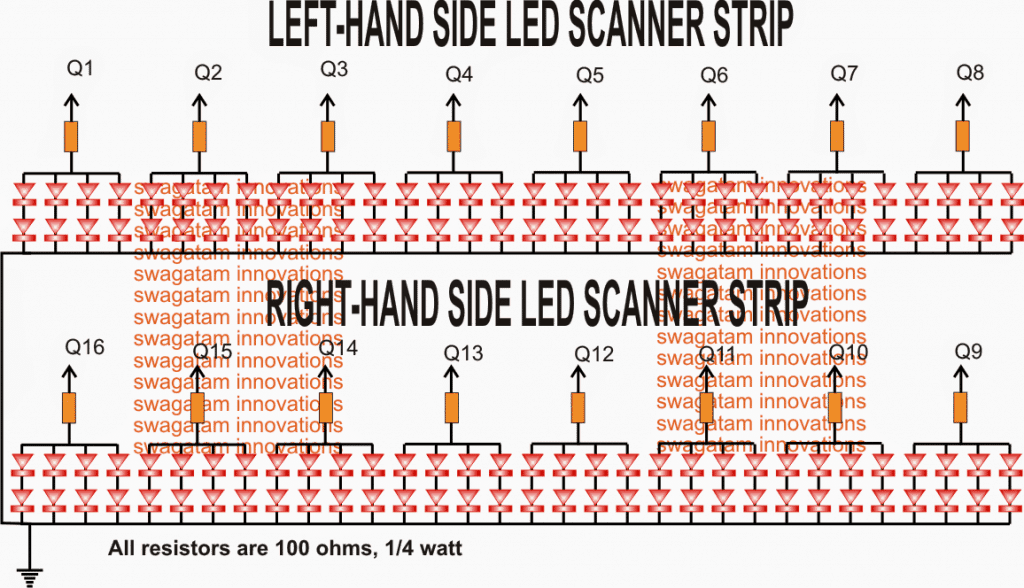
I'll keep the article updated with the new added features, but in the meantime I have explained how the LEDs could configured to the above scanner design as per the request made by Mr. Dannel. For ease of calculation and configuration we incorporate 32 + 32 LEDs on each left and right strips.
The arrangement and the connection details may be verified through the following diagram:
Enabling Rapid Up/Down Sequence
Another interesting scanner function that could be easily added to the above circuit with a feature producing rapid to and fro sequencing over the two strips in groups of four.
This could be easily done by toggling an arrangement wherein T1 would freeze once all the LEDs switch ON in bar like style.
Now in this position a 4017 with its own oscillator would come into the scene with its outputs switching OFF the lit LEDs rapidly in a reverse forward manner. The switching could be done using BJTs which would ground the relevant anodes of the LEDs in the process.
So now we have three interesting scanning sequences toggled in our very own homemade mustang LED scanner circuit, any more possible solutions are welcome from the readers.
5) LED Chaser Circuit with Slow Adjustable Fading Effect
The 5th circuit below discusses a cool chasing LED light circuit that features a timed delay fading slow transition effect across the whole illuminated sequencing LEDs. The idea was requested by Mr. Tamam
Technical Specifications
I want to design a circuit consisting equal no. of Red, Green, Blue, Yellow, Violet, Orange and White LEDs. I want to have these LEDs in a continuous and smooth transition effect like
below,
At first, Red branch of LEDs lit for a preset time then slowly fade out and then Green branch of LEDs fade in and fade out then next branch fade in and so on.
I would like to have control on transition time delay, light timing, fade in or out timing if possible. And I don't want to use any Programmable IC for this. So please please let me know if it possible without any programmable IC. It is okay even if I need several ICs to accomplish the job. You just show me the way !!
Thank you very much once again for your valuable time and for a quick reply! I am looking forward to you response!!
Circuit Diagram
The Design
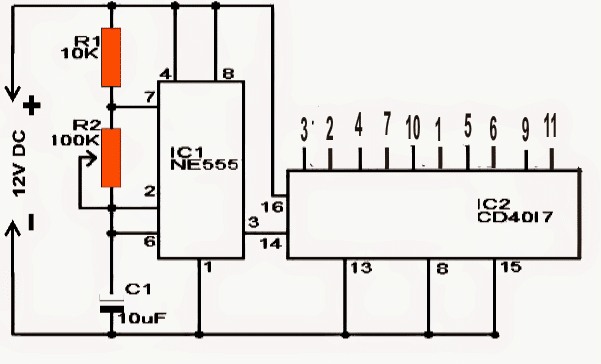
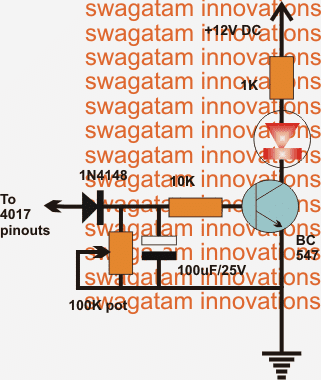
The proposed chasing, fading LEd light circuit may be understood with the help of the above schematic and the following description:
The upper circuit is a standard LED chaser design comprising of a decade counter IC 4017 and a clock oscillator using IC 555 astable configuration.
This IC 4017 generates a sequencing high logic (equal to supply voltage) across its entire output pins in response to the clocks at its pin14 from the IC 555.
If we connect LED directly across the 4017 outputs and ground, the LEDs would illuminate in a dot mode fashion from the first pinout upto the last in a sequencing pattern resembling a chasing effect.
This effect is pretty ordinary and we all probably have come across and built such light chasers circuits quite often.
However as per the request the effect needs to be enhanced by adding a slow transition over the LED illumination as it sequences across the entire channel.
This fading transition on the sequencing LEds is expected to generate an interesting group LED chasing effect instead of an illuminated dot like appearance.
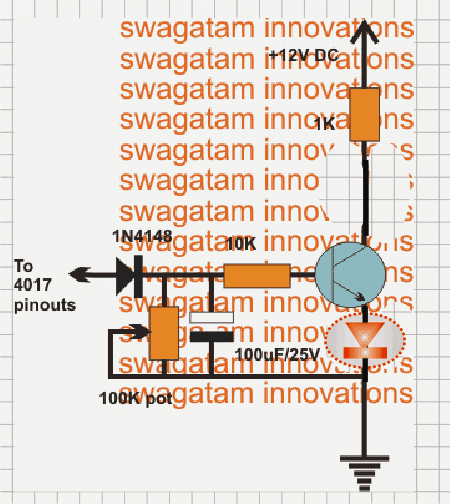
The above intriguing show could be easily implemented by connecting the LEDs to an intermediate BJT delay generator circuit.
This BJT circuit becomes responsible of generating the intended transition delay over the LED illumination and can be witnessed in the lower design.
This stage needs to be repeated across all the selected outputs of the 4017 outputs for achieving the desired chasing, fading slow transition over the LEDs.
As requested the rate of the above fading slow transition could be controlled by adjusting the given pot.
The circuit is basically a simple delay timer which sustains the illumination on the sequencing LEDs for a few moments depending upon the set value of the pot.
The stored charge on the capacitor produces this timed delay effect on the LEDs which could be predetermined as per ones own choice.
The speed of the sequencing could be also altered by tweaking the 555 IC 100k pot as per individual choice which this could in turn interfere with the delay transition effect and thus is a matter of some trial and error until the most attractive set up is determined.
For Improved Fading effect
For an improved fading response the LED could be connected across the emitter and ground of the circuit, as indicated the below given diagram:
6) 18 LED Light Chaser Circuit Using Two IC 4017
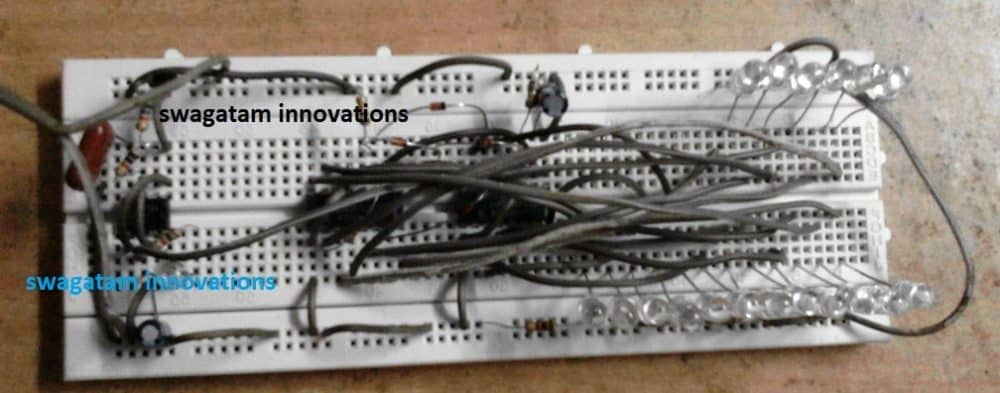
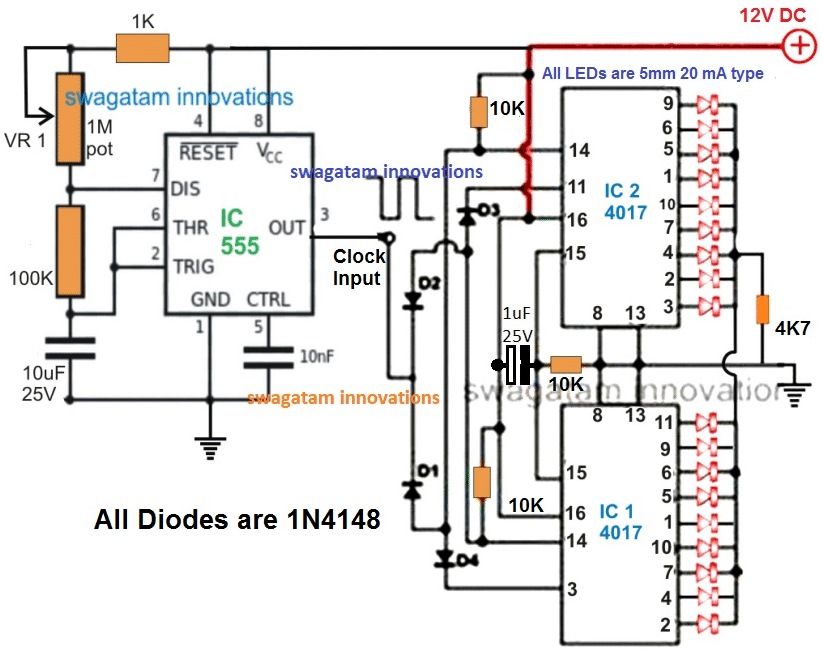
The next 6th design explains how to build an 18 LED chaser circuit through a simple cascading of two 4017 ICs, and some passive electronic components.
Working Explanation
Here we are discussing how to make a simple LED running light which can be built by any newcomer in the field albeit the individual has some knowledge of soldering and regarding the commonly used electronic components.
The concept of a light chaser discussed here utilizes the popular Johnson’s decade counter IC 4017 for getting the desired light chasing effect. IC 555 is used as the Oscillator
The IC 555 provides the clock signals to the counter ICs. We all have probably seen how the IC 4017 can be configured for creating the light chasing effect using LEDs, however the number of maximum LEDs supported by this IC is not more than ten.
In the following paragraphs we’ll learn how to make an eighteen LED light chaser by cascading two of these ICs.
Cascading two IC 4017 Johnsons Counter for the 18 LED Effect
Looking at the above light chaser circuit diagram we see how the two ICs are configured so that the “chasing” or "running"of the LEDs at its outputs are carried on for 18 LEDs.
The diodes included in the circuit especially are responsible for switching the ICs into a cascading action.
The diodes make sure the IC outputs are carried forward from one IC to another, so that the “chasing” effect is pulled for the entire 18 LEDs in the array.
The whole circuit can be built over a general purpose PCB, and connected together by soldering with the help of the shown diagram.
The circuit can be operated in between 6 volts to 12 volts.
HAVE FURTHER DOUBTS? PLEASE FEEL FREE TO COMMENT!
The above 18 LED cascaded chaser circuit can be also conveniently built using a 555 astable circuit, as shown below:
Video Clip of the above circuit in operational mode:
7) 100 to 200 LED Reverse Forward Chaser Circuit for Diwali, Christmas Decorations
The 7th concept below explains how to build a simple LED chaser circuit with a push pull or reverse forward sequencing effect. Also, in the later part of the article I have explained how this simple LED chaser could be upgraded to a 100 to 200 LED laser circuit with a reverse forward LED sequencing effect.
Introduction
As learned earlier, an LED light chaser circuit typically refers to an electronic configuration able to generate or illuminate a group of LEDs in some predetermined sequence. One popular IC 4017 is very commonly employed for making this type LED sequencer circuit.
Here also the IC basically is a Johnson's 10 stage decade counter/divider and can be used for many interesting light pattern generations, and may be used for various decorative purposes.
So far we have circuits using the above IC for producing chasing light effects, however making the IC create "reverse" "forward" "chasing" pattern with LEDs is something many of us might not be acquainted with. Here I have explained how to make a simple yet effective to and fro or reverse forward light chaser circuit using LEDs.
Understanding IC 4017 pinouts
But before that let's take a brief look at the IC 4017 pin out details.
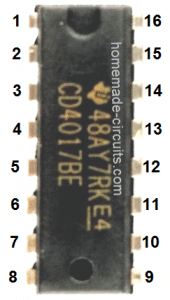
The IC 4017 is a 16 pin dual in line (DIN) IC.
The IC has 10 outputs which generate the sequencing high outputs in the order of the pin outs - 3, 2, 4,7, 10, 1,5, 6, 9, 11. The sequencing takes place in response to a frequency applied at pin 14 of the iC
Pin 16 is the positive supply input, pin 8 is the negative supply input or the ground line.
Pin 13 is used clock inhibit inhibit and will stall the circuit if connected to positive supply terminal, however connecting it to ground makes everything normal, so we connect it to ground.
Pin 12 is the clock carry out, not required for single 4017a applications, so we leave it open.
Pin 15 is the reset pin, and it resets the output to the start pin in response to a positive response to it.
The pin 15 of the IC is connected to the second last pin 9 of the IC, which means the output resets every-time the sequencing reaches pin 9m,and the moment this pin goes high, the IC repeats the action by resetting the system.
Pin 14 is the clock input and requires to be fed with a square wave frequency, easy obtainable through any astable oscillator made from ICs like IC 555, IC 4049, transistors etc.
Circuit Diagram
How it Works
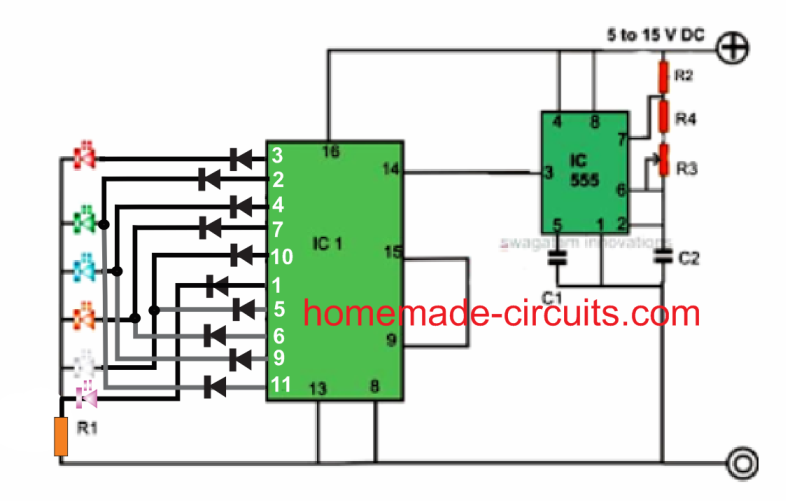
Looking at the shown reverse forward LED light chaser circuit, we see that basically the IC is arranged in its normal sequencing or chasing mode, however the clever introduction of the diodes at the outputs of the IC make the sequencing appear to be reversing and forwarding from start to finish and vice versa.
The smart arrangement of the diodes enables the output sequence of the IC to feed the LEDs in a way that the relevant LeDs are able to imitate a to and fro chasing pattern.
This is achieved by by forcing 5 outputs to move in a forward chasing pattern, while the following 5 outputs are redirected toward the same LEDs but in the opposite direction, making the pattern look like a to and fro chasing motion.
Parts List for the proposed 4017 LED light chaser circuit
- R1 = 1K,
- R2 = 4K7,
- R3 = 1K,
- R4 = 100K pot, linear,
- C1 = 10nF,
- C2 = 4.7 uF/25V,
- IC1 = 4017,
- IC2 = 555
Adding More LEDs
In the above example we have seen how a reverse forward LED sequencing may ge implemented over 5 LEDs, however in order to get a more interesting effect we would want to increase the number of LED to higher numbers so that the illumination increases and the visual effect is able to get much enhanced.
The following section have explained how this may be accomplished using 200 LEDs, however any number of LED could be used just by modifying the transistors and the series parallel connections for the LEDs, I have explained the details.
Circuit Operation
The circuit diagram shows a simple yet an effective configuration which is able handle up to 200 different colored LEDs and create the required to and fro chasing show.
The IC 4017 is the main part of the entire system whose outputs have been very cleverly manipulated using diodes.
Normally, in response to a clock signal the outputs of a 4017 IC would begin shifting sequentially from pin#3 to pin#11 covering ten of its pin outs in a certain random order.
If the LEDs are arranged in these ten outputs, one would acquire ordinary one direction sequencing of the LEDs.
In the discussed circuit, five of the end sequence pin outs have been diverted in such way that the connected LEDs produce a to and fro moving effect, however with this arrangement the total number of outputs get restricted to only 5, nevertheless sufficient for implementing the intriguing visuals.
Normally the outputs would accommodate a maximum of 4 LEDs, a total of 20 numbers. For handling as high 200 LEDs, transistor buffer stages have been included in the circuity.
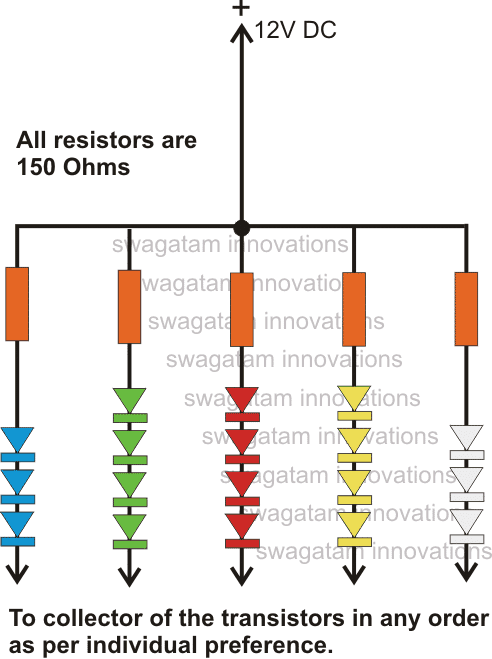
Each transistor or the channel can hold upto 50 LEDs, the LEDs are connected in series and parallel combination as shown in the last diagram.
The LEDs are connected to the collector of the respective transistors as referred to in the last diagram.
The IC 555 is wired up as an astable for generating the required clock pulses at the input pin#14 of IC 4017.
These clocks determines the sequencing rate of the connected LEDs which may varied by adjusting variable resistor R3.
The circuit may be powered from a 12V battery or a 12V/3amp SMPS adapter unit.
Circuit Diagram with 200 LED Chaser Circuit
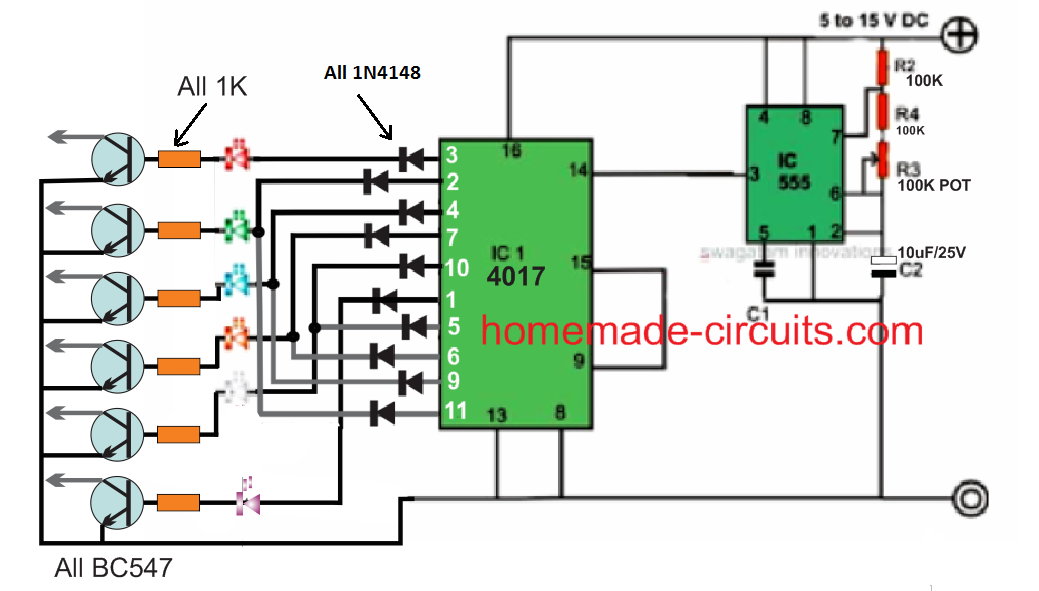
The basic reverse forward LED circuit using single LEDs can be studied elaborately in this LED scanner article, and the video can be witnessed below:
How to Connect the LEDs
The following diagram illustrates the connection arrangement of the LEDs to the above circuit. A single series for each channel has been shown in the diagram.
The numbers can be simply increased just by inserting more such series in parallel to the respective strings of the different channels.
Circuit Diagram for Series Parallel LED Connections
Parts List
- R1 = 1K,
- R2 = 4K7,
- R3 = 1K,
- R4 = 100K pot, linear,
- C1 = 10nF,
- C2 = 4.7 uF/25V,
- IC1 = 4017,
- IC2 = 555
- All diodes are = 1N4007
- All transistors are = BD139
- All transistor base resistors are = 1K
- LED resistors are = 150 Ohms 1/4 watt.
8) LED Chaser Circuit with Blinker Using IC 4017
The 8th concept presented below is also another LED chaser circuit but includes a blinking effect to the design. The circuit was requested by Mr.Joe, one of the keen followers of this blog.
The circuit initially was intended to be used for generating LED strobe light effects and was asked to be modified such that it could be used as an LED sequencer as well as a blinker. The change over would be implemented via a toggle switch.
Circuit Operation
The IC 4017 is not new to us and we all know how versatile and competent this device is. Basically the IC a Johnson’s decade counter/divide by 10 IC, fundamentally used in applications where sequencing positive output signals are required or desired.
The sequencing or the orderly shifting of the outputs take place in response to a clock pulse that needs to be applied at the clock input pin #14 of the IC.
With every rising positive edge of the clock input, the IC responds and pushes its output’s positive from the existing pin out to the next pin out in the order.
Here a couple of NOT gates are used as a oscillator for providing the above clock pulses to the IC 4017. VR1 may be adjusted for determining or fixing the speed of the sequencing.
The outputs of the IC are connected to an array of LEDs in a specific order which makes the LEDs look like as if they are running or chasing during the operations.
If the circuit would be required only to produce the chasing effect, the diodes would not be required, however as per the present ask the diodes become important and allows the circuit to be used as a blinker also, depending upon the position of the switch S1.
When the switch S1 is positioned at A, the circuit behaves like a light chaser and produces the normal chasing effect over the LEDs which start illuminating in sequence from top to the bottom, repeating the operations as long as the circuit remains powered.
As soon as S1 is flicked toward B, the clock signals from the oscillator are shifted into the input of the transistor T1, which instantly stats to pulsate all the LEDs together in response to the received clocks from N1/N2 configuration.
Thus as per the requirement we have successfully modified an ordinary light chaser circuit with an additional feature through which the circuit now is also able to function as a LED flasher.
Do not forget to connect the inputs of the remaining unused gates from the IC 4049 either to the positive or the negative of the supply.
The supply pins of the IC 4049 also need to be connected to the relevant supply rails of the circuit, kindly refer to the datasheet of the IC.
If all the ten outputs of the IC 4017 are required to be integrated with LED sequencing, just connect pin #15 of the IC to ground and use the left over outputs of the IC for the required sequencing of the LEDs in the order of: 3,2,4,7,10,1,5,6,9,11
Circuit Diagram
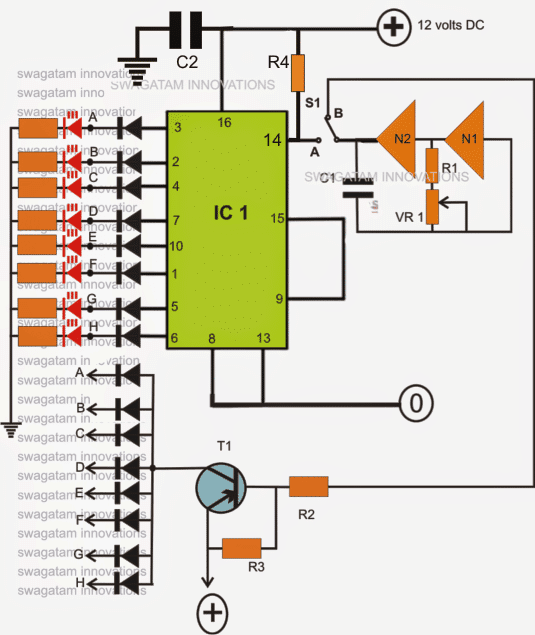
The following parts will be needed for making this LED light chaser with simultaneous flasher circuit:
- R1, R2, R3 = 1K,
- R4 = 100k
- VR1 = 100K linear pot.
- All LED resistors are = 470 Ohms,
- All diodes are = 1N4148,
- All LEDs = RED, 5mm or as per choice,
- T1 = 2N2907, or 8550 or 187,
- C1 = 10uF/25V
- C2 = 0.1uF,
- IC1 = 4017,
- N1, N2 = IC4049
Conclusion
Guys, so these were 6 best looking LED chaser circuits for you all that could be built and applied as a decorative piece of lighting with a dazzling eye catching effect.
You can use them anywhere you like, in your home, in your vehicles, garden, hall room, for parties, on caps/hats, apparels, during festivals etc.
Think have more such ideas, please share them here for the pleasure of the entire homemade circuit community.
9) Outward Chasing LED Circuit
If you wish to make a sequencing LED pattern which will imitate LED chasing from center to outward, then you can try the following design, which is our 9th design:
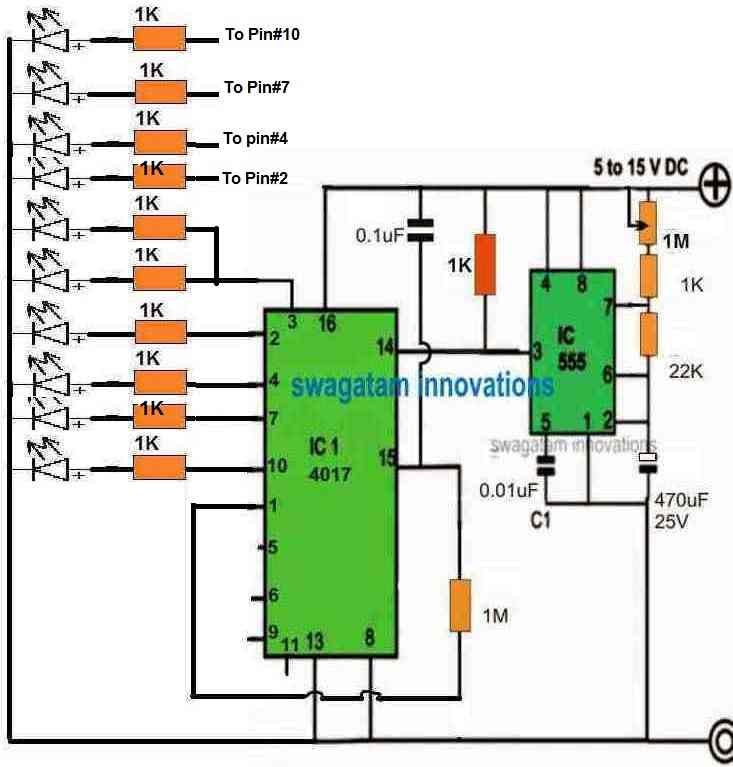
Here, group of 5 LEDs will appear running from pin#3 towards pin#10, giving an impression that the LEDs are chasing from center pin#3 to pin#10, outwards on either directions.
You can replicate the effect using all the 10 outputs of the IC 4017.
10) 16 LED Reverse/Forward Chaser Circuit
In the following 10th LED chaser circuit concept, the circuit sequentially turns on and off 16 LEDs using a 24 pin decoder IC.
A four-bit binary input is used by the CMOS 4514 binary-to-decimal decoder, IC3, to go forward and activate each of the 16 outputs.
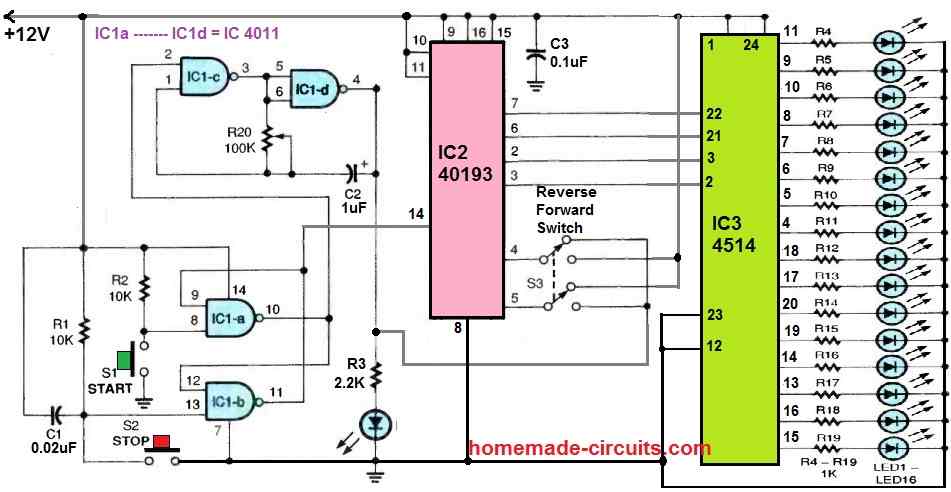
The binary input data for the 4514 decoder IC3 is provided by IC2 40193, which is a binary up/down (reverse/forward) counter.
Two gates of a 4011 quad 2-input NAND gate, IC1c and IC1d, are coupled to form a low-frequency, astable-oscillator clock circuit. C2 and R20 control its operating frequency.
IC1-a and IC1-b, the final two gates of the 4011, are set up as a set-reset flip-flop latching circuit.
Switches S1 and S2 control the start and stop functions of the device, respectively, while S3 enables the up/down sequencing feature of IC2.
This is how the circuit operates:
The oscillator is started by making pin 2 of IC1c high when S1 is pressed. This latches the output of IC1a at pin 10 high.
At the same time, pin 14 of IC2's reset input is latched low, enabling the IC to count up or down depending on how S3 is positioned.
As the clock runs, the LEDs (LED1 ot LED16) turn on and off sequentially, one at a time.
The sequence restarts once the final LED in the series turns on and off, and this sequencing keeps going until the stop switch is pressed.
Hi Swagatam,
In the circuit 16 LED Reverse/Forward Chaser Circuit, if I wanted to use only 14 LED, omitting the last 2, would the circuit continue to function normally?Best Regards.
Nélio.
Hi Nelio,
Yes, if you do not use the last two inputs the circuit should still work normally, according to me.
But since this circuit is not designed by me, I am not entirely sure about its functioning and whether it will successfully work or not, and also I am not well-versed with those ICs.
In your circuit No. 6 – 18 Led chaser circuit If I want to use 3 mm Led
then what changes should I Do ?
No need to change anything in the design, you can use the same circuit design without any changes….
Hi Swagatam,
I have had a look through the prior projects and experiments and could not find a suitably matched project for my needs.
I need to build a circuit that makes 3 or 4 LEDs “breathe” – fade in/ fade out over 2 to 5 seconds. There is a FADE IN/OUT Arduino project in the library but I do want to incorporate Arduino for this setup. I read about using 2 NE555s set slightly out of phase and the pulsing would be equivalent to the beat frequency of the output. The article lost me when it was suggesting XORing the output to the LEDs. Does this make sense to you? How would you do this? Or would you do it differently?
Thanks
Thank you Michael,
Did you check the following article?
https://www.homemade-circuits.com/alternate-onoff-led-fader-circuit/
I think this circuit should be able to fulfill your requirement.
A 5 seconds timer can be added through additional BJT circuit stage.
Please let me know if there’s any specific thing missing in the design.
Alternatively, a single 4093 IC could be also used to get all the required feature from a single chip.
Thanks for this. It’s virtually perfect as is. Any ideas how to make the LEDs brighter. It looks like the highest voltage through them is around 5v. Do you think I could safely bump the input to 19v? What is the BJT circuit?
Cheers
Sure, the LED brightness can be adjusted by adjusting the values of the R6 and R7 resistors.
The IC can work with up to 32 V, so 19 V can never be an issue. Just make sure the voltage rating of C1 and C2 capacitors are at least 1.5 times of 19V or higher. The R6, R7 must be appropriately calculated so that the current does not exceed their max specifications.
The transistors T1 and T2 are the BJTs, and form the BJT circuit.
Hello, Swagatam!
First, THANK YOU for having this website! It’s very generous to do this 🙂
I’m very interested in Circuit #1 and Circuit #5, because those look like something I can actually do and my goal is that I want something I can fit into a sort of “shadowbox greeting card” to be mailed to people.
My question is:
Since I’m looking at either the TLC551 or the LMC555, which as far as I can tell operate a 1V and 1.5V respectively, which values do I need to recalculate to run off of a 3V battery? Or is that not even do-able? I can go up to 6V, because I’ll be using CR2032 button cell(s) and minimal holders.
I’ve been looking, and asking, for the answer of how to go from a 5V-NE555, to a 1V or 1.5V CMOS-555 for three months – no exaggeration! -, but I still have no idea at all what values I need to recalculate to adjust the circuit from the NE555 to the CMOS low-power 555 or 551 IC.
If you could tell me what to recalculate, that would be a huge kindness! Not even do the calculations, but only tell me which things need to be recalculated, would be a big help!Even if I still need 6V but maybe only need to add a resistor to not “blow out” the CMOS timer, if you could tell me that, it would be a major kindness to me!
Thank you!
Hi Kris,
Thank you so much for liking this website, glad you found it useful.
If you check the datasheet of the cmos 555 ic it shows a formula for calculating the operating frequency which does take the supply voltage into account.
https://www.homemade-circuits.com/cmos-ic-lmc555-datasheet-works-with-1-5-v-supply/
That means regardless of the supply voltage the resistor capacitor values can remain the same.
So you can feel free to use the same circuit configuration which are shown in the above article for your specificapplication.
I think a 3V battery supply would be more appropriate instead of a 1.5V, as it would allow sufficient voltage margin for optimal illumination of the LEDs.
Please let me know if you have any further questions or doubts, I will be most happy to solve them for you.
G’day again Swagman, is it possible to have a led chaser circuit that will operate with leds that are connected in a common anode configuration, Regards, Alexander
Hi Alexander, yes that is possible, but then the LEDs will seem to operate like a “dark spot chaser”. Meaning initially all the all the LEDs would remain illuminated then each LED would begin shutting OFF/ON sequentially creating an appearance of a dark spot running.
Hi Swagman, I really enjoy your projects and appreciate all of your effort that you put into your site, you have helped me out greatly in the past with your expertise. I am subscribed to your new projects but I am not receiving any lately and wonder if something has gone wrong, thank you very much, Regards, Alexander Reid
Thank you Alexander, glad I could help you!
Actually I have moved my site to a new hosting provider which does not allow sending bulk emails to subscribers, that is why I am unable to send emails to my subscribers whenever a new post is published.
I am sorry about this issue. This issue cannot be solved unless I change the hosting provider which can be a lot of work again.
Hi Swagman, thanks for your reply, that’s sad news but won’t be a problem, I will keep monitoring your site for any new projects. I don’t know if you are aware that here in Australia a Swagman is an independent traveller that has all of his belongings wrapped up in a swag, (a blanket on a pole held over his shoulder) and wanders around the country side on foot in search of his next adventure, Cheers, Alexander.
Thank you for your kind words Alexander, I appreciate it.
Travelling and discovering new places is indeed a lot of fun and adventure. Hope I too get an opportunity to free myself from all worries and travel like Swagman. Thanks for this interesting information. Cheers!
Hi Swagatam, Thanks for the quick reply!!!!
You are welcome Norman!
Hi Swagatam,
I have a question about the “Mustang Type” LED scanner circuit using 74164 ic. I understand most of it but can’t figure out why the #9 pin is connected to the resistor/capacitor parallel circuit which is grounded. My understanding is that the #9 pin has to be connected to positive to allow the chip to work. Also, what is the 1N4148 diode doing?
Hi Norman, the circuit is not designed by me, it was taken from an external source so I am not so sure why pin#9 is connected to R3/C3 in mode 1.
The outcome can be confirmed only once this set up is tested practically. R3, C3 should be having some meaning, the designer might have placed it for some reason which can be identified only after building the circuit practically. The diode is probably for grounding the negative spikes or other forms of disturbances at the base of T1.
Thanks Swagatam! He shows a connection diagram that has one row of the LEDs connected backwards. That has to be an error. Thanks for the quick response. How is everything in your world? I hope you and your family are healthy and happy!
Hi Norman, if one of the LED rows are connected backwards that means they will run backwards, so this connection could be intentional.
Yes we are all fine here. Thank you! Hope you and your family are good too.
Hi Swagatam,
I found several LED chaser circuits on utube and I can’t understand how they work. The link to one is https://www.bing.com/videos/search?q=utube+led+chaser+circuits&qpvt=utube+led+chaser+circuits&view=detail&mid=2A94FFADF5768F0CD82C2A94FFADF5768F0CD82C&&FORM=VRDGAR&ru=%2Fvideos%2Fsearch%3Fq%3Dutube%2Bled%2Bchaser%2Bcircuits%26qpvt%3Dutube%2Bled%2Bchaser%2Bcircuits%26FORM%3DVDRE
He is using a cd4017 and he has 3 lines of 10 leds. For the second effect, he has one of the 3 lines connected backwards.???? Do you understand what he is doing? I thought you could explain what is going on and maybe it would be interesting to you and your readers.
Thank you Norman,
It is a simple IC 4017 IC 555 based LED chaser circuit. The 3 LED lines are connected in parallel, with the IC 4017 outputs. If you change the orientation of any of the lines or 2 lines then it produces a new type of LED chasing pattern.
You are correct! Thanks for looking it over and the quick response.
You are welcome!
I sent it to “word press”, so I changed and sent it to “hit man”
Hi Norman, I checked the circuit, it looks OK to me except the Q2 PNP transistor. Its emitter/collector pins must be swapped according to me. Emitter will go tho the battery positive
Hi Swagatam,
I sent it from my other email. Which is for this posting. Cascading 74ls164
I checked the email on which you normally send the circuits but I could not find any recent emails.
Hi Swagatam,
I am trying to cascade four 74ls164 chips to light 32 LEDs in sequence. I would be using a PIR to activate the circuit which also would determine the on time. I would use a 555 timer to clock the circuit. I have emailed you a schematic of the proposed circuit and ask if you would please look over the schematic and critique it. Thanks!
Hi Norman, I could not find any email from you. You can post the circuit on any free image hosting site and provide the link here, without https I will check it out.
1. What’s the difference between Led chaser & Running Led ?
2. How can I make multi effect flasher like commercially available with forward, backward counting action , dancing and fading ?
1) Both are one and the same.
2) It is possible only through a microcontroller or an Arduino
16led run glow return 16to1glow which circuit board use
Talking about the triac BT 136, it is found that the triac has different categories, like BT 136 600C, 600D, 600E etc. Recently I have ordered a large quantity of BT 136 online for switching the light purposes and they sent me BT 136 600D. The output voltage is lower than the input voltage with the BT136 600D. Earlier I used BT136 600E and the output voltage is equal with the input voltage. Can you tell me what can I use with the BT 136 600D which I have plenty with me?
The 600 denotes 600 V, so according to me all these variants are 1 amp 600V triacs, so you can use of these in the circuit without any issues!
In the Knight Rider circuit, using BT 136, the bulbs flicker and the lights are not fully bright. How do I solve the problem?
Please remove the transformerless supply and replace it with a 12V DC from AC/DC adapter as shown below, and check the response:
also connect 1uF/25V capacitor across gate/ground(A2) terminals of all the triacs
In the cascading 4017 circuit, the value of R2 is not shown in the parts list, and I guess 100K which is written as R5 in the parts list (which does not appear in the circuit) is R2.
(I do not know how to design circuits and fully depend upon the circuits shown).
R2 can be any value between 1k and 100k
R5 is indicated for this circuit:
" rel="ugc">
Thank you.
When I do not have 1 watt zener diode, but have half watts, will connecting 2 pieces of half watts in parallel serve the purpose?
You can do it by attaching a low value resistor in series with each of the zeners. A 50 ohm should do the job
In place of fading LED’s, can you design for fading the 220 volt bulbs. I will need for this Christmas. Thanks.
It is possible by replacing the LED with 220V incandescent lamp in the following diagram:
" rel="ugc">
And you will also have to replace the transistor with a MOSFET IRF840, by replacing the E, B, C pins of the BJT with S, G, D of the MOSFET respectively. You will have to remove the 1K from the collector/drain pin and connect it with the mains positive DC acquired by rectifying the 220V AC through a bridge rectifier.
Thank you so much for the suggestion. I will do so.
Recently I have got 100 pieces of tricolor LEDs meant for light decoration. I know how to use bicolor. Do you have any circuits for using tricolor in light decoration or running lights? If not could you design one?
You are welcome…
 " alt="red green blue LED sequencer circuit" />
you can try the following circuit for your RGB LEDs
Repeat the transistor stage for the other two pins of the shown LED, with pin2 and 4 of the IC.
Again repeat the same with the next LED for the pin7,10,1 of the IC and so on.
The common resistor on the other side of the LED will depend on the current rating of the LED
Thank you. A great help.
Many years ago, I got a circuit of one running light with IC 74138. I still have the IC now, but lost the circuit diagram and sold the assembled one. It was a 4 channels running light. While running, except one pin all others were high and low one by one. There was another IC, I do not remember what, besides 555. The effect was beautiful. I hope you will be able to design a circuit. Please try for this Chrostmas. Thanking you.
Thank you, the proposed circuit will behave in the exact same manner. Although it has 10 outputs, it can be converted to 3 outputs by connecting the pin15 with pin7, for 4 outputs connect pin15 with pin10 and so on…
It took sometime to get the MOSFET. I did exactly as you instructed. The circuit works well with the LED, fading slowly, but not with the MOSFET, (with MOSFET the switching is sudden on and sudden off). My requirement was for the Christmas star, to fade slowly. So from the output of the IC 555 using the transistor CL 100, I used the bright 12 volt LED that is working satisfactorily.
You may please try with the MOSFET as you suggested, and let me know why my assembly did not work. Thanking you.
The LEDs must be connected at the source terminal of the MOSFET, which corresponds to the emitter of a BJT, did you connect the LEDs between the source and the ground?
In the “Circuit Diagram with 200 LED Chaser Circuit” If I want to go directly from the 4017 to the transistor (BC547 or 2n2222) do I need a resistor between the 4017 & the transistor? If so, what value?
resistor will be needed at the base of all the transistors.
What is the max amount of led,s that can be used on a led chaser
30 LEDs with 12V supply.
Hi Swagatam,
I just realised.
It’s not the 1st but the second, connected to mains.
For what I can see, the circuit operates in 12V (Zener 12V).
I need to put this circuit in 3V, using CMOS versions of the 4017 and 555, which I own.
What would be the value of the resistors, and in order to get maximum brightness which transistores should I use in the LED’s.
Best Regards.
Nélio
Hi Nelio, for 3V operation you can change the 12V zener with 3V zener, and reduce the 1k resistor to 10 ohms, and the 0.47uF could be reduced to 0.33uF/400V
Hi,
Thanks.
Best Regards.
Nélio
Just now realized that the 1N4148 will drop 0.6V from 3V so the LEDs will be dim…In that case you can either replace them with schottky diodes or use 4V as the input
Hi,
It’s not a problem since the circuit will be powered by battery instead of mains, and I might include some transistors to trigger the LEDs, connected at the outputs of the 4017.
Best Regards.
Nélio
Hi,
I have redraw the circuit and at each LED cathode I have connected the Collector of a NPN transistor and the Emitter of all 6 transistors to the 10 Ohm resistor. The Base of the each transistor is connected to positive of power supply. Only thing left to do, is figure out which transistor to use and if I need or not to put a resistor at the base of each transistor.
Best Regars.
Nélio
Hi, I am afraid transistors won’t work, they have to be diodes only!
Good afternoon,
First i have to say: by your work, you encouraged me to start using 4017 chips.
When i noticed the array of possibilities that it gives i have made almost all the proposed variations of the chasers i’ve found in your publications, learned how to cascade them
learned using logic gates and so on. Simply put: you have inspired me to make another step forward on my self taught journey around the magic world of electronics????…
I am a keen e- bike user- and that became my only transportatinon of choice- threw my stinking car away, ..i’m rrestling now with the idea of making led chaser circuit that is speed controlled,
that would be working like a heart of my vehicle…
when standing still or going slow- its heartbeat (chasing speed ) will be also slow,
when accelerating- led chaser speed would also proportionally increase..
Unfortunately i do not know where to start.
I am using DIY ebike kit: Bafang BBSHD to propell the bike
thought also of using ADXL 335, accelerometer sensor,
but that is for now beyond my abstract understanding.
I was wondering perhaps you could have an idea how can i create clock pulse
dependant on speed and incorporate it in to one of your chaser designs..
Once again i’ d like to thank you for your time, effort , and inspiration…
With kind regards: Zibbi
Hi, Thank you, and Glad you liked the ideas presented in the above article, however for speed detection the above designs cannot be applied, instead you may try the concept presented in the following post:
https://www.homemade-circuits.com/10-led-tachometer-circuit/
Hi, good morning,
Thank you very much for the answer, since the idea of speed dependant chaser is constantly rolling over my head, i realised- i need something to crate clock pulse, not component ,but speed dependant, and suddenly had a break through…
this part was all this time sitting in front of my eyes, waiting for me to simply discover it:
Speed sensor that originally came with the e- bike kit. That is i belive ” just” a reed switch,
with the magnet attached to the wheel.Every time it passes by the sensor, there is a signal
of around 3.25v ( three wires out: plus, minus, signal )Since the circuit consists of a six 4017’s ,i used an AND gates to cascade it
which leaves me in the operation range of 5v that is exactly what that sensor needs to work properly…
So…with accelerating pulse out of the way ( i hope ) there comes the part how to maintain the circuit chasing while i’ m standing still, i thought i’ ll ask for assistance our old friend
NE 555, but it must only switch on while other ‘ clock ‘ is stilled due to a lack of acceleration,
and i thought again of a logic gates or may be a voltage comparator (LM393 or else…)
,…but again, i have yet no clue where to start….
If i could somehow keep NE555 multivibrator still , during the period when speed sensor is clocking – it could probably be called victory….provided- of course that the pulse frequency from the sensor would not exceed the max ratings of 4017 chips ( which i do not know yet) and choke them or worse burn them out,..
but well, the science is a cruel mistress ????…
With kind regards: Zibbi
Dear sir
i want to make 12 bulb circuit, but my bulbs are much higher amperes about 30A. so,
IRFZ-14 is suitable for it? or any other one?
what is the gate opening voltage and current of BT136 and IRFZ14?
Jayanth, IRFZ14 will not work as it is rated at 10amps only, you must search for a 40 amp mosfet….
trigger voltage for mosfet is 12V, for BT136 is 3V, current is not so important
sir this transformerless cct is it possible to construct it and without connecting load is it possible to measure voltage on that zener diode without spoiling the zener?
jack, it is possible, you can refer to this article
https://www.homemade-circuits.com/cheap-yet-useful-transformerless-power/
Sir I new and I am intreste to make circuit as per diagram 2. But sir the capacitor 1uf as shown in diagram connected near ic 555 the voltage of capacitor is not given. Please provide what is the volt of 1uf capacitor.
Rajesh, the 1uF capacitor could be rated at 25V.
also make sure to connect 1K resistor across each of the triac gates and the negative supply line.
Thx a lot for quick response sir
Thx sir I have made that circuit and it works well.
that's great Rajesh, Congrats to you
Sir if possible kindly provide three channel circuit which run sequencly not randomly.
Rajesh, You can use any IC 555/4017 chaser circuit, connect the pin3,2,4 with the LEDs and connect pin15 with pin7
Please upload 220V drawing PCB layout with PCB size.
or E-mail:ghulamjilani36@gmail.com
thanks.
I will try to update if time permits….
Dear Swagatam,
Thank you for your reply.
I have tried all your solutions but unfortunately with the same result.
I think it is weird because as you said the ICs are rated up to 15V.
Question:
Is it possible to build a small circuit without the use of a microprocessor for flickering some LEDs?
The flickering must simulate an arc welder, camp fire, candle light etc.?
Best regards,
Henrik
Dear Henrik, that's strange and not normal, because I have built many chaser circuits but never faced such an issue.
you can try the following single transistor flasher and use a smaller capacitor to make the oscillations look like sparking.
https://www.homemade-circuits.com/2011/12/how-to-make-single-transistor-led.html
you can use a while LED to make it more realistic, however the flashing might be consistent in nature and not abrupt like in actual arcing.
Dear Swagatam,
I have built the first circuit but without the high voltage part and the Zener diode.
It works fine at max. 5V
If I raise the voltage to above 5V the flashing of the LEDs becomes uncontrollable.
What do I need to change to use the circuit at 12V?
Thank you in advance,
Henrik
Hi Henrik, that shouldn't happen, because IC 555 and IC 4017 both are designed to work from 5V to 15V safely. THis can happen if the power supply has some issues, or if the power supply pot is not good.
try with a fixed 12V and see if the problem still persists.
or alternatively you can also try readjusting the IC 555 pot after increasing the voltage to the desired higher level
Pls post a circuit that can control 10-14 diwali lights with around 8-10 combination settings
Sir,can this circuit handle 10-14 diwali lights
what kind of light do you want to connect?
sir I made 2nd circuit led sequence working properly but triac doesn't switching all bulb are continuously ON. please help me to solve this problem.
sir I made 2nd circuit all 6 nos led chasing properly but triac doesn't switching output bulb continuously on condition. please help me to solve the problem.
Rahul, change all the 1K resistors with 220 ohm or 330 resistors and additionally connect 1K resistors between gate and ground of all the triacs and check the response
…the bulbs cannot be continuously ON, make sure the triacs are connected correctly…A1 must go towards the bulb side…
Thank you sir
Dear sir आपके दिये हुवे second circuit image में main power supply का जो circuit है उसके जरिये MOC3021 drive करने के लिय कितने value के resistance की जरुरत पड़ेगी
और इस supply के जरिये हम एक साथ maximum कितने MOC3021 का use कर सकते है
Dear Rakesh, for driving the LED of the MOC you can use any resistor between 2.2K to 10K
I am not exactly sure how many you can drive with 50mA but 5 or 6 optocouplers could be used…
Dear sir मैं आपसे कुछ इस तरह से Triac (BTA41) को Drive कर ने के लिए कह रहा था
मैंने आपके mail id पर दोबारा से image send किया है
क्रप्या इस image को देखे
Please Sir मुझे इसका हल बताइए
मतलब आपके कहने का अर्थ है 1N4007 के output से 0.33uf/400v को जोड़ना है और फिर 0.33uf/400v के एक छोर से 1k जोड़ना है और फिर 1k से Triac gate को जोड़ना है ok sir
No, that's incorrect
…120V to 1N4007 (band side), then other end of 1N4007 to 1K, then 1K to SCR gate.
after this solder the 0.33uF/400V leads directly on the 1N4007 leads (1N4007 and 0.33uF are in parallel).
dear sir i have send you my circuit
on your email id
Dear Rakesh, I have sent the image, i forgot to put 1K with the gate of the triac, so please put 1K in series with the gate
Dear sir 240V AC में, मैं अगर सिर्फ एक 1N4007 diode का use न्यूटल या फेस कर तो मुझे output voltage कितना मिलेगा ?
Please tell me sir
dear Rakesh, the output will be 120V DC average, but the peak will be around 310V DC
Dear sir आपने जो output बताया है मुझे इसी voltage से BTA41 को ऑपरेट करना है कैसे करूँ कोई ऐसा हल बताइए जो circuit के लिए सेफ हो
Please sir
connect a 1k resistor to triac gate and then connect a 0.33uF/400V capacitor and connect this capacitor end with the 120V input….also connect a diode 1N4007 parallel with the capacitor….cathode will be towards the 120V source.
Dear sir please drow this circuit for me
please please sir i request you
My mail id rakeshmauryaup@gmail.com
It's very simple…connect 120V input with the band side of a 1N4007 diode, connect the other side of the diode with 1K resistor, connect the other end of the 1K with the SCR gate.
after this connect a 0.33uF/400V capacitor right on the leads of the 1N4007
Dear sir how to make Triac Dimmer but operated by other circuit
Dear Rakesh, please explain more. which "other circuit"
Dear sir मेरे other circuit का कहने का मतलब है के दुसरे circuit द्वारा प्राप्त output voltage 0 से 0.8 DCV 200uA dimmer के लिए कम जादा कर सकते है जो की Triac को Triac Dimmer बनाने के लिए पर्याप्त नहीं है
तो मैं आपसे ये जानना चाहता हूँ triac को dimmer बनाने के लिए अभी कौन कौन से components की जरुरत पड़ेगी ?
Dear Rakesh.
0.8V will need to be amplified first with a 12V amplifier circuit or an optocoupler circuit….the output from this optocoupler can be used for driving the triac.
MOC3063 can be used for this.
Thank you sir for help me
sir मैं इस प्रोजेक्ट से हट कर एक सवाल पूछ रहा हूँ क्या मैं BTA41,BT139 और BT136 को Thyristor (SCR) की तरह use कर सकता हूँ
Rakesh,
What exactly are you planning to make?
Aap kya banana chahte ho pehle wo batao
yes you can use triacs in place of SCRs in projects such as this:
https://www.homemade-circuits.com/2016/01/8-function-christmas-light-circuit.html
yes it will
Thank you sir for help me
सर जी क्या मैं C 0.47uf/400V की जगह पर कोई और C use कर सकता हूँ सर जी अगर कोई और C हो तो बता दो पर circuit के लिए सुरक्षी हो 🙂
you can 105/400V cap
Sir good finally you have improved in your second picture
but sir you need improve in circuit other part
triac is fitted in the way your circuit but do not get that way for the entire supply triac and because of which fully AC supply cannot send. so will need to use transistors
now you make your circuit and used
and then some comment
You can see this circuit
" rel="nofollow ugc">
The transistor stage is not required, the triacs can be driven directly from the IC, as shown in the second circuit
i am telling you after check and i can prove it
and i am telling you that please check in circuit
capacitor, diode and Zener diode put in the wrong direction in your second picture circuit
Swagatam sir
the power of your circuit is wrong, it will not work, please you see in the 2nd picture
i have corrected it, please check it now….
Hello sir
How can I connect 1W*5 LED to above circuit
Hello sir
How i connect 1 W*5 LED to this circuit
Hello Sandeep,
see the last circuit, you can replace the bulbs with the LEDs with a series resistor.
The mosfets can be replaced with a TIP 122 transistor as an alternative.
You can connect 3nos of 1 watt LEDs with a resistor on each transistor
Great article, thank you.
My question is can you reverse it, have the LEDs on all the time and the circuit shut them off in sequence.
thanks, that would be possible with a normal IC 4017/555 chaser circuit without the forward reverse facility….there you can achieve it by simply reversing the LED polarity….I am not sure how it could be done in the above circuits….may be by reversing all the diodes an LED polarity, but I am not very sure.
Sir on this circuit how much nos of 8mm or 5mm white leds can run
basit, divide the supply voltage with the LED forward voltage this will give you the number of LEDs that can be connected in series on each channel.
thanks sir
circuit sahi se kam ker rahahe.1k ke badle mene 220E resrstor triac gate se connect ki ya aur apke bataye huye,1k resistor gate aur circuit GND se connect kerne par led sequence sahi a rahahe.aur triac proper kam ker rahahe.sab chanel 100w lamp se try kiya lumin sahi a raha he.
sir mene triac pin 1-A1 aur pin 2-A2 hisab se lagaya. thanks sir guide karne ke liye.
you r great……..
Glad to know it's working, you are welcome Orrie!
sir
mene 12v 2amp adapter use kiya.led sequence sehi aarahahe.lekin triac kam nehi kerrahahe.no.1 chanel kam ker rahahe100w bulb lagane par lumin kam ho rahahe.baki ke 5 chanel off he.
connect a LED with 1k resistor from pin3 of IC555 to ground, it should flash, if it doesn't then the fault could be assumed to be in the 555 circuit, other wise the fault could be in your 4017 circuit….make sure all the LEDs at the gate of the triacs are connected correctly and illuminate for enabling the triacs to conduct.
sir,
triac ke gate aur GND par 1k connact kene par sequence sahi arahahe thanks. lekin triac 100w bulb flash nehi ker rahaye. No.1 chanel se sirf flash ho raha he, lekin lumin kam ho raha he.
me ne 1k ke jaga 220E resistance se triac ke gate connect kiye,lekin No.1 chanel chor ke baki sab off he.lumin thora sa change huya lekin baki kam nehi ker raha he.
sir triac pin-1-T1.pin-2/tab-T2
pin-3-G.circuit me to is hisab se nehi he….sir plz help me…..
remove the shown capacitive power supply and try with a 12V adapter as the power supply and check the response..
sorry sir,
apne samay nikal kar mere prashna ka jabab diya,lekin kam ke bajese me try nehi kar saka.
aj mene try kiya led negetive se 1k lagaker GND se connect kiye.lekin 12v 2amp smps se sequence tut raha he. plz sir help me.
sir
mene apka 2 no. circuit try kiya.lekin jo 12 v hai o kam nehi ker raha he.12 v adopter use kerne par sequence proper nehi a raha hey. plz help me sir…
try connecting 1k resistors across gate and ground of all the triacs.
how many 5w 230v bulbs can be put in single triac in parrel? is there any triac for large watt handling?
100nos if the triac (BT136 etc) is mounted on a heatsink, for more bulbs you can try other higher rated triacs.
I've made the 12V car version. I've only left out the leds before the mosfets. But it's not working. When I don't connect the positive wire going to the 22k resistor, port 8 and 4 of ic555 and to port 16 of ic4017. All the light are burning, but when i connect this positive wire nothing is working at all. Have you any idea what could be wrong and how i can check it?
that's weird, because without the positive supply connected the LEDs would never light up.
I think there's something terribly wrong with your connections or the components.
Separate the 555 and the 4017 stages….build and test them separately, once the results are confirmed you can try integrating them as per the diagram.
request indicate c code for 12 led chaser for suitable pic with fading effect.comet tail
sorry i don't have it presently with me.
you will have to connect the triac MT1 and MT2 pins with AC mains supply and the bulbs as indicated in diagram.
a cell phone charger output will also work for verifying the sequencing.
check the 4017 circuit with a 12V DC adapter and see if the sequencing is working or not.