The following 5 versions of 6 volt 4 AH battery charger circuits has been designed by me and posted here in response to the request from Mr. Raja, I have explained the whole conversation.
Technical Specifications
"Dear sir, please post a circuit to charge 6 volt 3.5 ah lead acid battery from 12 volt battery. The charger should automatically stop charging as the battery is fully charged.
Please use transistor instead of relay to stop charging, and also tell me how to use 12 volt relay for the same circuit.
Explain Which is safe and durable either relay or transistor to cut off charging. (At present i am charging my above said battery by simply using LM317 with 220 ohm and 1 kilo ohm resistors and a couple of capacitor) i'm awaiting your article, thank you".
The Design
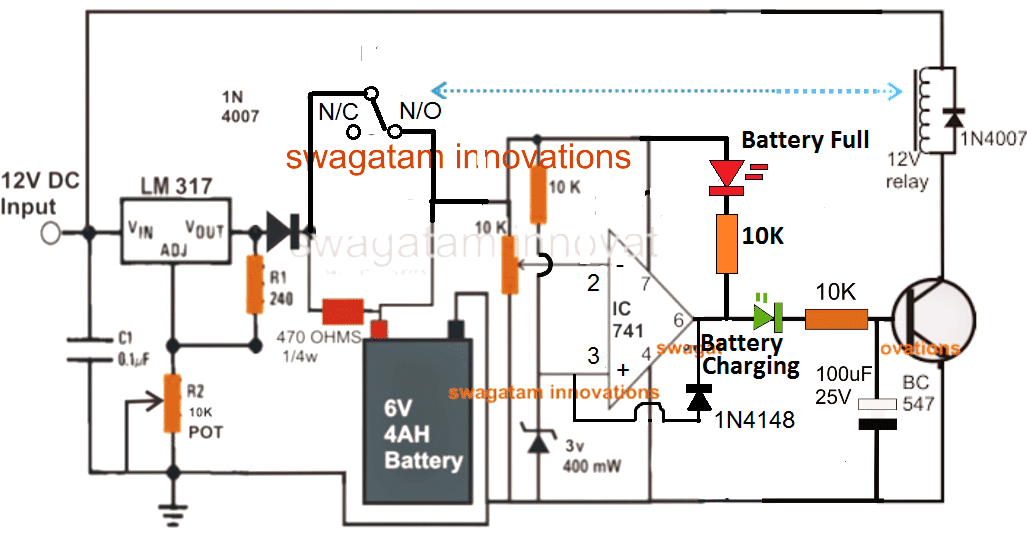
The following circuit shows a simple automatic 6 volt 4 to 10 AH battery charger circuit using a 12 volt relay, designed to automatically cut off the supply to the battery as soon as the full charge level for the battery is reached.
How it Works
Assuming no battery is connected with the circuit, when power is switched ON, the relay contact will be at the N/C and no power will be able to reach the IC 741 circuit.
Now when battery is connected, the supply from the battery will actuate the circuit, and assuming the battery to be in a discharged state, pin#2 will be lower than pin#3 causing a high at pin#6 of the IC. This will switch ON the transistor relay driver, which in turn will shift the relay contact from N/C to N/O connecting the charging supply with the battery.
The battery will now begin charging slowly and as soon a its terminals reaches at 7V, pin#2 will tend to become higher than pin#3, causing pin#6 of the IC to become low, switching OFF the relay and cutting off supply to the battery.
The existing low at pin#6 will also cause pin#3 to become permanently low through the linked 1N4148 diode, and thus the system will be latched, until power is switched OFF and ON again.
If you don't wish to have this latching arrangement, you can very well eliminate the 1N4148 feedback diode.
Note: The LED indicator section for all 3 following diagrams were recently modified after a practical testing and confirmation
Circuit#1


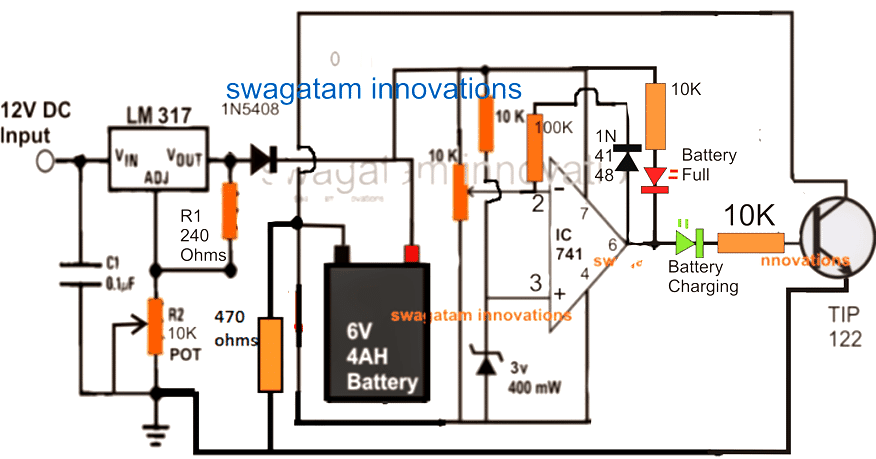
The following circuit shows a simple automatic 6 volt 4 AH battery charger circuit without using a relay, rather directly through a transistor, you can replace the BJT with a mosfet also to enable high Ah level charging also.
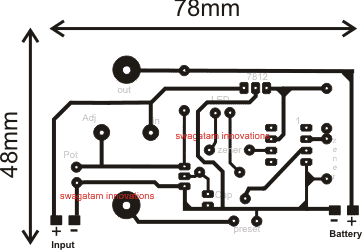
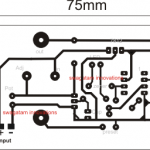
PCB Design for the Above Circuit
The PCB layout design were contributed by one of the avid followers of this website, Mr. Jack009


Circuit#2

Update:
The above transistorized 6V charger circuit has a mistake. At the full-charge level as soon as the battery negative is cut-off by the TIP122, this negative from the battery is also cut-off for the IC 741 circuit.
This implies that now the IC 741 is unable to monitor the discharging process of the battery, and will be unable to restore the battery charging when the battery reaches the lower discharge threshold?
To correct this we need to make sure that at the full-charge level, the battery negative is only cut-off from the supply line, and not from the IC 741 circuit line.
The following circuit corrects this flaw and makes sure that the IC741 is able to monitor and keep track of the battery health continuously under all circumstances.

How to Set Up the Circuit
Initially, keep the pin6 feedback resistor disconnected and without connecting any battery adjust R2 to get exactly 7.2V at the output of the LM317 (across cathode of 1N5408 and ground line), for powering the IC 741 circuit.
Now simply play with the 10k preset and identify a position where the RED/GREEN LEDs just flip/flop or change or swap between their illumination.
This position within the preset adjustment may be considered as the cut-off or the threshold point.
Carefully adjust it to a point at which the RED LED in the first circuit just lights up......but for the second circuit it should be the green LED that is supposed to get illuminated.
The cut-off point is now set for the circuit, seal the preset in this position and reconnect the pin6 resistor across the shown points.
Your circuit is now set for charging any 6V 4 AH battery or other similar batteries with an automatic cut-off feature as soon as or each time the battery becomes fully charged at the above set 7.2V.
Both the above circuits will perform equally well, however the upper circuit can be altered to handle high currents even up to 100 and 200 AH just by modifying the IC and the relay. The lower circuit may be made to do this only up to a certain limit, may be up to 30 A or so.
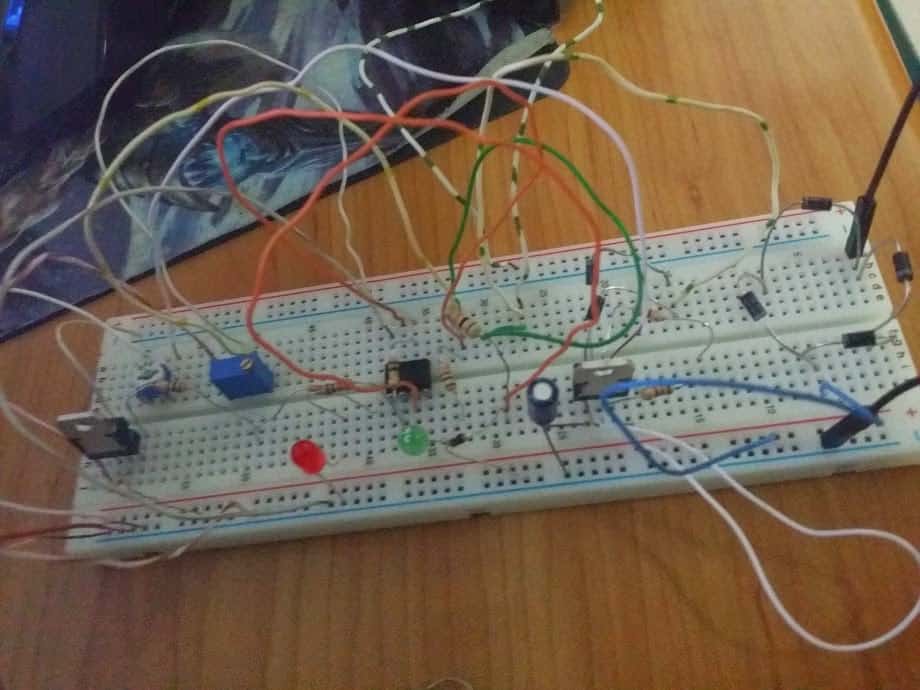
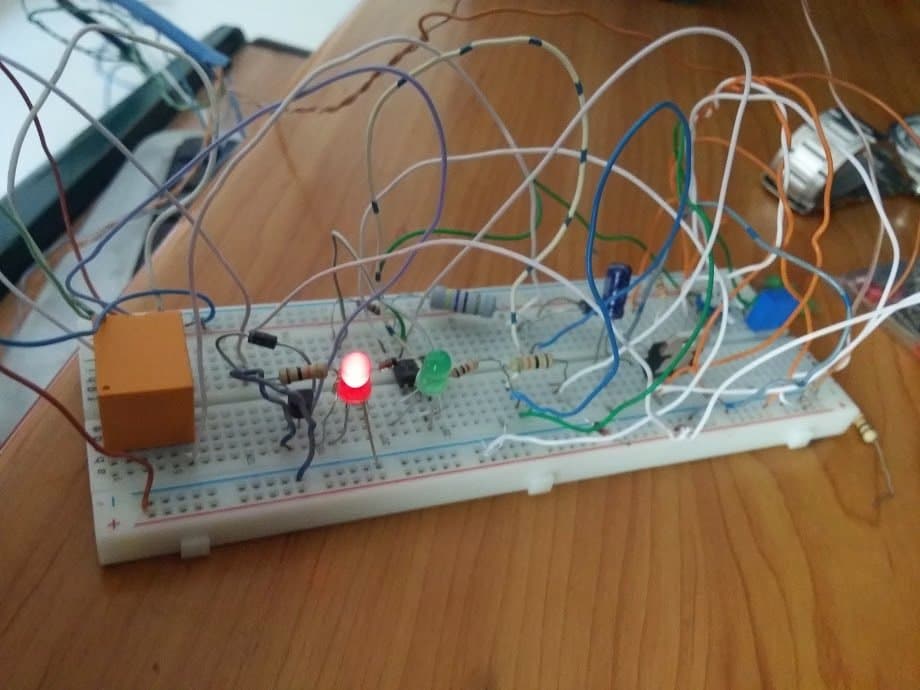
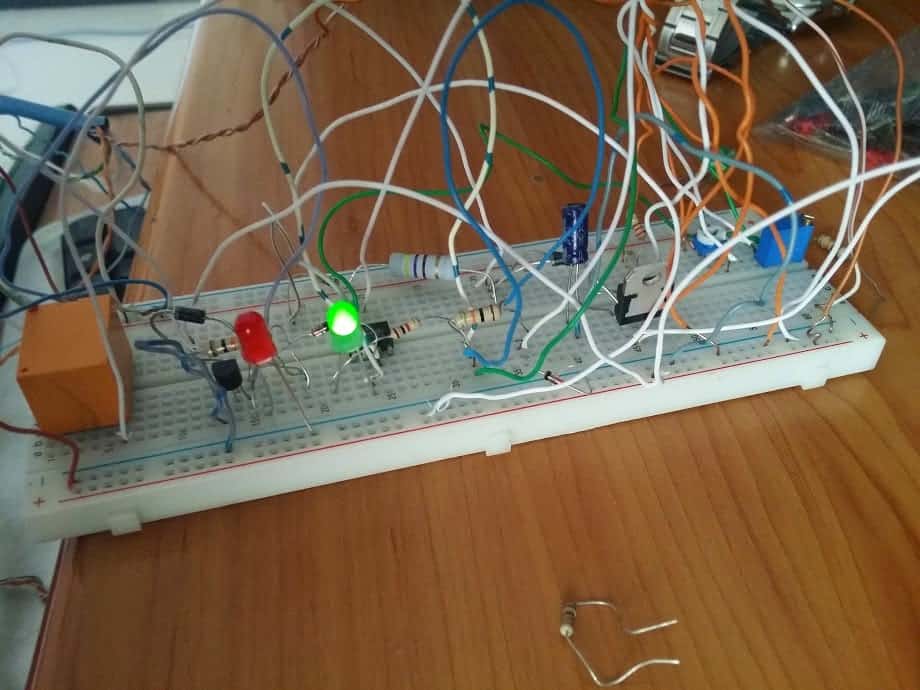
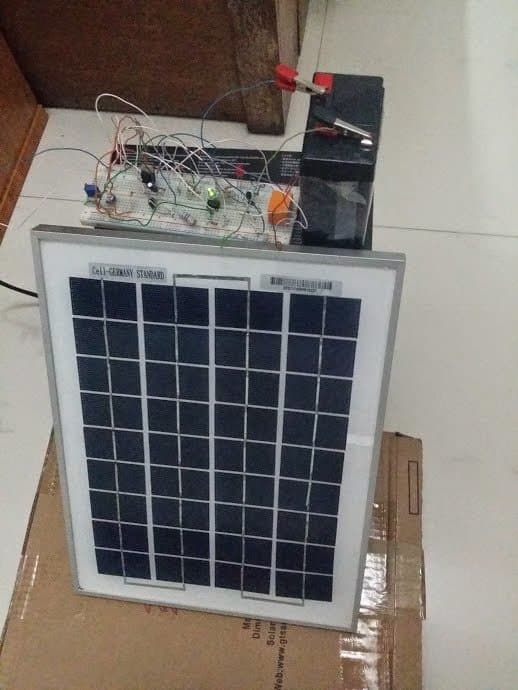
The second circuit from above was successfully built and tested by Dipto who is an avid reader of this blog, the submitted images of the 6V solar charger prototype can be witnessed below:


Adding a Current Control:
An automatic current control regulator function can be added with the above shown designs by simply introducing a BC547 circuit as shown in the following diagram:
Circuit#3

The current sensing resistor can be calculated through the simple Ohm's law formula:
Rx = 0.6 / Max charging current
Here 0.6V refers to the triggering voltage of the left side BC547 transistor while max charging current signifies the maximum safe charging for the battery, which may be 400mA for a 4AH lead acid battery.
Therefore solving the above formula gives us:
Rx = 0.6 / 0.4 = 1.5 Ohms.
Watts = 0.6 x 0.4 = 0.24 watts or 1/4 watt
By adding this resistor will ensure that the charging rate is fully controlled and it is never exceeded the specified safe charging current limit.
Test Report Video Clip:
The following video clip shows the testing of the above automatic charger circuit in real time. Since I did not have a 6V battery, I tested the design on a 12V battery, which does not make any difference, and its all about setting the preset accordingly for the 6V or a 12V battery as per user preference. The above shown circuit configuration was not changed in any manner.
The circuit was set to cut off at 13.46V, which was selected as the full charge cut off level. This was done to save time because the actual recommended value of 14.3V could have taken lot of time, therefore to make it quickly I selected 13.46V as the high cut off threshold.
However one point to be noted is that the feedback resistor was not employed here, and the lower threshold activation was automatically implemented at 12.77V by the circuit, as per the IC 741's natural hysteresis property.
6V Charger Design#2
Here's another simple yet accurate automatic, regulated 6V lead acid battery charger circuit which switches off the current to the battery as soon as the battery reaches full charge. An illuminated LED at the output indicates the fully charged condition of the battery.
How it Works
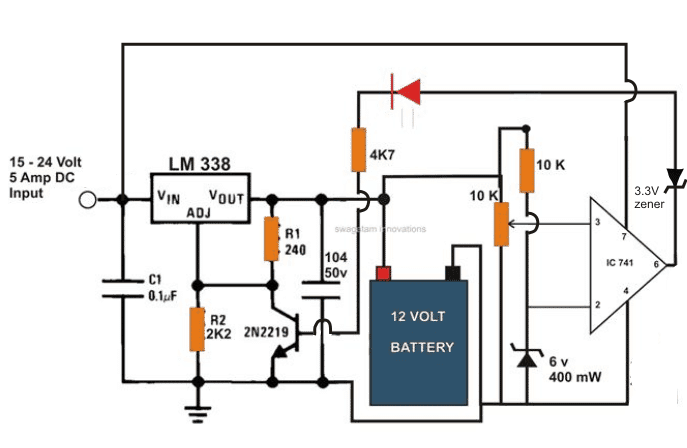
The CIRCUIT DIAGRAM can be understood with the the following points:
Fundamentally the voltage control and regulation is done by the versatile, work horse IC LM 338.
An input DC supply volt in the range of 30 is applied to the input of the IC. The voltage may be derived from a transformer, bridge and capacitor network.
The value of R2 is set to get the required output voltage, depending upon the battery voltage to be charged.
If a 6 volt battery needs to charged, R2 is selected to produce a voltage of around 7 volts at the output, for a 12 volt battery it becomes 14 volts and for a 24 volt battery, the setting is done at around 28 volts.
The above settings take care of the voltage that needs to be applied to the battery under charge, however the tripping voltage or the voltage at which the circuit should cut off is set by adjusting the 10 K pot or preset.
The 10K preset is associated with the circuit involving the IC 741 which is basically configured as a comparator.
The inverting input of the IC 741 is clamped at a fixed reference voltage of 6 via a 10K resistor.
With reference to this voltage the tripping point is set via the 10 K preset connected across the non inverting input of the IC.
The output supply from the IC LM 338 goes to the battery positive for charging it. This voltage also acts as the sensing as well as the operating voltage for the IC 741.
As per the setting of the 10 K preset when the battery voltage during the charging process reaches or crosses the threshold, the output of the IC 741 goes high.
The voltage passes through the LED and reaches the base of the transistor which in turn conducts and switches off the IC LM 338.
The supply to the battery is immediately cut off.
The illuminated LED indicates the charged condition of the connected battery.
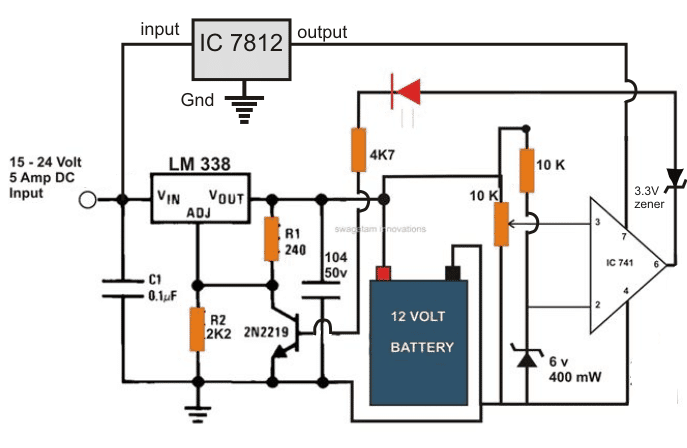
Circuit#4

This automatic battery charger circuit can be used for charging all lead acid or SMF batteries having voltages in between 3 and 24 volts.
The above circuit was found not so satisfactory by some of the readers, so I have modified the above circuit for a better and guaranteed functioning. Kindly see the modified design in the below given figure.

PCB Design for the above finalized 6V, 12V, 24V automatic battery charger circuit

Solar 6V Battery Charger Circuit with Over Current Protection
So far I have explained how to a simple 6V battery charger circuit with over current protection using mains input. In the following discussion I will try to explain how the same could be configured in conjunction with a solar panel, and also with an AC/DC adapter input.
The circuit also includes a 4 stage battery status indication feature, an over current controller stage, automatic switch OFF for the load and battery charging, and also a separate cell phone charging outlet. The idea was requested by Mr. Bhushan Trivedi.
Technical Specifications
Greetings, I trust you are well. I am Bhushan, and I am working on a hobby project currently. I am very impressed by the knowledge you share at your blog, and was hoping if you would like to guide me a bit with my project.
My project is around charging a 6V 4.5 Ah sealed battery with grid and solar panel.
This battery will supply power to led lights and a mobile phone charging point. Actually, the battery will be kept in a box. and box will have two inputs for battery charging. These two inputs are solar (9V) and AC (230V) for charging the 6V Battery.
There will not be any automatic switchover. Its like the user has an an option to either charge the battery from solar or grid. but both the input options shall be available.
For example, if on a rainy day or for some reason the battery can't be charged from a solar panel, then grid charging should be done.
So I am looking for an option of both the inputs to the battery. Nothing automatic hereThe battery level indicator LED should indicate in red yellow and green on the battery level.
Automatic battery cut off after voltage goes down certain limits to ensure long battery life. I am attaching a short problem statement along this email for your reference.
I am looking for a circuit for the arrangement shown in it. I am keen to hear from you on this
Kind Regards,
Bhushan
The 5th Design
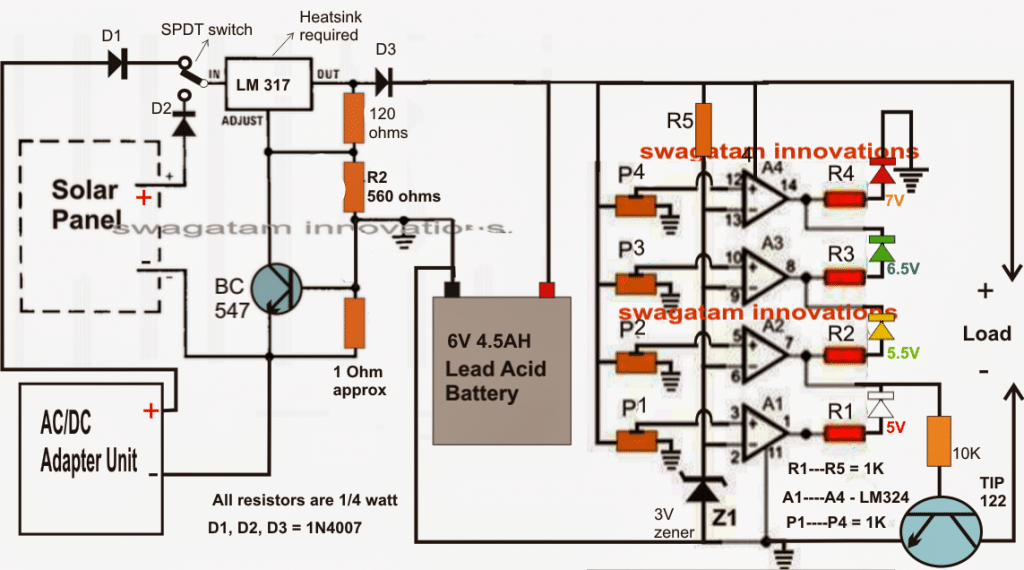
The required 6V solar battery charger circuit can be witnessed in the diagram presented below.
Referring to the diagram, the various stages may be understood with the help of the following points:
The IC LM317 which is a standard voltage regulator IC is configured to produce a fixed 7V output determined by the resistances 120 ohms and 560 ohms.
The BC547 transistor and its base 1 ohm resistor ensure that the charging current to the 6V/4.5AH battery never exceeds the optimal 500mA mark.
The output of the LM317 stage is directly connected with the 6V battery for the intended charging of the battery.
The input to this IC is selectable via a SPDT switch, either from the given solar panel or from an AC/DC adapter unit, depending whether the solar panel is producing sufficient voltage or not, which could be monitored through a voltmeter connected across the output pins of the LM317 IC.
The four opamps from the IC LM324 which is a quad opamp in one package are wired up as voltage comparators and produce a visual indications for the various voltage levels at any instant, during the charging process or during the discharging process through the connected LEd panel or any other load.
All the inverting inputs of the opamps are clamped to a fixed reference of 3V through the relevant zener diode.
The non-inverting inputs of the opamps are individually attached to presets which are appropriately set to respond to the relevant voltage levels by making their outputs high sequentially.
The indications for the same could be monitored via the connected colored LEDs.
The yellow LED associated with A2 may be set for indicating the low voltage cut-off threshold. When this LED shuts off (white lights up), the transistor TIP122 is inhibited from conducting and cuts off the supply to the load, thereby ensuring that the battery is never allowed to discharge to dangerous unrecoverable limits.
A4 LED indicates the upper full charge level of the battery....this output could be fed to the base of the LM317 transistor in order to cut-off the charging voltage to the battery preventing overcharging (optional).
Please note that since the A2/A4 do not have hysteresis included could produce oscillations at the cut-off thresholds, which won't necessarily be an issue or affect the battery performance or life.
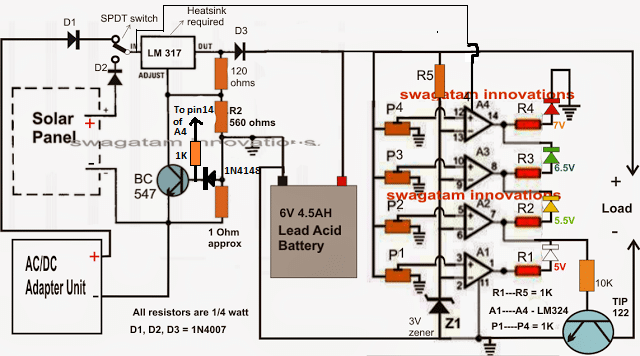
Circuit#5

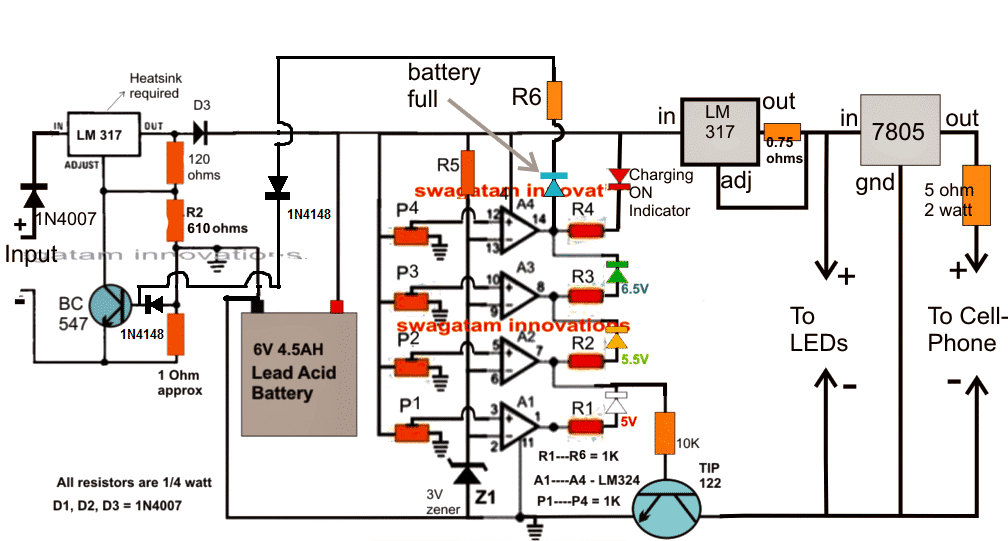
Adding an Auto-cut OFF on Batery Battery Full Charge
The modified diagram with over charge auto-cut of can be implemented by connecting A4 output with the BC547.
But now the current limiting resistor formula will be as follows:
R = 0.6 + 0.6 / max charge current

Feedback from Mr. Bhushan
Thank you very much for your continued support and the above circuit designs.
I have a few minor changes to the design now, which I would like to request you for incorporating in the circuit design. I would like to express that cost of the PCB and components is a big concern, but I do understand quality is also very important.
Hence, I request you to strike a fine balance between the performance and cost of this circuit. So to begin with, we have this BOX, in which will house the 6V 4.5 Ah SMF Lead Acid Battery and the PCB too.
The 6V 4.5 Ah Battery will be charged either through the followingn options from one single input:
a) A 230 V AC to 9V DC Adaptor (I wish to go ahead with a 1 amp rating charger, your views?) ‘OR’
b) A 3-5 Watt Solar module (Max Voltage: 9 V (6V nominal), Max Current: 0.4 to 0.5 Amps)
Block Diagram

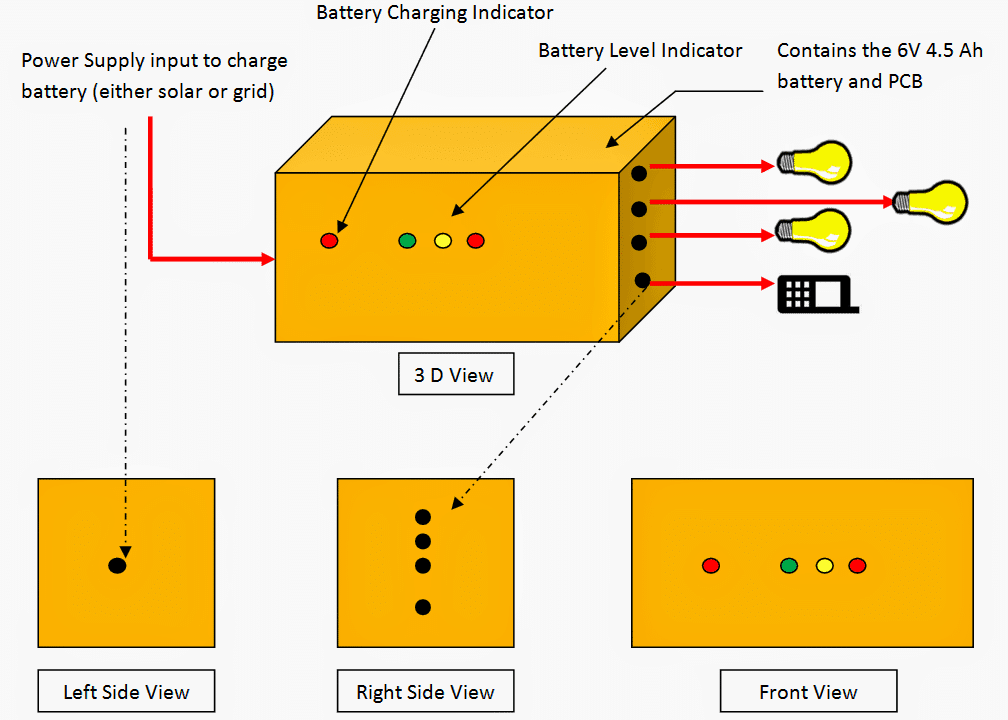
The battery can be charged by only one supply at a time hence will only have one input on the left side of the box.
For the time when this battery is being charged, there will be small red led light which glows on the font face of the box (Battery Charging Indicator in diagram) Now, at this point, the system should also have a battery level indicator (Battery level Indicator in diagram)
I wish to have three levels of indications for the battery state. These tables state the open circuit voltage. Now with the very little electronic knowledge I have, I am assuming this is ideal voltage and not the actual conditions, right?
I think I will leave that on you to decide and use any correction factors if required for calculations.
I wish to have the following indicator levels:
- Charge level 100% to 65% = Small Green LED is ON (Yellow and Red LED off)
- Charge level 40% to 65% = Small Yellow LED is ON (Green and Red LED off)
- Charge level 20% to 40% = Small Red LED is ON (Green and Yellow LED off)
- At 20% Charge level, battery disconnects and stops supplying output power.
On the Output side now (Right Side View in diagram)
The system will supply power to the following applications:
a) 1 Watt, 6V DC LED Bulb – 3 No’s
b) One output for Mobile Phone Charging I wish to incorporate a feature here. As you see, the DC loads connected to the battery are of relatively less wattage. (just a mobile phone and three 1 watt LED Bulbs). Now, the feature to be added in the circuit should kind of work as a fuse ( I don’t mean an actual fuse here).
Assume if a CFL bulb is connected here or some other application of higher wattage rating, power supply should be cut off. If the total power drawn is in excess of 7.5 Watts DC connected to this system, the system should cut off supply and shall only resume when the load is below 7.5 Watts.
I basically wish to ensure that this system is not misused or drawn excessive energy from, thereby damaging the battery.
This is just an idea. I do however understand this can potentially increase the complexity and cost of the circuit. I will look for your recommendation on this on whether to include this feature or no as we already are cutting off the battery supply once the state of charge reaches 20%.
I hope you find this project exciting to work on. I look forward to receiving your much valued inputs on this.
I am thanking you for all your help till now and in advance for your extended cooperation on this.
Kind Regards,
Bhushan.

The Design
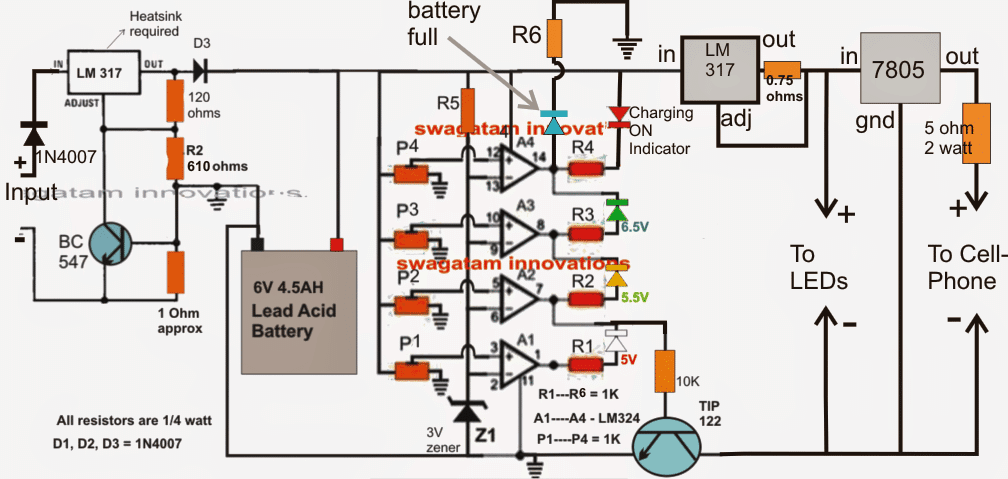
Here's a brief explanation of the various stages included in the proposed 6V battery charger circuit with over current protection:
The left side LM317 is responsible for producing a fixed 7.6V charging voltage across its output pin and ground for the battery, which drops to around 7V via D3 to become an optimal level for the battery.
This voltage is determined by the associated 610 ohm resistor, this value can be reduced or increased for changing the output voltage proportionately if required.
The associated 1 ohm resistor and the BC547 restricts the charging current to around a safe 600mA for the battery.
The opamps A1---A4 are all identical and perform the function of voltage comparators. As per the rules if the voltage at their pin3 exceeds the level at pin2, the corresponding outputs become high or at the supply level..... and vice versa.
The associated presets may be set for enabling the opamps to sense any desired level at their pin3 and make their corresponding outputs go high (as explained above), thus A1 preset is set such that its output becomes high at 5V (Charge level 20% to 40%)....A2 preset is set to respond with an output high at 5.5V (Charge level 40% to 65%), while A3 triggers with a high output at 6.5V (80%), and finally A4 alarms the owner with the blue LED at battery level reaching the 7.2V mark (100% charged).
At this point the input power will need to be switched off manually since you did not demand for an automatic action.
Once the input is switched off, the 6v battery level sustains the above positions for the opamps, while the output from A2 ensures that the TIP122 conducts keeping the relevant loads connected with the battery and operative.
The LM317 stage at the right is a current controller stage which has been rigged to restrict the output amp consumption to 1.2 amps or around 7 watts as per the requirements. The 0.75 ohm resistor may be varied for altering the restriction levels.
The next 7805 IC stage is a separate inclusion which generates a suitable voltage/current level for charging standard cell phones.
Now, as power is consumed the battery level begins receding in the opposite direction, which are indicated by the relevant LEDs....
Blue is the first one to shut off illuminating the green LEd, which shuts off off below 6.5V illuminating the yellow LEd which identically shuts off at 5.9V making sure that now the TIP122 no longer conducts and the loads are shut off....
But here the condition may oscillate for some moment until the voltage finally reaches below 5.5V illuminating the white LEd and alarming the user for an input power switch on and commence the charging procedure.
The above concept can be further improved by adding an automatic full charge cut off facility, as shown below:

Hi Swagatam Sir ,
In your 3rd circuit I think you can provide the 741 ic positive supply fr the out put of LM 317 through a IN4007 diode and also add a 47 mfd 16v cap from that point to gnd.
Regards. Sambath
Hi Sambath,
The 741 circuit must be supplied from the battery only, so that it is always in a position to detect the battery level, without errors, and if the battery is not connected then the whole circuit remains disabled. Otherwise, the relay might start chattering on power switch ON, in the absence of a battery.
Hello sir,
In my project i need to charge multiple batteries using switching circuit. from dc load one charger and same charging for 2 split batteries, charged battery will light the load when required. when dc source is not available. tell me how can i do this. give me your contact details
Hello Sheela,
I guess you are referring to a battery charger circuit that will charge two batteries alternately depending on which is fully charged or discharged.
You can refer to the Last circuit diagram from the following article using two op amps
https://www.homemade-circuits.com/automatic-dual-battery-charger-with/
I have a question about the automatic full charge cutoff in the last couple circuits. The output at the A4, pin 14 is connected to the transistor, but won’t it slowly let more and more current through as it approaches the desired charge? And consequently, won’t the output of the lm317 drop too as current starts to flow across the transistor, lowering the reference voltage? I guess I am failing to see how the battery will ever reach the desired charge. I would be delighted to hear what is wrong with my thinking. Really enjoyed reading about the design process. I am currently a student and I learned a lot.
The A4 pin14 will not change slowly rather it will change from 0V to 7V instantly and shut down the LM317, cutting off the supply to the battery. Op amp outputs are not designed to change state slowly, rather their output change state with a snap.
So when the 6V battery reaches its full charge level, let’s say 7 v, at this point the A4 input detects the full charge level and its output instantly changes state from 0V to 7 V shutting down the LM317 and cutting off the charging supply to the battery.
Please let me know if you have any further doubts or questions.
Hello sir, thank you for your sharing, I need the automatic cut-off charging circuit, but I cannot find the exact equivalents of some components (lm324) in the proteus isis program in the last circuit you shared, I request you to share the proteus files of this circuit or an alternative circuit.
Hello Murat, Sorry, I don’t proteus file for any of the above circuits. LM324 is a very common and standard IC and is most suitable for this application. You can try two LM358 ICs if you are having problem with LM324.
Good day, Sir. I would like to ask for your help. I’m planning to design a battery charging circuit for a microbial fuel cell that will possibly run an operating maximum voltage of 425mV. I would like to charge a battery of 12V and 8Ah. The battery will be used for charging a flashlight and a cellphone with micro USB charging port. Thank you very much for your help.
Hi Ish,
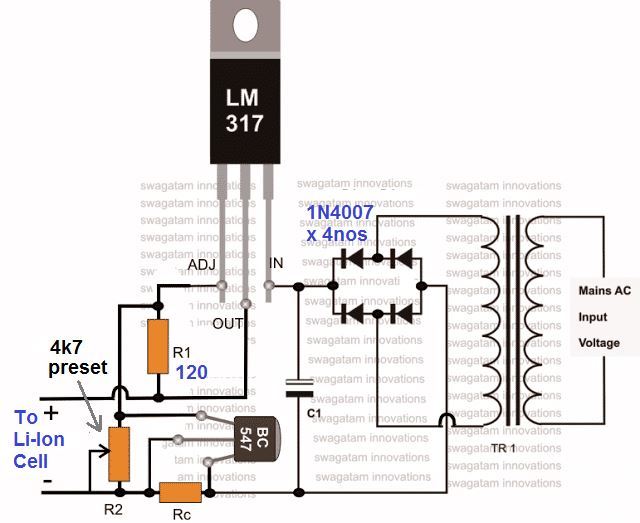
for your 12 V, 8 Ah lead acid battery you can simply use an LM338 based charger as shown below:
" rel="ugc">
Just makes sure to replace the LM317 IC in the diagram with an LM338 IC.
Next, adjust the pot to get an exact 14 V at the output for the battery, and calculate the RC to get around 1 amp at the output. The battery might take around 10 hours to get fully charged. For the transformer you can use a 9-0-9V transformer and use the 9-9 V taps for feeding the bridge rectifier.
Hello again, sir. Thank you for your reply. What if I want a DIY dc to dc booster to charge a 12V 8Ah battery? Like, around 400-500mV (maximum operating voltage from MFC) into around 9V.
Hi Ish, Charging a 9 V or 12 V battery from a 0.5 V source is almost impossible. Even a boost converter might not work correctly with a 0.5 V source.
Moreover, to charge a 8 Ah battery, the 0.5 V source must have a current output of 30 amps.
Hi. How about using an op amp LT1366 with the same 0.5V source? Is it possible to charge a cellphone battery? Thank you.
LT1366 needs a minimum of 1.8 V to operate and also the input source would need to have at least 8 amp current to charge a cellphone battery
Thank you for your replies. I really appreciate that you’re giving such a valuable time to answer my inquiries. As of now, I read an article at which they use a MCP1643. Can you tell me if it is possible for this microchip to be used for the same 0.5V source for cellphone battery charging or it is only good for LED booster?
You are welcome! You can try this IC, it might work! However, the cellphone battery will require at least 500 mA current to charge. This means your 0.5 V source must be able to generate at least 4 amp of current.
Hello Sir.
Please I can not find resistor 610ohms in our local market here, what can I do, or can I go ahead and use 680ohms ?
Hello Engr Bayo,
You can use the following software to calculate and adjust the desired R1, R2 values for getting the 7.6V output for the battery, after D3
https://www.homemade-circuits.com/lm317-lm338-lm396-calculator-software/
Dear Sir,
I use five LI-Ion batteries 3,6V 2000mAh in series to make a battery pack for my 18V cordless drill . Which circuit I should use to make a proper charger for it? I have looked trough those circuits and I am confused with power supply and zener voltages.
Thank you in advance.
Nedzad Niksic
Hello Nedzad, you can charge your battery simply with an LM338 variable regulator circuit. No need of complex opamp stage. You just have to adjust the output of the LM338 power supply to a point which is marginally lower than the full charge voltage of the battery. Once you do this the LM338 will charge your battery safely without the need of any auto cut off. To monitor the charge level you can attach voltmeter across the battery terminals.
Dear Sir,
I have maid simple charger for 18V battery, using LM338 variable regulator circuit only, as you suggested. I would appreciate if you help me to make a LED indication for fully charged battery. I guess by addition of a transistor.
Thank you in advance.
Nedzad Niksic
Hi Nedzad, you can probably build one of these circuits which are discussed in the following article:
https://www.homemade-circuits.com/battery-full-charge-indicator-circuit/
Sir,
I have made the first circute (having relay) with the same pcb layout given. Every thing is fine but the charging green led is always on when the 6 volt battery is connected to the circute. Could you please help me.
Midhun, try adding a diode in series with the emitter of the BC547. Anode of the diode will go to the emitter, and cathode to the ground line.
Alternatively, remove the green LED and replace it with a jumper link, and add the green LED with a 1k series resistor parallel to the relay coil.
Also make sure to add a 2k2 resistor between base emitter of the BC547
Sir thanks for your valuable reply.
You are welcome!
Hello Sir,
Is it possible to add to this design a modification to protect the battery charging system
on a 1975-80 Honda CT 90. This would help a large group of people.
Thank you for your time.
Hello Joseph, the battery will be well protected in all the above described circuits….
Hi,
This website is an excellent initiative that both helps and encourages hobbyist like me. I appreciate the efforts of swagatham.
Need an information on the pcb layout of the 1st circuit giive ( I mean the one with the relay ). Could you share the measurement ( length and width of pcb pls ). It appears scaled when printed out, so need to restrict to the actual scale.
Thanks!!
Thank you Priyan, glad you are finding my articles useful….
The easiest way to resize the PCB to the correct dimensions, is by matching the pinouts of an actual relay on the computer screen. The PCB size that perfectly matches the relay pinout distance will fix the real dimension of the board
You can punch the holes of the relay on a hardboard and then press the area over the PCB layout on your computer screen and keep adjusting the PCB dimension until the holes match correctly.
Hello Swagatam,
Your suggestion to have relay dimensions as reference to scale the print out worked well.
Thanks!!
Thanks Priyan, glad it solved the problem!
Is the PCB with components mounted available for sale?
I would like to buy 2 to 5 boards.
Sorry, we don’t sell parts or kits in this website!
hi.
for the second circuit without relay.
I got this circuit, I couldn’t.
Whereas it was very necessary for me
for the second circuit without relay
6v- 4 ah
for 4 Ah, a 400 mA current would be perfect, lower current than this will prolong the charging time upto 15 to 20 hours.
So a 500 mA is the nearest and the most favorable current for your application.
And please do not increase the maximum voltage above 7.2 V
Hi, I like your work. My name is Joakín. And I want to do an adjustable charger 3V to 85V 3A, with automatic turn off for 14V, 27V, 42V, 56V, 70V and 84V and automatic adjustable 1A to 3A charge control. Would you be so kind to help me with the circuit and explanations.
The best for you and your´s.
Joakin
Hi Joakin, I am glad you liked my work. You can probably try the following concept for your specific application:
https://www.homemade-circuits.com/regulated-car-battery-charger-circuit-for-garage-mechanics/
For getting the specified 6 voltage ranges, you will have to replace the S1 switch with a 6 way rotary switch…and then add more number of the respective zener diode/diode stages for each of the contacts of the rotary switch, depending on the max voltage levels. You will also have to add the 1k presets for each of these arms for enabling the fine tuning facility for each of these voltage adjustments.
Also, make sure to change the BD138 with TIP30CG, BC547 with ZTX853, and BC546, BC557 with ZTX553
Yotta thanks for your answer.
I´m trying to do an universal charger for Electro bikes, for Liion and Gel-acid batteries in different voltages.
I´ll see what you suggested to me.
Thans so much
Joakín
No problem, wish you all the best with the project!!
for the second circuit without relay.
Energy input to lead battery 0.18 A.
If this is the problem how can I fix it?
what is the battery Ah value?
hi.
for the second circuit without relay;
When I set R2 to 7.2v, the energy input to the battery becomes 6.4v.
When I set R2 to 8.3 volts, the energy going to the battery is 7.2v.
Hi, the input voltage will always drop and settles down to the discharge level of the battery. It will start increasing slowly up to the 7.2 V mark as the battery charges.
Make sure the input is 10% of the battery Ah value for a lead acid battery, and is 50% for a Li-Ion battery.
hi.
for the second circuit without a relay;
I’m adjusting 10k until the red led turns off.I’m doing R2 7.2 volts.After doing everything, the red led lights up as soon as I connect the battery cable.As soon as I pull the positive cable of the battery, the red led turns off.and the voltage of the outgoing cable to supply the battery is up to 5.5 volts.room shouldn’t be 7.2v?
What am I doing wrong.
thank you
Hi, for the second circuit, the red LED should illuminate when the battery charges upto 7.2V. Because at this voltage the pin2 should go above the pin3 voltage level.
So long as the battery voltage is below 7.2V, the pin2 voltage will be lower than pin3, which will keep the output pin6 high and the green LEd will be illuminated.
Once the battery level goes past 7.2V, the pin6 will become 0V. illuminating the red LED and shutting off the green.
hi.
I want to charge a 6v-4 ah battery.
I want it to stop charging when the battery is full.I want it to automatically cut the charge when the battery drops to 6 volts.
Which circuit do I need to use this without relay?
The cable of energy to the battery will always be connected.Please I ask you to recommend a circuit accordingly
I thank a wise like you very much.
Hi, I have explained the details in the above article, I would recommend you to go through the whole explanation and then proceed accordingly.
Hi Swagatam Sir,
query CIrcuit#2(without relay):
After adjusting preset 10K to flip flop position between green and red led at which position to leave preset green ON or red ON before reconnecting 100K resistor.
thanks in advance.
Hi Muzzanil, initially keep the preset center arm to ground level. Disconnect the 100k feedback. Apply the full charge level, which should turn ON the green LED with red switched OFF. Now slowly turn the preset until the red turns ON and green turn OFF….that’s all the circuit is set now. Connect the 100k feedback link into its initial position.
Hello Swagatam Sir,
query Circuit#2(without relay):
when battery(6V 4.5Ah) is charged full which led should remain ON.
I have built circuit and when I check voltage across battery terminal while charging
below 6V Green ON Red OFF
above 6V Green ON Red ON TIP122 OFF(checked by continuity testing across pin 2(collector) and pin3(emitter) of TIP122) charging current drops to 10-20mA
please help where I am wrong.
Hello Muzzamil, when the battery is switched OFF the current will drop towards zero….use LM358 op amp instead for ensuring that only One LED lights up at a time…
Hello Swagatam Sir,
what other changes needs to be done if I replace ic 741 by LM358 in “Circuit#2(without relay)” will schematic change.
in current circuit(set at 7.3V) red led is ON as soon as battery reaches 6V.
I want red led to glow when battery reaches 6.4V
thanks in advance.
Muzzamil, no changes will be required for LM358, you can use the same circuit. For 6.4 V cut off adjust the preset to get the changeover at 6.4 or 6.5 V threshold.
Hi Swagatam sir,
thank you for the support.
tried this circuit using LM358 still no luck. Red and green led both keeps glowing when battery reaches above 6V.
You said above circuit is tested, so is it tested physically with battery or on PC run simulation.
Hi Muzzamil, this website is about learning electronics, so please investigate your circuit and find out why both the LEDs are ON in your circuit?
You can take the help of this video, and build this basic set up first and try to understand the op amp behavior.
https://www.youtube.com/watch?v=phPVpocgpaI
You can also try the second last circuit without a feedback to check whether your basic circuit is OK or not:
https://www.homemade-circuits.com/usb-automatic-li-ion-battery-charger/
In the Circuit#2:
Across which pin we have to set 7.2V.
Here confusion is there because if I set 7.2V across LM317 then same voltage is not shown on battery terminals(battery not connected).
It would be really helpful if you can mark on circuit and show image across which point to set 7.2V
Thanks in advance.
Hi, thanks, I have updated the description with the required information…it should be between the cathode of 1N5408 diode and the ground line.
Thanks for reply. I understood it.
Dear Mr. Swagatam ,
I am very grateful to you for this project. This charger with an IC is very interesting.
I have a question, will this circuit work for other kind of LeadAcid batteries (6V7.3Ah or 12V7.3Ah) that are connected to a circuit? I want the my circuit to be connected to the battery and the battery to be connected to the charger. The solution is somehow simple (connecte the charger to the battery) while the circuit is still connected or I have to do some adjustments?
The circuit current consumption is around 200-250 mAh and once a hour it has as spike that can go up to 2Ah for 5-10 seconds depending on how fast the GSM shield is finishing it’s task.
Dear Andrei, yes this circuit can charge all types of batteries below 30 V and 50 Ah.
For your application you can modify the transistorized desigbn in the following manner:
Dear Mr Swagatam,
I have read many interesting articles and solutions from you for requests made by visitors/addicts of your website. I would like to know if it is possible to change these circuits to be used as follows;
I have a dashcam in my car and I am searching for a solution. When the car is running, the dashcam gets its power, 5 volts, from the car battery. Meanwhile the car battery is charging a powerbank. The moment you turn off the car the powerbank needs to power the dashcam. If the sun is out, the solar panel provides power to the powerbank. The dashcam itself has a small battery of its own. The powerbank are some li-ion cells from an old laptop battery pack. I have been thinking of a cheap solar charger from china but these are unreliable and produce a lot of heat which is a waste of power. I am sorry if I did not search very well and did you already create such a schematic.
Dear Robert, A PWM based charger works best for any solar charging application. Although there are plenty of pwm chargers designed by ti.com, the following one looks perfect for most applications.
PWM Inverter Using IC TL494 Circuit
Dear Swagatam,
Thank you for your reply, but that solar charger is not what I am looking for.
I am trying to find something like a Hybrid Solar Charger Circuit to charge lithium batteries.
Or alter an existing circuit to suit my needs.
Input 12v car system and 6 or 12 volt solar panel.
Output for the batteries and charge controller should be 5 volts and a few amperes ( 2 to 5).
Sir, is it possible to add that feature or modify one of your designs.
Hi Robert, there are a few examples in the following article which may suit your purpose:
https://www.homemade-circuits.com/simple-dc-ups-circuit-for-modemrouter/
Dear Swagatam
For circuit number 3 can I use an mje13009 instead of tip122 because this is what I have in hand. Will I need to bring some kind of modifications after doing so?
Thks & Rgds
Aslam Chumroo
Hello Aslam, It won’t be an appropriate selection, but it might work, although not as efficiently as a TIP122. You may have to add a 2N2222 with it to make it a Darlington type. No other parts will need to be changed
OK.. I discovered an mje3055 hanging around in my house. I believe it is a better option because it has a higher current gain.. But I like your idea of using a 2n2222 to form a darlington because this will boost the current gain. Thks
Dear Swagatam,
I am trying to build circuit #3.. I do not have the 3V zener diode. Instead can I use a tl431 and configure it to output 3V?
Thank you
Hello Aslam, you can use any form of fixed reference for pin3 and TL431 would be fine, although zener diode is a much easier option.
Thank you sir
Hi, dear
PLEASE CONNECT A 10uF ACROSS PIN2 AND PIN4, SO THAT THE OP AMP OUTPUT ALWAYS BEGINS WITH A “HIGH” ON POWER SWITCH ON
If I understood the circuit should it look like this, tell me if i’m wrong?
https://imgur.com/a/ogFvjni
Can I charge a 4.5Ah battery with this circuit?
That looks oK to me, pin4 is also the ground line of the circuit
Thanks Swagatam, I will be doing a PCB Layout for this circuit soon.
Hi dear, I made PCB Layout for this circuits.
Warning: download the file within 30 days, after which the file is automatically deleted.
https://easyupload.io/q269w9
Hi thanks, but I cannot open the PCB design in my computer
Hi, you must have EAGLE 7 installed to open Design, Download the new .RAR file, I Made a PDF version 1:1
I would love for you to make a detailed video on this topic.
Warning: download the file within 30 days, after which the file is automatically deleted.
https://easyupload.io/qnomyn
OK thanks, I have taken the screenshots and updated them in the above article.
Sure, a video clipping will be greatly appreciated.
Hi Jack009,
Could you upload the PCB layout and share me a link please. The one shown in this page is scaled to bigger size so couldn’t transfer that to copper clad.
Thanks
Priyan
Or the actual size ( width & height ) of the image if given will help to manually scale in the image while printing out.
Thanks!!
ok so if i want to use 0.06 ohm’s. how many 1 ohm’s am i going to connect in parallel in other to get 0.06 ohm’s.
You will need 16 resistors
Sir is about the circuit no #3 my Rx is 0.1 ohm but due to the resistor is not in the markert you told me to connect 0.06 ohm in parallel but yet this 0.06 ohm’ is not yet to be found. pls sir any other suggestion on what to do concerning this resistor. waiting for your respond.
Youngking, I never said that, I actually said the opposite. Please read my comment correctly.
For 0.1 ohm, you can connect 10nos of 1 ohm in parallel
Pls sir don’t be bore with my question. How will i by pass the relay contact with wire link and more over there are two preset in that circuit, will i only make use of only 10k pot when doing the adjustment pls clear me on this. Thanks
The preset associated with LM317 is for adjusting the full charge level at the cathode of the 317 output diode.
The op amp preset is for adjusting the full charge cut off.
for bypassing the relay just short circuit the pole and the N/O contact of the relay. Do not connect any battery while doing the setting up procedure….
so if i may understand what you mean after i apply 14v from variable power supply to the input of lm317 i will remove N4148 diode and adjust the 10k pot until th green led is off , after that i will still turn the 10k preset that is is connected with ic741 until the red led is on before connecting back the feedback diode. is that what you mean.
If you want to use the LM317 supply itself, then you must adjust its output at the battery full charge level, then bypass the relay contacts with a wire link, and then adjust the preset EXACTLY as I mentioned in my previous comment…1N41418 feedback must be removed before applying power.
Make sure to remove the bypass link after the adjustment is complete and also reconnect the 1N4148
Hello sir, thanks for your quick respond but i have one more question concerning this last circuit #3 that uses relay, pls sir explain how i can set this circuit using variable power supply. Sorry for asking too much.
It is the same as other op amp battery chargers designs presented in this blog, remove the 1N4148 feedback diode, adjust the 10K preset to ground, apply the full charge voltage from a variable supply across the supply terminals of the op amp, adjust the preset until the Green LED is switched OFF and RED turns ON. Finally, reconnect the feedback diode
Good evening sir, pls sir i have few quetion concerning the circuit last circuit #3 base on the calculation you gave . 1- if am to charge 12v 75ah to 100ah lead acid battery, so my calculation will be 0.6/10=0.06 0.6×10=6 which means Rx=0.06 ohm’s 6watts resistor while 10 is my battery current, but the problem is that i can’t find 0.06 ohm’s resistor and ic lm338 in the market any help. Pls correct me if my calculation are wrong. (2. I know that setting this circuit will require a varible power supply pls explain the setting clearly. (3. Like you said that all your battery cutoff act as a switch so does it mean that using solar panel with this circuit as a source that one has to include transformer and rectified diode pls explain. Lastly where will i turn my dial to when measuring current using my small multimeter. Pls sir i’m waiting for your respond. Thank you.
youngking, you can use connect 2nos of 0.1 ohm in parallel to get 0.05 ohms….for 10 amp you must use LM396, LM338 will not work.
How can you use a transformer with a solar panel? The output from a solar panel is already a DC.
Without knowing your multimeter specs I can’t suggest much!
Hi, Sir
How to limit max current to 400mA in this version: " rel="ugc">
Can i use 220R instead 240R?
Hi Jack, please see the last diagram, and add the BC547 and Rx stage to the LM317 appropriately.
yes 240 ohms will also do insteda of 220 ohm
Hello Sir,
I have made the last circuit posted by you, and I have made changes to it to make it for 12V battery, 6V zener instead of 3V (Z1) and I’ve also replaced the 610ohms resistor with 10K preset to adjust the charging voltage whenever I require. I need 16V output to from LM317 to charge my battery faster and I am using a 18V 2A SMPS to the input of LM 317. To adjust the input voltage I am using a variable power supply, and I am unable to adjust it to 16V output at 317 when i give 18V input to the same. The problem that is happening is the output is reaching at 14V when i apply 16V input and as I increase this 16V input further, the output of 317 starts dropping from 14V to 13V and then cuts off to 1V or something. Please provide a solution for this.
Hello Sagar,
The LM317 is itself is a variable regulator IC, so an external variable supply is not required. You can supply the 18V directly to the LM317 input, and set the LM317 pot for the battery.
However, the voltage is never responsible for fast charging, it’s the current that determines the charging rate. But if a high initial current is used it must executed step wise through a step charger circuit….otherwise it can cause permanent damage to the battery.
The recommended current is 1/10th Ah value if a step charging is not used, and at this current level it does not matter whether the input is 14V or 16V especially when the cut off is set at 14.2V
So you must set the LM317 output voltage to 14.5V, and the cut off at 14.2V, and the input can be 18V from the SMPS.
If the input has higher current than the recommended value, in that case you can limit it by using the 4rth circuit from top, through Rx.
Can you please provide the step charging circuit as you mentioned? I want to charge the battery fast! Please help.
you can try this concept
https://www.homemade-circuits.com/fast-battery-charger-circuit/
Hai Sir,
One small doubt in circuit 3 sir…
0.6/0.4=1.5ohms
0.6/0.4=0.24ohms
How u calculate 0.24ohms sir..
If i calculate ,1.5 ohms value coming sir..
Pls clarify it sir
And how to calculate resistor wattage sir
Thank u sir
Thanks Kesavraja,
Yes it is 1.5 ohms, I have corrected the calculations in the article, and also added the wattage value under it. Please check it out now.
Ok sir Thank you.
3.7v 2400mah
for a 3.7 V cell I would recommend the last circuit from the following article:
https://www.homemade-circuits.com/usb-automatic-li-ion-battery-charger/
what will .be the changes
Please provide detailed specification of your Li-Ion cell….
can i use the last circuit to charge liion battery
yes you can, try the last one.
Please how can I use a MOSFET in place of relay, thanks
Replace the TIP122 with MOSFeT
Dear mr Swatagam’
I am gratefull for all your project. Everything I have in mind to do you are done.
Thank you . I am engineer of electronic too but in poor condition with many resurces
top of that now is time because I am retired. But that project like this make me happy and full my time
and mind. In circumtances of ilnest is great light in the end of tunnel when I finish some of yours
project and it works sucsesfull. joy for me, thank you.
for ideas energy focuss
when finish project i told you
see ya or read ya
petre
No Problem Petre, I am always there to assist you! Wish you all the best…and please keep posting!
I have been trying to make this circuit, But the charging LED doesn’t seem to wok for some reason, Please help me out with it
Is it only the LED that’s not illuminating or the entire circuit not functioning? Try removing the 1N4148 feedback link and check again.
can you contact me via email or whatsapp please? I have too many doubts regarding the circuit.
Only the red Charging On LED is not working. Also The cutoff happens at 4.3 volts instead of 5
Which circuit have you built?
The last one.
You will need a variable power supply for the setting up procedure. Initially do not connect the mains input or the battery. Rotate all the presets to ground side. Apply 5V across pin#4 and pin#11 of the LM324.
Adjust the lowest opamp A1 preset such that the white LED just illuminate.
Increase the voltage to 5.5, adjust the A2 preset such that the yellow LED just illuminates.
Again increase the voltage to 6.5V, adjust the A3 preset such the green LED just illuminates.
Repeat the same for A4 with a voltage of 7V until the blue LED just illuminate. When blue lights up RED will shut off.
That’s all the circuit is set up now. Remember the output after D3 should be 7.2V, so adjust R2 near LM317 accordingly.
This is the correct setting up procedure, I hope you understood now
You can freely discus the problems here, I will solve them all step by step, the concept above is very simple, so it won’t be a problem.
I made the circuit and converted it into 12Volt by using 6V zener instead of 3V zener and connected it to a 12V 7Ah battery. At initial stage the battery was 12.05V. then I checked the battery Voltage after 19Hours, the battery voltage dropped to 11.71 Volts. Is this circuit supposed to use the battery this much? What are the options to reduce this drop? Also, Only the circuit was connected no load was connected.
If you made the last circuit, the LEDs will give you direct indications whether the battery is charging or not.
Which circuit did you make? How did you adjust the preset? What voltage and current did you apply?
Give all the details for getting proper solution!
I made the last cricuit. The fully updated one. And used the procedure as explained by you before. but for 12V system. I just want to know if this circuit will lower the battery in idle condition.
Yes it will discharge the battery if it’s connected for a very long time, you can eliminate this by removing D3 and by connecting it in series with the battery positive line, as done in this diagram:
" rel="ugc">
I want to have charging auto cutoff in your last 6v battery charging circuit having mobile charging facility.
Waiting for reply
I have updated the required diagram at the end of the post, you can check it out!
Thanks a lot
I m looking for circuit 3.7v / 5200mah lithium ion battery charger from 12v solar panel with battery level indicator & charging full & lo battery load cutoff
In the last circuit replace both the LM317 ICs with LM338. If the load is not a power LED you can eliminate the right side LM317 and replace it with the wire link.
Also, replace the 1 ohm resistor by solving this equation: 1.2 / desired charging current
Can we have Load cutoff indicator in 6v battery charger
when the yellow LED shuts off and white illuminates it means load is shut off
I m looking for 3 stage 12v/7ah 12v/18ah solar battery charger with hi & lo voltage cutoff & battery level indicator
You can try these two circuit:
https://www.homemade-circuits.com/fast-battery-charger-circuit/
https://www.homemade-circuits.com/make-this-3-step-automatic-battery/
Why 470ohms 1/4 watt resistor connected permanently to +terminal of battery in 741 IC used charger circuit?
To keep the battery trickle charged continuously once the charging is over!
Thanks
One 100uf capacitor connected between transistor BC547’s base and negetive line in #circuit1.what is the advantage that?
To enable a stable operation of the relay changeovers.
sir,
I have successfully built one of your project ‘ pwm inverter using sg3525 ‘. Now I wants to include the charger circuit no.3 to the inverter circuit. Since the circuit is for 6volt battery, will it be compatible for the inverter of 12volt battery. If so what are the changes to be made. Pl. kindly suggest me sir. Is ziner diode of 3volt is to be substituted with 6volt?
Thanking you sir.
Leelesh.
Hi BK, I am glad you could build it successfully.
you can use the same circuit for charging 12V battery also. You can use a 6V zener if you wish, although a 3V will also work without issues.
If your battery is higher than 10 Ah, then you can replace the LM317 with a LM338
Sir,
I can’t find 741 IC, 2N2219 and LM338 instead i found HA17741 IC, TIP41C and LM317T
is there any changes in the final circuit sir? the battery is 12v 50Ah.. thanks a lot sir..
Hi Paul, those parts will also work without issues, however TIP41 can be unnecessarily big for driving a relay, you can try any other small signal transistor such BC547, or 8050, or BD139.
By the way for a 50 Ah battery LM317 won’t work , and won’t be required also. You can use a 0-12V 5 amp or 7 amp trafo, rectify the output with a bridge rectifier and a 2200uF/25V filter capacitor, and feed the DC to the opamp circuit, ….at the anode of the left side diode. This diode must be rated at 10 amps.
Also for the 1N4148 diode, use two in series.
Sir i cannot see the relay in the finalized circuit where it will put? and the 1N4148? im going to make the modified finalized circuit?
OK, if you want to use the last diagram, you can build it with your available parts, but TIP41 will not respond correctly with the opamp output. You will have to reinforce it with another NPN in a Darlington configuration. It can be a BC547 or any similar. TIP41 will also need a good heatsink.
Sir is 104/50v electrolytic capacitor and can I use 3.6v zener instead of 3.3V?
Ken 104 is not electrolytic, it is ceramic, yes 3.6V will do
Thanks for the reply sir.. C1 is also 104 / 50v ceramic cap. sir? and is it possible to use TDA2822 audio I.C instead of 741?
yes it is also 104/50V but it is not crucial…TDA may work, but that would be an awkward way to use an audio amplifier IC, actually I am not very sure about it!
Hi Swag,
In the 3rd circuit, the one corrected, what changes do I have to do in order to charge 3 6V/4.5AH batteries connected in parallel?.
Thanks.
Best Regards,
Nélio Abreu
Hi Neilio, you won’t require any changes, just make sure that the input supply current is not over 2 amps.
Hi,
Ok. Thanks
Best Regards.
Nélio Abreu
Hi Neilio, forgot to tell you, please make sure to add separate diodes for each battery, as shown in the following article.
https://www.homemade-circuits.com/connecting-batteries-in-parallel/
Hi Swag,
Ok. Thanks for the notice.
Best Regards,
Nélio Abreu
i have 12V dc battery and 7A/h current ratting please give me the correct circuit as soon as possible.
You can try the first circuit from this article:
https://www.homemade-circuits.com/how-to-make-current-controlled-12-volt/
Make sure to adjust R2 to get exactly 13.9V, and select Rc as 0.6 ohms 1 watt
Hi sir I’m Yogesh .6v/4.5ah ka Jo circuit h usme 12v off karneke bad green led battery supply pe on hi raheta h to usko disconnect kaise karneka .plz help me .
Hi Yogesh, the green or red LED will be ON if the battery remains connected, because the LEDs will indicate the immediate status of the battery, green will indicate that the battery is not fully charged and red will indicate it is fully charged….so that’s part of the circuit and it is correct.
I want to fabricate a 12v, 3.5 Ah Nimh bty charger. I’ll be grateful if you send me the cct diagram with description.
you can make use of the 3rd circuit and use it for your purpose…just make sure to supply the correct specified amount of current from the input side, and set the preset accordingly for the cut off
Hello Swagatam, I am facing great issue every time to take out the battery from my nokia x2 to charge and your charger circuits are very promising and I even built a skeleton circuit with the design with two bc547, will check out..but, we all need fastest charger, and nearly everything I used so far, universal charger etc. plus your schemes, provide very little current and rate, 150ma or so. So I have to wait six to seven hours for fully charging! The reason is stated that liion batteries keep good health if charged very slowly, but again, liion has advantage of charging almost equal rated current as its Ah. Even, companies, in my case, microsoft, provides charger with rated current 600 ma. So I need a design with simplest scheme with charging current around 1-1.5 A, using 555ic or tl431and any regulator ic 317, 7805etc, I am not much into zener diodes ) and your charger design with two bc547 lacks charging led indicators, so these in new design will also be welcomed. I can buy 4056 module, that comes with a 1A promise, but, I want to make something myself also the components at my disposal needs to be used. Thanks for your time.
Hello Indrajit, I never said that Li-ion battery must be charged slowly. This is true only for lead acid battery not for Li-ion.
None of my circuits are designed to restrict current to a fixed level or to 150mA, it depends what input supply you apply. All The auto battery cut-off circuits which I have explained only act like a switch and will never drop current by itself.
It completely depends on the input supply current that you use and ofcourse your battery health condition, if your battery is bad then it will never consume current at the correct fast rate, regardless of which charger you use.
For more info you can red the following post:
https://www.homemade-circuits.com/constant-current-source/
By the way which charger circuit are you referring to??
Hi, how to control the charging current to the battery with the third circuit? Because the LM317 in the above circuit acting as voltage regulator. I need to charge a 12v, 1A battery with the above circuit which require 100mA for charging?
Hi, you can add a BC547 transistor stage as per the following article diagram:
https://www.homemade-circuits.com/how-to-make-solar-battery-charger/
ok. Can I use the third circuit for 12v battery? Do I need to change any components for that? Will the 3v zener fine for 12v charger?
In 3rd circuit, Pin 2 and Pin 3 is interchanged when compared to your other battery charger circuit? Is that correct?
you can make the third circuit, no components needs to be changed, the pin#3 zener can be any zener between 3 and 9V.
here pin#2 and pin#3 are swapped because a relay is not used, transistor is used directly for the cut-off… so the triggering needs to be opposite, and is correct.
Hai sir…
I try lm317 charging circuit for 6v 4.5ah battery….
I try only charging section not auto cutt off section..
Input i use 12v 1.5ampere adapter….
I adjust the output voltgae 8v…
Now battery is charging…
But ic heat sink more heat..can’t even touch it….
After few hours the ac adapter power led auto off and on.when adaptor output voltage got short it only the led off..but here i check the connection all proper
.i check the 317 output voltage…its decrease and increase.like
2.5v,3.4v ,4v,5.23v,6v continues …
When i remove battery the lm317 output voltage good…i think that battery may be damage ,so i check with another battery same think happening
So i change Ic …half hour charging well afterwards this problem continues…
And also i change adaptor….
But this problem continues when i connect to battery..
Without battery its working good…
Guide me sir…
Hi Kesav, it may be happening due to the IC getting overheated, which is never good for any IC, you must use a large adequate amount of heatsink to control and dissipate heat appropriately. and also make sure that the battery is getting charged with a correct ampere rate, for a Lead acid battery it should be 1/10th of its AH, exceeding this will be bad for the battery and also for the controller circuit if its not rated to handle this.
Thank u sir….
I will rectify and tell u sir
ok..
Sir today i check it ampere ratings of transformer…
12v 2ampere transformer output showing 6 ampere in DC AMPERE in multimeter out of 10.
12V 3 Ampere transformer output showing 9.47 Ampere sir..
I think that multimeter may be faulty..so I check with another one multimeter also showing the same results….
While charging battery when i check ampere it shows only 700 to 800ma in 2A Trans…900 to 998ma in 3A trans…
New transformer also showing same results.
Even i not make any complex circuits…simple rectifier only…to battery charge…
What should i do sir….
Help me sir
Kesav, check it again with your meter on the AC 10 amp range directly across the transformer wires, a 2 ampere trafo cannot produce 6 am or 9amp.
while charging your battery connect a 12V motorcycle headlamp bulb in series with the positive wire…if this lamp glows brightly initially while charging then your battery might be OK and charging normally, if not then your battery could be faulty…
12-0-12 2ampere…i make fullwave rectifier and connected to the battery .12v 7.5ah
I check ampere level..it shows only 718ma….
I use 5408 diodes…
Is it Transformer problem sir…
If i use 3ampere transformer …battery charging ampere shows 980ma…
Remaining 2 ampere ?…
Pls guide me sir
Kesav, check the current using a DC 10 amp range meter directly across the bridge output without any battery, this will tell you the actual ampere rating of the trafo. take the reading quickly within 1 or 2 seconds
Okay sir today i will do….
Instead of transformer we can use SMPS sir….
Which one is good for charging battery.
Which one will be life span high without trouble
You can use any DC source, the only criteria being the voltage and current values which must be rated as per the standard specs.
We can use any zener value…
Or
Pin 2 zener value and o/p zener value must be same or we can change any value in output.
you can choose any value, but it should be preferably lower than your battery’s low discharge threshold specification.
Hai sir
What the uses of zener 3v in pin no 6…
What happen if zener not use
It blocks the leakage offset voltage from the output pin, if the zener is removed the transistor will remain permanently switched ON and not respond to the opamp ON/OFF correctly
Hi Swagatam. Plz give me your whatsapp number. My number is 9725335577
Hi Hiren, you can contact me on my email ID
hitman2008 @ live.in
Dear Sir, I have the 6v, 4.5ah battery and it's charging nicely with the second circuit you provided, and now I want to add one more feature how to know how much charge is present in battery and supply this information to arduino microcontroller and also power the same arduino with that battery. What changes I have to add to make this new feature work.
Thank you,
Yours sincerely
Siddharth Talesra
Thanks Siddharth, your Arduino must be coded such that it is able to read the charging rate and the reduction in current consumption while it's charging and then compare these parameters to figure out the approximate time left.
A crude method is to attach a 9V incandescent bulb in series with the positive of the battery and monitor its intensity electronically to learn the same.
Hi Swagatam,
I was replaced LM317 by another one (not LM338 as you mentioned) but I still get the current is 20mA. Maybe the problem is due my battery.
Have you any battery charging circuit similar with above circuit (without relay) which can adjust the voltage and current by VR? If yes, could you please give me the link?
Thanks,
SY, the above circuit design is perfect for your application
Hi Swagatam,
I made one circuit without using a relay for battery charger. I using power source with 14v 1A. Because I do not have R1=240 Ohm should I replace it with one resistor 220 Ohm.
I have set up the circuit in the following way:
1. Without connecting any battery, disconnect one pin of the 100k resistor to pin6 (IC741). Another pin of 100k resistor keep connected to pin2 (IC741)
2. Adjust R2 to get 7.2v. At this step, I have put 2 ends of VOM at 2 points on the circuit to get 7.2v:
– point 1: Behind 1N5408 diode
– point 2: Behind 10k POT (GND)
is that right?
3. Adjust 10k preset and identify a position where RED led just lights up and GREEN led supposed to get illuminated.
4. Reconnect 100k resistor to pin 6 of the IC 741.
5. Connect 6V 4AH battery to charging (the voltage of the battery when not connected is 4.8v).
At the moment, I use VOM to measure amperage passing through battery is 20mA, too small compared to 4/10=0.4A=400mA.
Could you please help me know where I was wrong?
Hi SY, all the mentioned procedures are correct….now the moment you switch ON power with the batt connected, the 7.2V instantly should drop to the battery level at 4.8V, please check whether this is happening or not?
If this is happening next you can check the current by connecting ammeter in series with the battery positive line.
If it's 20mA as you say then either the battery is faulty or the LM338 is faulty…confirm the output current from the LM338 by connecting ammeter across its output and ground line…it must show the maximum available current as per the supply source rating….if not then do the same across the supply source terminals to confirm the current.
Sir why have u used a 470 ohm resistor in between the battery negative rail and the ground rail in the last circuit ( charger without using relay ) ?
Will it cause the continuation of charging even after the over charge cut off is detected since the current is enable to enter into the ground rail from the battery -ve through the 470 ohm resistor always ?
RT, it is optional, I have included it to enable trickle charging for the battery after the transistor has cut off at the full charge threshold. This is to make sure that the battery is always in the topped-up condition and to eliminate self-discharge
So, if I used TIP122, either I give lesser input current (1-2A) or 4A together with a cooling fan would do right ?
If I were to use TIP142, how to make a heatsink ? I am sorry sir since I am still a student and never learnt this term before. Can you suggest me the way to do it ? Thank you for always making my doubts clear 😀
Regards,
for a TIP122, exceeding 2 amp is not recommended, for a TIP142 you can use 4amp but the heatsink will need to be of high quality, as shown below:
static.rapidonline.com/catalogueimages/Product/S36-0272P01WM.jpg
but a hand made using aluminum sheet will also work, as shown below
1.bp.blogspot.com/-NTil4Qc1_vM/TvA7H8P5LyI/AAAAAAAAAaE/cE95Dt9H5AQ/s1600/to-220.png
Hello sir, Chaw is here again !! I want to clarify some of the facts with you in second diagram(using transistor).
(1) Since I wanted to have an input DC supply of 3-30V, I will use LM338 IC, 480ohm resistor(two 240 ohms in series) and 10k preset to have an output of 27V, calculated based on the calculator u have provided. Am I on the right track ?
(2) For the input current, let's say 1A is given, the battery terminals will receive the full charging current right ?
(3) May i know what is the use of 470 ohms resistor connected to the cathode of battery ? Any other value can I use (0.1k,1k,10k etc) ?
(4) Plus, Is there anything do I need to modify to the auto cut off part of the circuit according to my specs ?
(5) Instead of TIP122, can I use BC547 instead ?
Regards,
Hello Chaw, here are the answers:
1)If you have calculated the figures then it would be fine to go ahead with the mentioned values of the resistors and the port.
2) yes full 1amp would reach the battery.
3) It's for providing the battery with a floating or trickle charge current after it has reached the full charge level and the transistor has switched OFF
4) No need of modifying anything, but with a IC741 you cannot exceed the voltage above 19V across its pin#7 and pin#4
BC547 will be able to supply only upto 50mA…for 1amp you will have use a TIP 122 or a TIP142
Noted sir !! But LM741CN i bought from the market has a supply voltage from 10-36V. So I could apply up to 30V right ? By the way, I am going to charge 3.7V 4000 mAh lithium ion battery. I need to confirm with you that
(1) Before charging, 100k resistor is removed and I know that we need to give an input supply. Is this input voltage is three or five volt higher than the battery like the last time in 6V,12V battery charger circuit ? (for my case would be 6.7V )
(2) For the input current, is it possible to set at full rate 4000 mA ?
(3) There is no effect to TIP122 right ? My one has a DC collector current of 5A/
(3) An input current of five or ten time lesser than the battery is only for lead acid batteries right ?
Regards,
1) yes the input should be adjusted to achieve around 20% higher than the battery rating…meaning for example in case of a 12V batt it's 12 + 20% = 14.4V…this should be confirmed across the points where the battery needs to be connected.
2) input current can be 4 amps but that will generate some heat on the batt which will need to be monitored and controlled with a cooling fan.
3) TIP122 will get significantly hot at 4amps so TIP142 is recommended, which will also require a heatsink.
3) that's right 10 times less current is recommended for lead acid batts not for Li-ions.
Brother Swagatam!
can it charge for battery 5v?
yes brother it can be used for charging all batteries between 3V and 24V
Thank you so much Swagatam for your valuable share. As I am not an engineer but hobbyist and have enough Know-How about Arduino's and it's circuitry and using ESP8266 WiFi module a lot in my hobby projects. I have bunch of 4v 1 amp/hr lead acid batteries, lot of LM393, 5v dc wall supplies, TIP122 darlington transistors, bunch of IN4148, and off course capacitors and resistances. I want to build an automatic chargers to charge these batteries used in my hobby projects. May you suggest some design? I have few in my mind, including your this project, but want to seek help of a professional one like you. I don't want to buy automatic battery chargers available in market as they are more than what needed. May you help me?
Thank you Waqas, the above designs are the best and universally suited to all batteries for achieving automatic cut offs at the intended thresholds….so I would recommend you to go for one these circuits and try it for your application..
Hi Swagatham, thanks
I assembled 2nd circuit for charging 3.7v/800mah Li-Ion battery. Not yet tried hysterisis control and TIP122 section section.Circuit working perfect as you described.
I have a doubt to clear.
Input supply is 9v/500mah and charging supply is 4.2v/500mah. Battery rated 3.7v/800mah. So, I think I have to add a current limiting resistor (42v-3.7v/160mah=3.125ohms) 3ohm/1W series with battery to reduce charging current to 160mah (800mah/5=160mah).
Hi Anil, that's great.
Li-ion batts can be charged at their full 1C rate so current control won't be so crucial however in order to manage heat you can use a lower amount of current for charging it.
you can do it by adding a BC547 transistor stage with the LM317 as done for this circuit:
https://www.homemade-circuits.com/2012/04/how-to-make-solar-battery-charger.html
Hi bro. I want automatic circuit for my 6v 4ah battery which is connected with my wifi router and the source is the dc input of 9v which is the adapter of wifi. I want that 9v 2amp adapter is to charge mai battery when battery get charge then it can automatically stop further charging. Any idea pls
Bro you can try the first circuit from the following article:
https://www.homemade-circuits.com/2013/03/simple-dc-ups-circuit-for-modemrouter.html
use a 7.5V zener instead of the shown 14V for your battery.
hello sir i have confusion about +supply pin of ic741 in the circuit +supply go to pin 7 and 4 is ground but in other circuit +supply gose to pin 4 and 7 is ground
hello manjiinder, please provide the link of the other circuit
sir how to check the voltage at pin 6, it should be check at the anode of the zener diode or on its pin6 of the ic?
sir i try again to make this circuit with a new ic, as you have said a few days ago, the voltage at pin6 should be in 0v but in my reading the lowest voltage whenever i adjust the preset is proximately 2v but i connect the zener diode correctly. sir what do you thinks is the problem?
Check the voltage across pin6 and ground….and then across zener anode and ground, if both these voltages are same then probably your zener diode is faulty or is wrongly connected.
sir waht is the function of a 100kohms resistor across pin2 and pin6?
sir one more question, why did you used a 3v zener diode in series with the 10k resistor and that is connected at pin3?
and what is the function of a 470ohms resistor that is connected to negative terminal of the battery. sir please explained it to me so that i can understand more.
as explained above, it's for the setting up a reference point for the other pin.
the 470 will keep the battery charging continuously at a very low rate even after the actual charging is cut off…in order to prevent the batt from self discharging.
the 100k is for latching the IC in the cut off position so that it does not oscillate while the battery voltage drops slightly after the cut off
Can TIP 122 cutoff load up to 5A if not than suggest suitable alternate for 5A load Also can we have overload LED indicator with cutoff.
Use TIP142 for 5 amp and above. Connect a red LED across the 1 ohm resistor for overload indication, and connect a 1N4148 in series with the BC547 emitter associated with this resistor. Calculate the 1 ohm using the following formula:
R = 1.5 / max charging/discharging current
sir thank you for responding! i have read the article about the opamp. and i learned more about it.
sir the 10k resistor and a 3v zener diode juction in which the pin 3 is connected across it is a "REFERENCE VOLTAGE" if so, what voltage value or how much voltage is your ref voltage?
and if i am not mistaken the 10kpot preset is the sensing voltage. Meaning when the voltage across it falls or increase above the reference voltage the output at pin 6 will change to high state then it will be "on" the transistor TIP122.
Sir if i wrong please correct and guide me so that i can learn much about this circuit.
Angelous, you understood it correctly, an opamp output will always go high if its (+) input pin attains a higher potential than its (-) input pin, regardless of which pin may be connected as the reference.
The reference voltage can be any voltage below the actual supply voltage for the IC.
when the output is high tip122 will conduct and vice versa
sir can you explain on how this circuit operates please. what is the fuction of the tip122 it shoulbe in off state or on state?
Angelous, I think I have explained it somewhere in the above comment, if you search it you'll be able to find it. you can also read the following article, which uses the same principle but in the opposite way by using a PNP transistor, but the basic function of the opamp is exactly identical:
https://www.homemade-circuits.com/2013/10/low-battery-cut-off-with-indicator.html
sir, in this circuit i used a 9v rectified as supply in this charger circuit so it is okay to use 9v or to supply a 9v? cause as far as i know a 9v supply is good enough to charge a 6v and 4.5ah lead acid battery.
Angelous, 9v is OK, and will work correctly with the above explained design
well, thank you sir i will make it again and i really want to success with your circuit. sir could you please send me a link about on how 741ic works as comparator?
You can read the following article for knowing the details:
https://www.homemade-circuits.com/2012/03/how-to-use-ic-741-as-comparator.html
,
i have already make this circuit and i connected correctly all of the components based on the circuits above without using a relay when i connect the 6v bat and a 9v supply the green and red leds are glown.. it supposed to be the green led will glow first then when the bat is full the red led will glow…
Measure the voltage at pin6 with reference to ground, it must show zero volts or supply voltage depending on the 10k preset setting.
the red LED is glowing due to leakage voltage at pin6, but the 3V zener is supposed to stop this, make sure you have connected the zener at pin6 correctly.
I think I have explained the entire setting up procedure somewhere within the comments please search it and set the 10K preset accordingly.
SIR, AS YOU HAVE SAID, I HAVE ALREADY TRIED YOUR ADVISE BUT WHEN I CHECK THE VOLTAGE FROM THE PIN 6 OF THE IC741 WITH REFERENCE TO GROUND I JUST GOT READING APPROXIMATELY 2V.
SO SIR DO YOU HAVE ANY SUGGESTION REGARDING TO THIS ISSUE IF YOU DONT MIND? THE 10K PRESET WAS WORK WELL BECAUSE THE GREEN AND RED SWAP WHENEVER I ADJUST THE PRESET
SIR COULD PLEASE EXPLAIN ON HOW TO OPERATE THIS CIRCUIT SO THAT I CAN UNDERSTAND ON HOW TO TEST THIS CIRCUIT?
ONE MORE THING, WHEN I CONNECT THE BATTERY THE TRANSISTOR TIP122 HEATED UP. IS IT NORMAL SIR?
Angelous, did you you use the 3V zener diode at pin6, it's supposed to block this leakage 2V…or may be your IC is duplicate quality and faulty, change it with a good one and check again
use a big heatsink for the TIP122, to keep it cool…make sure that the transformer current rating is not over 1amp for the connected 4AH battery
sir i try to use a new ic but the same result what i have got.
sir, it should be set the pot preset at pin 6 to 0v first then you can charge your battery now? then when the battery being charge reach the reference voltage lets say the ref voltage is 7.2v then the red led will on and the green led should be in off state when the battery gets full charge?
Angelous, the 3V zener at pin6 is supposed to block the leakage voltage across pin6 and ground….if you wish you can use a preset also across pin6 and ground for the same but that can be risky and damage your IC if accidentally the preset is grounded while adjusting.
sir i think there is something wrong with your circuit because i have already made it base on your circuit diagram with the right components as your circuit indicates. please check it again and make some improvement.
thanks
sir if i am going to use less than 1 amp trafo well i think it is nough enough to charge a 4ah battery.
yes sir, i used 3v zener diode but still not 0v and i also try to replace that zener diode with a new one just to make sure but still there is a 2v output voltage at pin6.
Angelous, I have myself tested and used this circuit many number of times for different applications, and it worked perfectly….may be you are not able follow my instructions, and so not able to troubleshoot your circuit.
and if you keep trying without understanding you are never going to succeed with any circuit…so attempting after understanding the details is the most important thing.
sir what should be the resistance value of 10k potentiometer that is connected to pin2 of ic1 if im going to charge a 6v lead acid battery…
i have maked the circuit above but the two leds are glow.
Asalamo alaikum sir I need automatic 6 volt battery charging circuit with relay and 555 time ic plz send me circuit…
Sir what is the full voltage or fully charge voltage of a 6v 4.5ah battery?
it will be around 7.2V
Hello Swagatam,
Can i ask you for help for this circuit, please… i made the first one and i want to use it for 12V battery; the problem is, that when i'm adjusting the output voltage, and when it exceed 1.5V the relay is triggering, so the charging LED is lighting, and when i try to adjust the other pot – on the IC741, it is always flicking
PS
I used resistor R1 – 220 ohm, instead of 240 ohm;
and also i saw in the first coment, that initially, the pot under LM317 has been 2.2K
Hello Goran,
initially keep the preset slider arm towards ground, completely…so that the pin#3 of the opamp is at a zero potential.
Now adjust a 14.4V from the LM317 and slowly adjust the preset slider arm upwards until the red LED just lights up (green LED shuts off)
220 ohm is OK….
2.2k pot is not proper…it must be around 5k to 10k
Yes, initially the preset is giving 0.0V at pin#3, but adjusting the preset is just slightly increasing the light of the RED LED, and the relay is getting triggerd when i'm adjusting the output voltage, just when it exceed 1.5V;
Also the RED LED is always very slightly flickering, even when the preset is giving 0V at pn#3,
maybe some resistor must be bigger…?
No, everything's perfect in the circuit and the resistors don't matter much, even if you were to use 100k resistors at the input of the opamp, it would provide the same sequence of results.
make sure that you remove the feedback resistor across pin6 and pin3 while setting-up the pin3 preset.
did you include the zener at the output pin6 of the opamp?
there should be no battery connected while the setting up procedures are being carried out.
I wasn't removed the reedback resistor while setting up… so i did it with a swich, but there was no difference, because the voltage at pin#6 is always about 2.8 – 3V for 14.4V output;
what do you mean about the zener? i have it on the place, like on the circuit diagram;
yes, there's no battery while setting up;
But i have used C1 – 0.1uF ceramic? Maybe it must be electrolitic…?
that means your IC is faulty or you have done something wrong with the connections, the output pin6 must instantly turn equal to the supply voltage as soon as pin3 potential is pushed just above pin2 potential….this will happen while you adjust the preset….but if that's not happening indicates that something's not right in the assembly.
C1 is not relevant here….so it doesn't make any difference what you have used.
I remade the circuit entirely from the beginning, but it's happening the following:
1 – when the voltage exceed ~2.3V the relay is triggering
2 – the voltage at pin#3 is 0V but at pin#6 it is not the same, but about 2.6 (which i think is because of the 3V zener…)
3 – at the situation of "2" the both LEDs are lighting equally, and when the input voltage (at pin#3) exceed ~2.3V the voltage is jumping to about 9V at the both input and output, and afterwards it's increasing while adjusting… but in that very moment the RED-Batt Full LED starts shining stronger, and the GREEN LED shines slower
4 – all the time the relay is triggered and the LEDs are lighting, no matter of the brightness
I didn't understand what happened, but in one moment the IC exploded along with the input C1, as the last one set on fire, so i wanted to ask you, do you have that circuit made and all working properly…?
All these indicate that your IC is duplicate or of poor quality….with pin3 grounded the voltage at pin6 should be not more than 1V or max 1.5V (leakage volts)
the 3V zener is introduced to block the pin6 leakage voltage from reaching the BC547 base, it won't create the volts as you are assuming.
did you remove the 10k feedback resistor across pin6/pin3, while adjusting the 10k preset??? it needs to be removed and later on reconnected
and under no circumstances the IC can explode unless the pin7 voltage is increased above 22V
please go through all the comments above to get a better idea regarding the procedures.
you can try using a small boost converter and step up the 5V to 7V,
try the following concept:
https://www.homemade-circuits.com/2012/09/led-emergency-light-circuit-using-boost.html
Hi swagatam, thanks very much for posting these circuits. I want to ask 2 questions about your second circuit.
1) Can i charge a 6V 6.8Ah battery from this circuit? Any modifications?
2) What is the function of the 10K potentiometer used at the right side of the battery with op amp. How much should i adjust both the potentiometers to charge 6V 6.8Ah battery
Thanks in advance
Hi Muhammed, yes you can charge the mentioned battery, just adjust the LM338 pot and ensure a 7V across the battery terminals without connecting any battery.
the 10k preset is for adjusting and setting the cut off threshold at the battery full charge level, set this such that the green lights up and red led shuts off at 7V across the battery terminals
Hi Swagatam,
Could you please explain the purpose of the transistor on the op-amp output ?
Kind regards
Louis
Hi Swagatam,
I am looking to build the second of the two circuits you listed above. Going through the list of explanations you provided in the comments I think I have a fair understanding of how it works, except for the tip122 on the output of the op-amp. Could you please explain what the purpose is of this component ?
Kind regards
Louis
Hi Louis,
TIP122 acts like a switch, it remains switched ON and connects the negative of the battery with the negative supply line as long as the battery is charging and is below the full charge mark…it switches OFF the negative line to the battery the moment it reaches the full charge,
Thank you very much sir for the above circuit it works perfectly for me.I need one more feature on the above circuit because the above circuit didn't cutoff the load when the battery voltage is to low this will affect the life of a battery.please say any idea that battery should be automatically isolated from the load when battery voltage is to low.I am waiting for your reply sir.
Hi Vijay,
the above two circuits will never allow the connected battery to go below a predetermined level (as set by the value of the feedback resistor from pin6 to pin#3)…as soon as a low battery is detected the circuit will revert and begin the charging process for the battery
OK sir.my supply voltage is from solar panel.during night if the voltage from a panel is to low the charging process get stopped on such period of time my battery voltage reaches to low it will affect the life time of battery .can u get my point sir????.pls suggest an idea for me.thanks for your reply sir
Vijay, remove the LM338 output diode and connect in the manner shown in the following article:
https://www.homemade-circuits.com/2012/02/how-to-build-automatic-6-volt-12-volt.html
this will solve the issue of the battery getting discharged through the 10k presets.
SIR, INSTEAD OF CAPACITOR 0.1UF WHICH OTHER CAN I USE
thank you sir
you can use any capacitor there, even if you don't use it won't matter…
which smps circuit did you use? Is the circuit present in this site, if so please provide me with the link.
Hello Sir, I have built the 2nd circuit again but I am facing one problem. When ever I vary the 10k preset the light shifts position but the other LED glows dimly. For example if red LED is glowing brightly then green is glowing dimly vice versa.
I interchanged the position of the resistor (100 ohm) and zener at pin 6 and placed LED junction in between them as you have instructed earlier, but it is not working. Is there any other modification I can do?
Sir I have successfully implemented the second circuit. Additionally I have made a bridge rectifier with the charger circuit to connect it with the source. Here is the picture,
https://drive.google.com/file/d/0ByOP1BiJWDUaRjNNb1R2dDZkWEk/view?usp=sharing
However I have one problem when I vary the 10k pot the red light doesn't completely turn off but glows very dimly. How can I solve this problem?
thanks for the image Dipto,
remove the 3V zener from the transistor base and change its position by connecting its cathode directly with pin6 of the IC and the anode with the junction of the two LEDs and the transistor base resistor.
Sir, I have followed the procedure you have mentioned the red LED is turned off indeed however the green LED always stays on even after varying the 10k pot.
One thing I did in the original circuit was connecting a 10k resistor is series with red LED (between red LED and 1K resistor) and the red LED seemed to be almost turned off. So it is okay if attach a 10k resistor with red LED?
Dipto, the procedure is given as under:
disconnect the feedback persist which comes from pin6 of the IC temporarily.
without any battery connected, set the output to 7V
now adjust the pin2 10k preset until the green LED just lights up.
seal the setting with glue.
reconnect the 10k resistor between pin6 and pin2.
the setting is done!
if you have done the zener modification as suggested by me, then a single resistor with each LED will be enough….do not manipulate in any other way.
….the word "persist" is a typo it was meant to be resistor
Sir, after shifting the position of the zener diode as per your suggestion the problem seems to be gone now. The LEDs are swapping without any issues now. I have also implemented the first circuit using relay and attached a solar panel it is also working as well. Here are some pictures,
https://drive.google.com/file/d/0ByOP1BiJWDUab2k5UGotTWtBYm8/view?usp=sharing
https://drive.google.com/file/d/0ByOP1BiJWDUaMVpWaWRDR2V0Smc/view?usp=sharing
https://drive.google.com/file/d/0ByOP1BiJWDUaZGRQekk3OTdFMmc/view?usp=sharing
Thanks, That's great Dipto,
I'll make sure the images get updated in the above article soon…
Hi Dipto,
Can you please share corrected circuit digram for “circuit#2(without relay)”.
I am trying to build it from past 1 week still no sucess.
Muzzamil, I have tested this circuit and it has worked perfectly for me. By the way did you understand the working of the circuit? if you do it without understanding the stages properly, you will keep getting failures, because you can never troubleshoot your faults.
However, the current transfer that you may get from relay contacts cannot be achieved from a transistor.
Hello Dipto, please go through the previous…..
Hello sir, i have two questions,
1) Can I use a 10w 6v solar panel to charge this battery? If so what would be the current rating?
2) Can this battery charger be combined with this circuit mentioned in the link below?
https://www.homemade-circuits.com/2012/09/automatic-inverter-supply-and-mains.html
Hello Dipto, for charging a 6V batt you will need at least an input of 9V in the above circuit, so probably a 9V or a12V panel may be required.
yes it can be used in conjunction with the referred changeover circuit….
thanks you sir for your quick reply. I will be doing my final year project & your blog is helping me a lot.
another question I have sir,
what should be the current rating of the solar panel? and how long will it take to charge the battery 6V 4.5AH with a 10W 12V solar panel?
withe the given solar/batt specs it could take around 6 to 8 hours for the battery to get fully charged
current rating of the panel may be calculated as follows:
10/12 = 0.833 amps
you can try a readymade 12V smps 1amp adapter, and regulate the output using an LM317 circuit…that would be much clean and easy.
use a good heatsink for the LM317
Sir,I need to charge a 11.1 volt 2200 mah lion battery, i have read your above reviews and understand that i will have to use a 14-15 vdc source. I am not too sure about the Current rating of the dc source, should be be around 250 ma(1/10 of the mah) or how much more? as there would be current draw from the circuit itself. thanks and warm regards
Hi Richard, I might have missed your comment, so I am replying it now, for Li-ion you can use a current source that may be equal to the batt AH rating, therefore in your case you can charge it at the the rate 2.2 amps.
Sir swatagam,
what are the modification to be done i the circuit to charge a 12vdc 100ah deep cycle battery?
Joevil, you can make use of the first circuit, upgrade the relay to handle 10amps and also replace LM317 with LM396…that's all.
Thank you so much for this great circuit, I always like to build your circuit.
Pls am having problem here getting TIP 122 pls can I use BC transistor or Mosfet instead of TIP122, if yes which BC or mosfet can I use?
Thanks so much
thanks kolley,
BC series will not work….
you can try a mosfet, the specs will depend on the battery AH rating…
Thanks so much, you are indeed angel sent from heaven to solve human electronic hobbyist problem, more grease to your elbow.
Sir , am having problem getting TIP122 pls can I replace it with BC or mosfet? If yes which BC or mosfet can I use? Thanks in advance
thanks kolley,
what's BC?
you can try a mosfet, the specs will depend on the battery AH rating…
Dear sir
I have 6v 4a battery which I use for a toy car
problem is the adapter broken and I got a adapter 6v1
Will it work?
Dear Mashal, it should be at least 6.5 to 7V for charging a 6V battery, 6.1 will not be good.
Hello sir, is the 2 IN4007 and r470 connect to + batt? And if relay cut off they still connect?
Hello Sumantri,
yes, it's to keep the battery trickle charged even after cut-off.
you can eliminate the 470 ohms if you don't want this to happen.
Is that r 470 and two diodes connect with + battery? And if relay cut off they still connect?
Hello Swagatham thanks for your help, I believe i can use the same for charging 12V battery. with suitable corrections of resistors?? Thanks for your great help
Regards
Yeshwanth kumar J
Yes surely you can do that Yashwanth….you are welcome.
Dada,
If we use LM324 in place of IC741 and 4.7V Zener then do we have to change any components in the 2nd Circuit.
Tanmoy, no changes would be required if a LM324 is used, you can use the same configuration.
Hi
I want 9v input instead of 12 v what changes i need pls help
you can use the same circuit for 9V input, no changes would be required.
Can you please show me the exact link of the emergency light, I will try to figure out the whole design
please clear the confusion, 2nd design tip122 transistor emiter and collector are joined to 470R resistor with ground,i think collector should go to positive. what is the purpose to use 3v zener at the base of tip122?
if i want to use 2nd circuit to charge cellphone battery (3.7v,800mah) with USB power source, what modification should be done?
the TIP122 connection is correct, rest assured.
It will be difficult to explain all the modifications for a USB 3.7 charger, because there are many changes to be done.
I'll post the compete design in my blog and provide you with the link soon.
yes will do!
hello, i tested the ckt some month ago. after that i was an accident and do not finished. now i again test. but something is wrong. when i switch on the power of ur ckt my relay is energized and green led is lit. i bought new 6V 4.5A battery and connect to the ckt. but my battery do not charge. plz give some advice to me. i use 3.3v 1w zener diode.
Without any battery connected the input voltage should be 7V, at this voltage first adjust the 10k preset such that the relay just cut-off or deactivates.
Once this is done, then connect the battery and switch ON power, now the relay will not activate until the battery is charged.
While adjusting the 10k preset remember to keep the pin6 10k resistor disconnected…..connect it back after the adjustment is finished.
Sir
I am interested to make a battery charger for 12 volt battery.But when I went shops to get parts they could not understand relay for 12 volt battery charging.What specifications like any series number should i tell so that I can get it
Thanking you
P Ramamurthi
Hello Ramamurthi,
please tell them to give you a 12V, 10amp relay, preferably a PCB mount type and made by O/E/N.
see the black dot….it means it connects the LEDs links and also pin6 together
hello sir,
what modification should be made in the circuit if 3v zener is replaced with 3.3v zener.
hello Seelamsetti,
no modifications would be required, you can use any zener between 3 and 9V.
sir i wnt 2 make a solar chrge controler of 6v nd 5amp which circuirt should i use it plz let m guide it???
hey dear nice circuit but im not understand 10k pot use? or not
it's for adjusting the over charge cut-of threshold level of the battery
…use a bridge rectifier and a 2200uF/25V for the filtering the DC.
you can use a 12v/750mA trafo…
Don't modify the cell phone charger, use a power supply with an output of at least 7V and current 1 Amp.
yes it will.
It means your opamp is faulty or there's some other kind of mistake, because altering the 10K preset should certainly make the relay flip.
I think it would be better if you refer and learn how an opamp functions, it will help you to troubleshoot the issue immediately from the core. there are many online sources dealing with this subject
By the way did you remove the feed back 10k resistor while doing the testing, it is important otherwise the relay will not respond properly.
The relay N/C contact connects with the diodes, diode should be a rectifier diode rated at least at 1amp, any type will do.
try using a boost charger circuit as shown in article:
https://www.homemade-circuits.com/2013/03/how-to-convert-12v-dc-to-220v-ac-using.html
the coil will need to be modified appropriately.
1) It's due to parasitic leakage from the IC output, it can be corrected in the following manner.
Swap the positions of the transistor base resistor and the zener, next shift the LED joint in between the resistor and the zener, this will clean up the issue.
2)The relay contacts can be seen connected with the battery positive, so as soon as it activates the battery gets disconnected from the supply at the full charge conditions.
Ideally it should 7V @500mA
Thank you very much for you very useful information. But can you please tell me which circuit should I built for my case ? the first one or the second one ?
And Kindly please tell me which presets I should change to charge 3v & 4v batteries ?
I understand that I can use the Nokia charger to power the circuit to charge the 3v & 4v batteries, but in this case I need any parts change on the circuit ?
Waiting for your information.
B. Regards,
MD
You can try the second circuit.
No change in parts would be required.
Hi,
I am sure this circuit is very good. But I need your help here. This circuit is for 6v 4ah battery but I have 6v 4.5ah (1) battery. and I also have 4v 3ah (1) and 3v 2ah (1) total 3 batteries that I bought few days ago.
Please help me build charger for the battery 6v 4.5ah battery. and also please tell me can I use Nokia charger (5v 350 ma) for two of my other batteries directly to charge?
I will be very happy if you help me.
Regards,
MD
Hi,
You can use the above circuit for charging all the three batteries that you have bought by suitably adjusting the given presets in the circuit.
You can use the 5v charger supply with the above explained circuit for charging the 3V batteries.
I'm awaiting your helpful feedback.
Dear Sir,
As per your instruction I have repeat the
previews adjustment, first adjust 2K2 POT
for required output charging voltage & swap
the 10k variable resistor with successfully
Green LED on and shut off red but not fully
off with slide lighting . but could not
charging when connect negative voltage from
TIP 122 (Collector). after input negative
voltage connect to battery terminal & it
charging to battery with heat to LM 317.
please help me to find-out the problems.
for your information I have attached picture
file of circuit.
1. How to off & on TIP 122 transistor with
which voltage need to done this job?
2. please explain the function of base
Zaner diode of TIP 122 transistor?
Below the voltage status of circuit
Input voltage 11.94 with 5A
output regulated voltage 7.77 after adjusting the 2.2k variable.
IC PIN 2 voltage =7.77
IC pin 3 voltage =7.08
IC pin 6 voltage =2.17 after swap the 10k
variable & before swap 10kV voltage was V6.74
TIP122 Base voltage after swap 10k variable
140 mV and 0.657V before swap the 10k
Variable.
Thanks & Regards
Tanvir Ahmed
Bangladesh
facebook.com/cse.tanvir
Dear Tanvir,
You have done just the opposite of what was required to be done.
Without connecting any battery, set the 2k2 pot for the required output, next adjust the 10k preset to just switch ON the RED LED.
After this switch off the circuit, connect the battery, and switch ON power. Now you will find red LED switched OFF and the green LED coming ON…once the battery gets fully charged, the RED will again switch ON indicating that the battery is charged and disconnected.
While setting 10K preset remember to disconnect the 100k feed back resistor….connect it back after the setting is done.
….the input current must be rated at 1/10th of the battery AH, otherwise the above procedures will not work.