When an inverter with square wave AC output is modified to generate a crude sinewave AC output, it is called a modified sine wave inverter.
The following article presents 7 interesting modified sine wave inverter designs with exhaustive descriptions regarding its construction procedure, circuit diagram, waveform output and detailed parts lists. The designs are intended for learning and building experimental projects by engineers and students.
Here I have explained different varieties of modified designs ranging from a modest 100 watt to a massive 3 Kva power output model.
How Modified Inverters Work
Folks who are new to electronics may get a bit confused regarding the difference between a square wave and a modified square wave inverter. It may be understood through the following brief explanation:
As we all know an inverter will always generate an alternating current (AC) similar to our domestic AC line voltage so that it can replace it during power failures. An AC in simple words is basically a rise and fall of voltage of a particular magnitude.
However, ideally this AC is supposed to as close as possible to a sinewave as shown below:

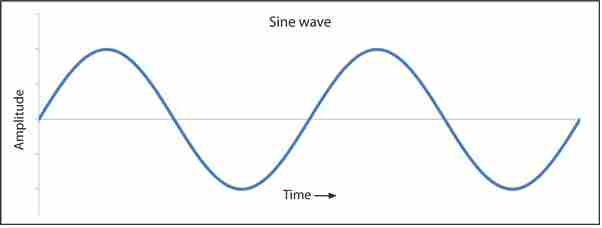
Basic Difference between Sine waveform and Square Waveform
This rise and fall of voltage happens at a particular rate i.e. at a particular number of times per second, known as its frequency. So for example a 50 Hz AC means 50 cycles or 50 ups and downs of a particular voltage in one second.
In a sine wave AC as found in our normal domestic mains outlet the above rise and fall of voltage is in the form of a sinusoidal curve, i.e. its pattern gradually varies with time and thus is not sudden or abrupt. Such smooth transitions in the AC waveform becomes very suitable and a recommended type of supply for the many common electronic gadgets like TVs , music systems , Refrigerators, motors etc.
However, in a square wave pattern the voltage ups and downs are instant and sudden. Such immediate rise and fall of potential creates sharp spikes at the edges of each wave and thus becomes very undesirable and unsuitable for sophisticated electronic equipment. Therefore it is always dangerous to operate them through a Square weave inverter supply.
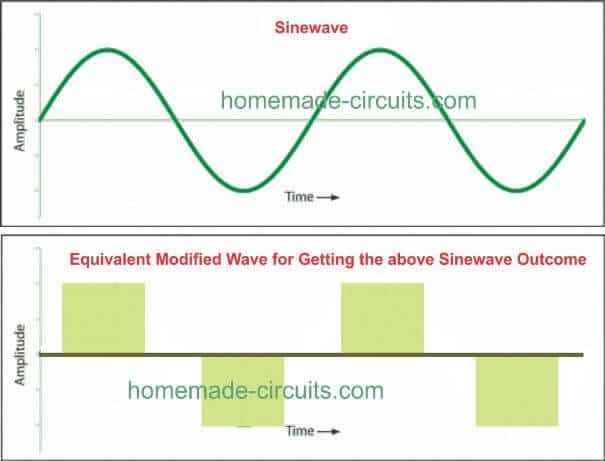
Modified Waveform
In a modified square wave design as shown above, the square waveform shape basically remains the same but the size of each section of the wave-form is appropriately dimensioned so that its average value matches closely to an AC waveform’s average value.
As you can see there's a proportionate amount of gap or null areas between each square blocks, these gaps ultimately help to shape up these square waves into sinewave like output (albeit crudely).
And what is responsible for adjusting these dimensioned square waves into sinewave like features? Well, it is the inherent characteristic of the transformer's magnetic induction which effectively carve the "dead time" transitions between the square wave blocks into a sinewave looking waves, as shown below:
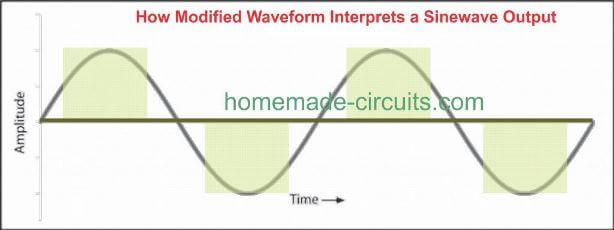
In all the 7 designs I have explained below we try to implement this theory and ensure that the RMS value of the square waves are appropriate controlled by chopping the 330V peaks into 220V modified RMS. The same can be applied for 120V AC by chopping down the 160 peaks.
How to Calculate through Easy Formulas
If you are interested to know how to calculate the above modified waveform so that it results in an almost ideal replication of a sinewave, then please refer to the following post for the complete tutorial:
Calculate Modified Square Wave RMS Sine Equivalent Value
Design#1: Using IC 4017
Let's investigate the first modified inverter design which is rather simple and uses a single IC 4017 for processing the required modified waveform.
If you are looking for an easy to build modified sine wave power inverter circuit, then perhaps the following concept will interest you. It looks astonishingly simple and low cost with an output that’s to a very extent is comparable with other more sophisticated sine wave counterparts.
We know that when a clock input is applied to its pin #14, the IC produces a shifting cycle logic high pulses through its 10 output pins.
Looking at the circuit diagram we find that the pin outs of the IC are terminated to supply the base of the output transistors such that they conduct after every alternate output pulse from the IC.
This happens simply because the bases of the transistors are connected alternately to the IC pin outs and the intermediate pin-out connections are just eliminated or kept open.
The transformer windings which are connected to the transistor’s collector respond to the alternate transistor switching and produce a stepped up AC at its output having a waveform exactly as shown in the diagram.
The output of this Modified sine wave power inverter is although not quite comparable to the output of a pure sine wave inverter but definitely will be far better than that of an ordinary square wave inverter. Moreover the idea is very easy and cheap to build.
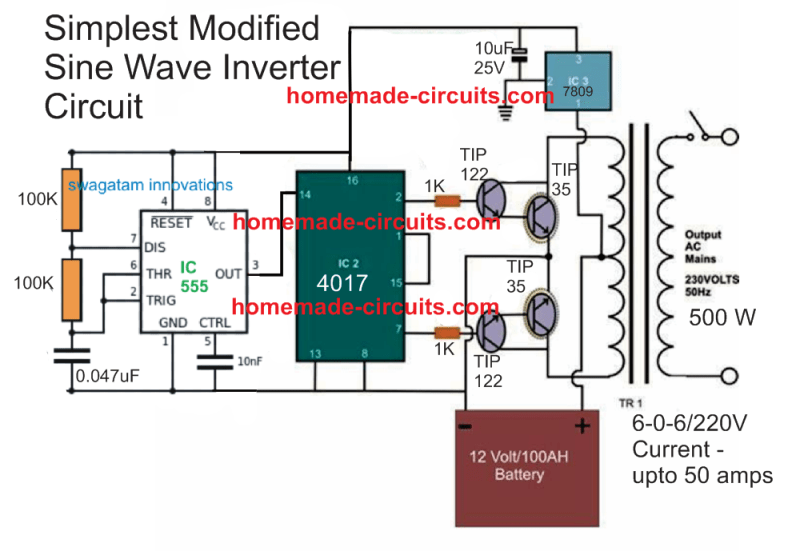
WARNING: PLEASE CONNECT PROTECTION DIODES ACROSS THE COLLECTOR EMITTER OF THE TIP35 TRANSISTOR (CATHODE TO COLLECTOR, ANODE TO EMITTER)
UPDATE: As per the Calculations presented in the this article, the IC 4017 output pins could be ideally configured for achieving an impressive looking modified sinewave inverter.
The modified image can be witnessed below:
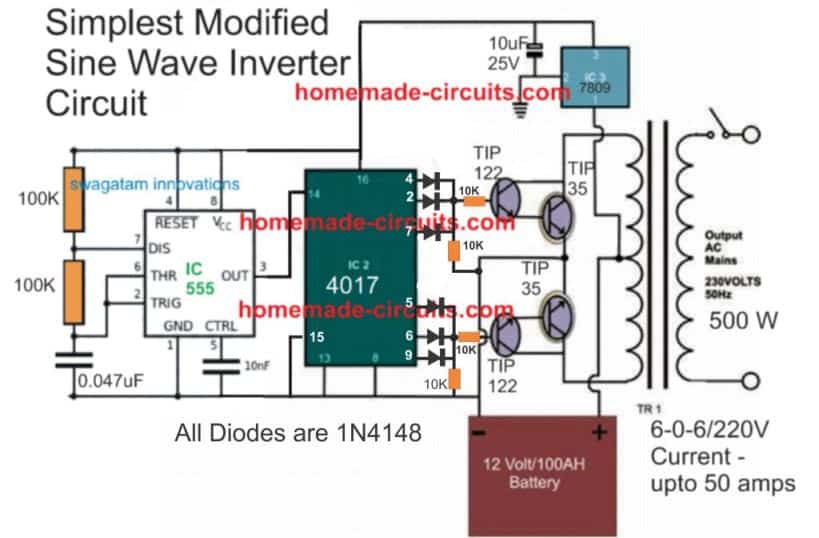
WARNING: PLEASE CONNECT PROTECTION DIODES ACROSS THE COLLECTOR EMITTER OF THE TIP35 TRANSISTOR (CATHODE TO COLLECTOR, ANODE TO EMITTER)
A MOSFET version of the above design can be witnessed in the following diagram. Using MOSFETs IRF3205 can allow the inverter to handle above 400 watts.
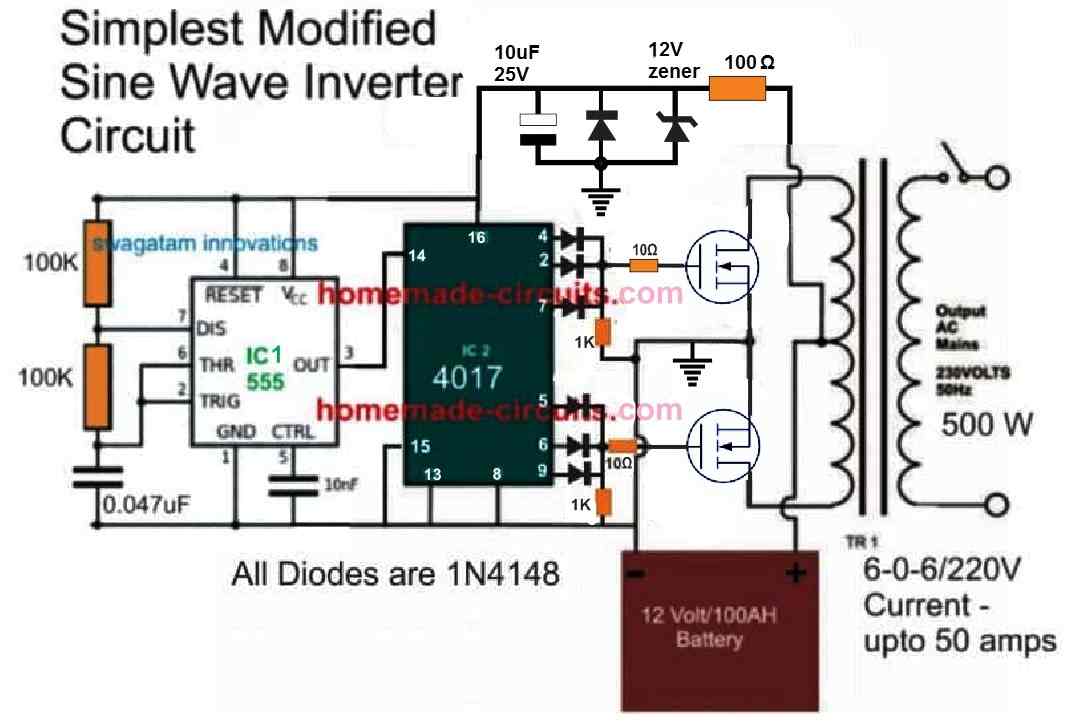
Video Demo:
Minimum Specifications
- Input: 12V from Lead Acid Battery, for example 12V 7Ah battery
- Output: 220V or 120V depending on transformer rating
- Waveform : Modified sinewave
Feedback from one of the dedicated viewers of this blog, Ms Sarah
Hello Swagatam,
This is what I obtained from the output of IC2 post resistors R4 and R5. As I earlier said I expected to have a bipolar wave. One in positive and the other in negative . to simulate an ac wave cycle. I hope this picture will help. I need a way forward please.
Thanks
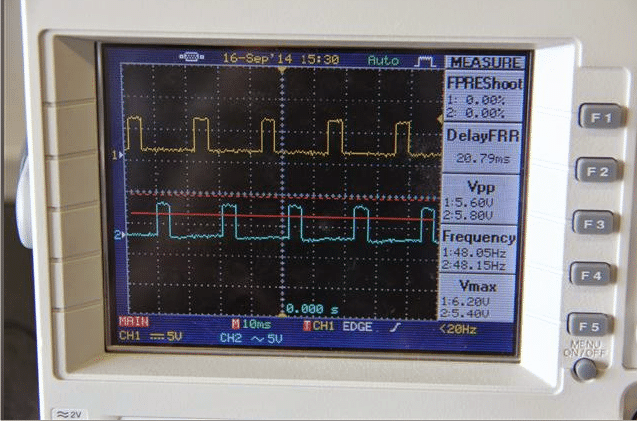
My Reply:
Hello Sarah,
The IC outputs will not show bipolar waves since the signals from these outputs are intended for identical N type transistors and from a single supply....it's the transformer which is responsible for creating the bipolar wave at its output since it's configured with a push-pull topology using a center tap ....so what you are seeing across R4 and R5 are correct waveform. Please check the waveform at the output of the transformer for verifying the bipolar nature of the waveform.
Design#2: Using NOT Gates
This second in the list is a unique modified sine wave inverter concept also designed me. The entire unit along with the oscillator stage and the output stage can be easily built by any electronic enthusiast at home. The present designed will be easily able to support 500 VA of output load.
Let's try to understand the circuit functioning in details:
The Oscillator Stage:
Looking at the circuit diagram above, we see a clever circuit design comprising both, the oscillator as well as the PWM optimization feature included.
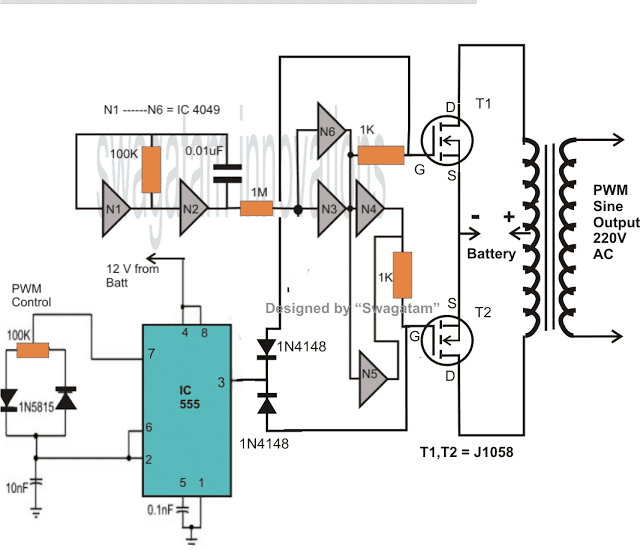
Here, the gates N1 and N2 are wired up as an oscillator, which primarily generates perfectly uniform square wave pulses at its output. The frequency is set by adjusting values of the associated 100K and the 0.01 uF capacitor. In this design it is fixed at the rate of around 50 Hz. The values can be altered appropriately for getting a 60 Hz output.
The output from the oscillator is fed to the buffer stage consisting of four parallel and alternately arranged NOT gates. The buffers are used for sustaining perfect pulses and for avoiding degradation.
The output from the buffer is applied to the driver stages, where the two high-power darlington transistors take the responsibility of amplifying the received pulses, so that it can be finally fed to the output stage of this 500 VA inverter design.
Until this point the frequency is just an ordinary square wave. However the introduction of the IC 555 stage entirely changes the scenario.
The IC 555 and its associated components are configured as a simple PWM generator. The mark-space ratio of the PWM can be discretely adjusted with the help of the pot 100K.
The PWM output is integrated to the output of the oscillator stage via a diode. This arrangement makes sure that the generated square wave pulses are broken into pieces or chopped as per the setting of the PWM pulses.
This helps in reducing the total RMS value of the square wave pulses and optimize them as close as possible to a sine wave RMS value.
The pulses generated at the bases of the driver transistors are thus perfectly modified to resemble sine wave forms technically.
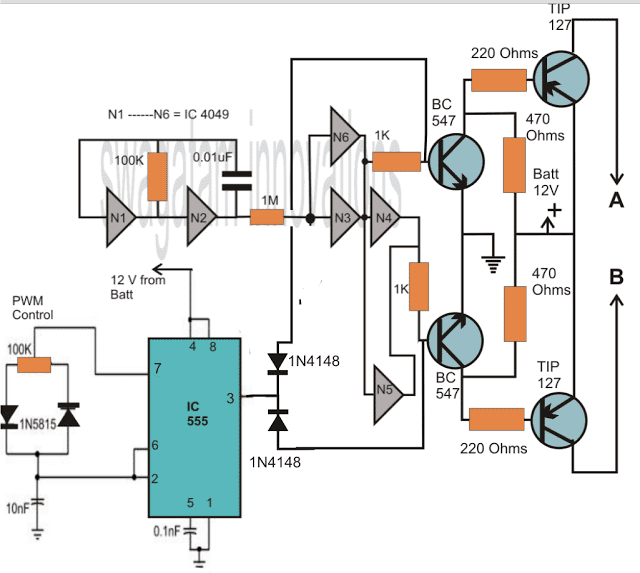
The Output Stage:
The output stage is quite straight forward in its design. The two winding of the transformer are configured to the two individual channels, consisting of banks of power transistors.
The power transistors at both the limbs are arranged in parallel to increase the overall current through the winding so as to produce the desired 500 watts of power.
However to restrict thermal runaway situations with the parallel connections, the transistors are connected with a low value, high wattage wire wound resistor at their emitters. This inhibits any single transistor from getting over loaded and fall into the above situation.
The bases of the assembly are integrated to the driver stage discussed in the previous section.
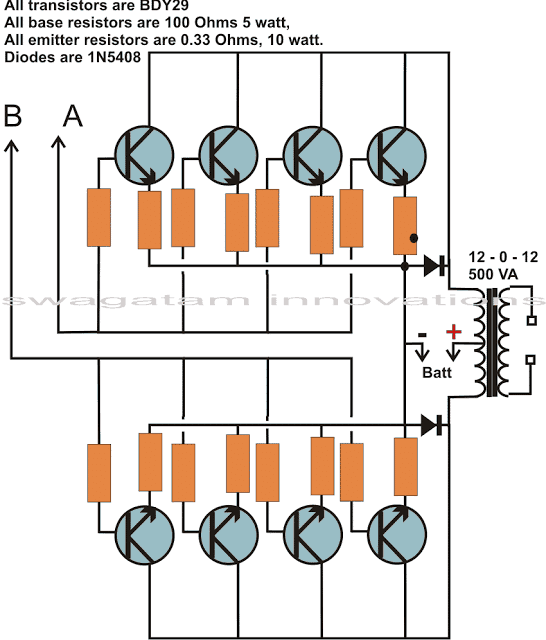
The battery is connected across the center tap and the ground of the transformer and also to the relevant points in the circuit.
Switching ON power immediately starts the inverter, providing rich modified sine wave AC at its output, ready to be used with any load upto 500 VA.
The component details are supplied in the diagram itself.
The above design can also be modified into a 500 watt PWM controlled mosfet sine wave inverter by replacing the driver transistors simply by a few mosfets. The design shown below would provide about 150 watts of power, for obtaining 500 watts, more number of mosfets may be required to be connected in parallel with the existing two mosfets.
Design#3: using a 4093 IC for the Modified Results
The PWM controlled modified sine wave inverter circuit presented below is our 3rd contender, it uses just a single 4093 for the specified functions.
The IC consists of four NAND gates, out of which two are wired up as oscillators while the remaining two as buffers.
The oscillators are integrated in such a way that the high frequency from one of the oscillators interacts with the output of the other, generating chopped square waves whose RMS value can be well optimized to match the regular sine waveforms.Inverter designs are not always easy to understand or build, especially so when it's as complex as modified sine wave types. However the concept discussed here utilizes just a single IC 4093 for handling all the required complications. I have explained how simple it is to build.
Parts you will Ned to Build this 200 Watt Inverter Circuit
All Resistors are 1/4 watt, 5 %, unless otherwise specified.
- R1 = 1 M for 50 Hz and 830 K for 60 Hz
- R2 = 1 K,
- R3 = 1 M,
- R4 = 1 K,
- R5, R8, R9 = 470 Ohms,
- R6, R7 = 100 Ohms, 5 Watt,
- VR 1 = 100 K,
- C1, C2 = 0.022 uF, Ceramic Disc,
- C3 = 0.1, disc ceramic
- T1, T4 = TIP 122
- T3, T2 = BDY 29,
- N1, N2, N3, N4 = IC 4093,
- D1, D1, D4, D5 = 1N4007,
- D3, D2 = 1N5408,
- Transformer = 12 -0 – 12 volts, current from 2 to 20 Amps as desired, output voltage can be 120 or 230 volts as per country specifications.
- Battery = 12 volts, typically a 32 AH type, as used in cars is recommended.
Circuit Operation
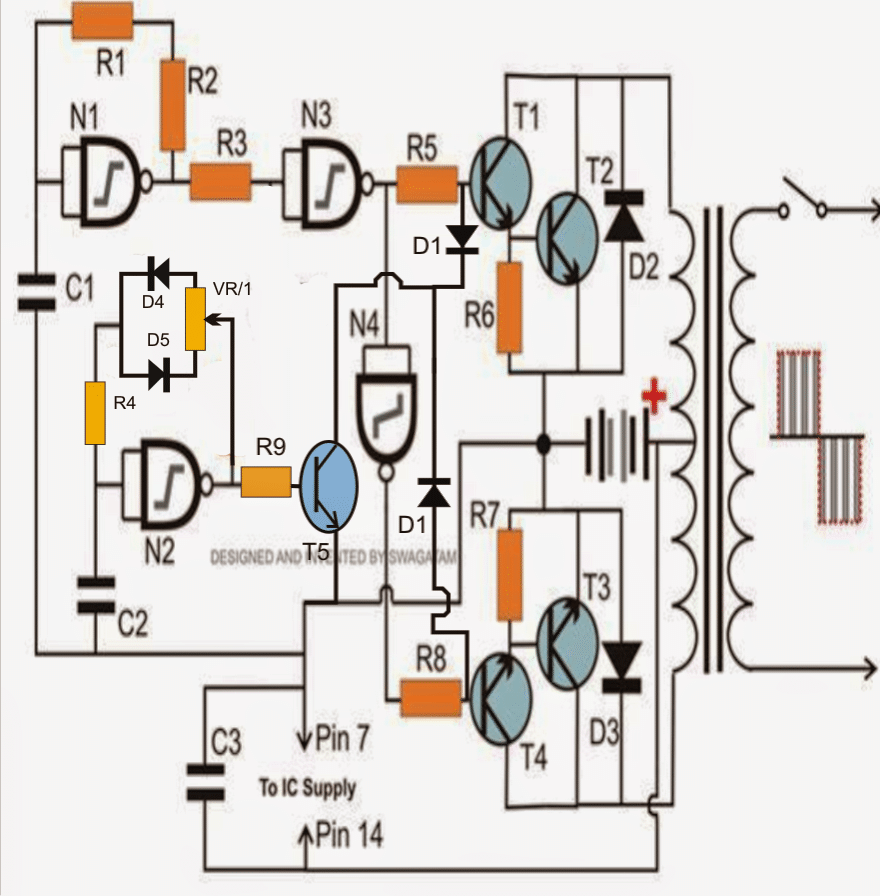
The proposed design of a 200 watt modified sine wave inverter obtains its modified output by discretely “cutting” the basic square wave pulses into smaller sections of rectangular pulses. The function resembles to a PWM control, commonly associated with IC 555.
However, here the duty cycles cannot be varied separately and is kept equal throughout the available variation range. The limitation does not affect the PWM function by much, since here we are only concerned in keeping the RMS value of the output close to its sine wave counter, which is executed satisfactory through the existing configuration.
Referring to the circuit diagram, we can see that the entire electronics hovers around a single active part – the IC 4093.
It consists of four individual NAND Schmitt gates, all of them have been engaged for the required functions.
N1 along with R1, R2 and C1 forms a classic CMOS Schmitt trgger type of oscillator where the gate is typically configured as an inverter or a NOT gate.
The pulses generated from this oscillator stage are square waves which forms the basic driving pulses of the circuit. N3 and N4 are wired up as buffers and are used for driving the output devices in tandem.
However these are ordinary square wave pulses and do not constitute the modified version of the system.
We can easily use the above pulses solely for driving our inverter, but the result would be an ordinary square wave inverter, not suitable for operating sophisticated electronic gadgets.
The reason behind this is that, square waves may differ greatly from the sine waveforms, especially as far as their RMS values are concerned.
Therefore, the idea is to modify the generated square waveforms so that its RMS value closely matches with a sine waveform. To do this we need to dimension the individual square waveforms through some external intervention.
The section comprising N2, along with the other associated parts C2, R4 and VR1, forms another similar oscillator like N1. However this oscillator produces higher frequencies which are tall rectangular shaped.
The rectangular output from N2 is fed to the basic input source of N3. The positive trains of pulses have no effect on the source input pulses due to the presence of D1 which blocks the positive outputs from N2.
However, the negative pulses are allowed by D1 and these effectively sink the relevant sections of the basic source frequency, creating kind of rectangular notches in them at regular intervals depending upon the frequency of the oscillator set by VR1.
These notches or rather the rectangular pulses from N2 can be optimized as desired by adjusting VR1.
The above operation cuts the basic square wave from N1 into discrete narrow sections, lowering the average RMS of the waveforms. It is advised that the setting is done with the help of a RMS meter.
The output devices switch the relevant transformer windings in response to these dimensioned pulses and produce corresponding high voltage switched waveforms at the output winding.
The result is a voltage which is quite equivalent to a sine wave quality and is safe for operating all types of household electrical equipment.
The inverter power may be increased from 200 watts to 500 watts or as desired simply by adding more numbers of T1, T2, R5, R6 and T3, T4, R7, R8 in parallel over the relevant points.
Salient Features of the Inverter
The circuit is truly efficient and moreover it is a modified sine wave version which makes it outstanding in its own respect.
The circuit utilizes very ordinary, easy to procure types of components and is also very cheap to build.
The modifying process of the square waves into sine waves can be done by varying a single potentiometer or rather a preset, which makes the operations pretty simple.
The concept is very basic yet offers high power outputs which may be optimized as per ones own needs just by adding a few more number of output devices in parallel and by replacing the battery and the transformer with the relevant sizes.
Design#4: Fully Transistor Based Modified Sinewave
A very interesting circuit of a modified sine wave inverter is discussed in this article which incorporates just ordinary transistors for the proposed implementations.
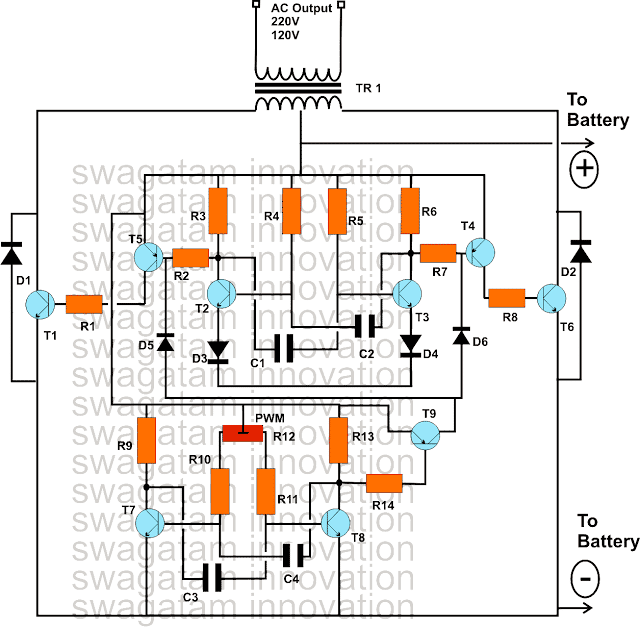
The use of transistors typically makes the circuit easier to understand and more friendly with the new electronic enthusiasts. The inclusion of a PWM control in the circuit makes the design very efficient and desirable as far as operations of sophisticated appliances are concerned at the inverter output.The circuit diagram shows how the entire circuit is laid down. We can clearly see that only transistors have been involved and yet the circuit can be made to produce well-dimensioned PWM controlled waveform for generating the required modified sinew waveforms or rather modified square waves to be more precise.
The whole concept may be understood by studying the circuit with the help of the following points:
Astable as the Oscillators
Basically we can witness two identical stages which are wired up in the standard astable multivibrator configuration.
Being astable in nature the configurations are specifically intended for generating free running pulses or square wave at their respective outputs.
However the upper AMV stage is positioned for generating the normal 50 Hz (or 60 Hz) square waves which are used for operating the transformer and for the required inverter actions, in order to get the desired AC mains power at the output.
Therefore there’s nothing too serious or interesting about the upper stage, typically it consists a central AMV stage consisting of T2, T3, next comes the driver stage consisting of the transistors T4, T5 and finally the receiving output stages consisting of the T1 and T6.
How the Output Stage Works
The output stage drives the transformer via the battery power for the desired inverter actions.
The above stage is only responsible for carrying out the generation of the square wave pulses that’s imperatively required for the intended normal inverting actions.
The PWM Chopper AMV Stage
The circuit at the lower half is the section which actually does the sine wave modifications by switching the upper AMV according to its PWM settings.
Precisely, the upper AMV stage’s pulse shape is controlled by the lower AMV circuit and it implements the square wave modification by chopping the basic square inverter square waves from the upper AMV into discrete sections.
The above chopping or dimensioning is executed and defined by the setting of the preset R12.
R12 is used for adjusting the mark space ratio of the pulses generated by the lower AMV.
According to these PWM pulses, the basic square wave from the upper AMV is chopped into sections and the average RMS value of the generated waveform is optimized as close as possible to a standard sine waveform.
The remaining explanation regarding the circuit is pretty ordinary and may be done by following the standard practice that’s normally employed while building invertes, or for that matter, my other related article may be referred for acquiring the relevant information.
Parts List
- R1, R8 = 15 Ohms, 10 WATTS,
- R2, R7 = 330 OHMS, 1 WATT,
- R3, R6, R9, R13, R14 = 470 OHMS ½ WATTS,
- R4, R5 = 39K
- R10, R11 = 10K,
- R12 = 10K PRESET,
- C1-----C4 = 0.33Uf,
- D1, D2 =1N5402,
- D3, D4 = 1N40007
- T2, T3, T7, T8= 8050,
- T9 = 8550
- T5, T4 = TIP 127
- T1, T6 = BDY29
- TRANSFORMER = 12-0-12V, 20 AMP.
- T1, T6, T5, T4 SHOULD BE MOUNTED OVER SUITABLE HEATSINK.
- BATTERY = 12V, 30AH
Design#5: Digital Modified Inverter Circuit
This 5th design of a classic modified inverter is yet another design developed by me, although it's a modified sine wave, it can also be referred as a digital sine wave inverter circuit.
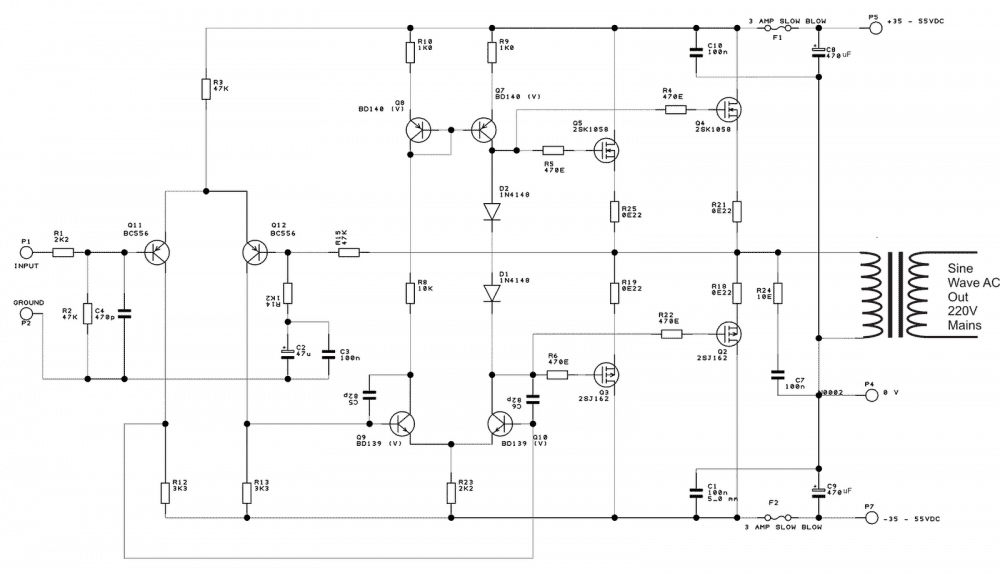
The concept is again inspired from a mosfet based powerful audio amplifier design.
Looking at the main power amp design we can see that basically it's a 250 watt powerful audio amp, modified for an inverter application.
All the stages involved are actually for enabling a frequency response of 20 to 100kHz, though here we won't need such high degree of frequency response, I didn't eliminate any of the stages as it wouldn't do any harm to the circuit.
The first stage consisting of the BC556 transistors is the differential amplifier stage, next comes the well balanced driver stage consisting of the BD140/BD139 transistors and finally it's the output stage which is made up of the powerful mosfets.
The output from the mosfets are connected to a power transformer for the required inverter operations.
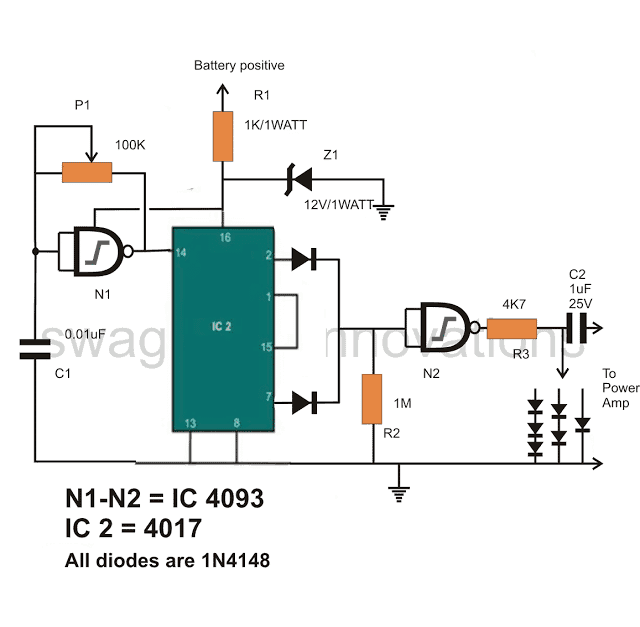
This completes the power amp stage, however this stage requires a well dimensioned input, rather a PWM input which would ultimately help to create the proposed digital sine wave inverter circuit design.
The Oscillator Stage
The next CIRCUIT DIAGRAM shows a simple oscillator stage which has been suitable optimized for providing adjustable PWM controlled outputs.
The IC 4017 becomes the main part of the circuit and generates square waves which very closely matches the RMS value of a standard AC signal.
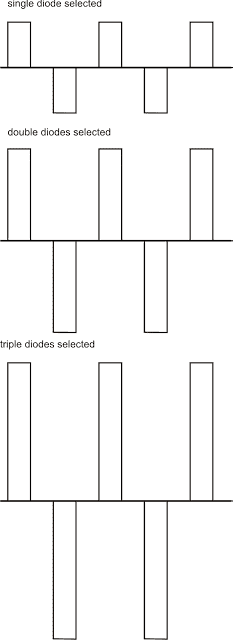
However for precise adjustments, the output from the IC 4017 has been provided with discrete voltage adjustment level facility using a a few 1N4148 diodes.
One of the diodes at the output may be selected for reducing the amplitude of the output signal which would ultimately help in adjusting the RMS level of the transformer output.
The clock frequency which must be adjusted to 50Hz or 60Hz as per the requirements is generated by a single gate from the IC 4093.
P1 can be set for producing the above required frequency.
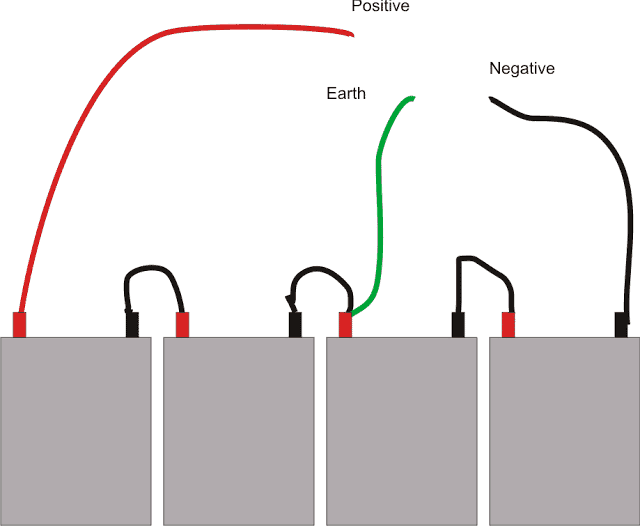
For getting a 48-0-48volts, use 4 nos. 24V/2AH batteries in series, as shown in the last figure.
Power Inverter Circuit
Sine Wave Equivalent Oscillator Circuit
The figure below shows various waveforms outputs as per the selection of the number of diodes at the output of the oscillator stage, the waveforms may have different relevant RMS values, which must be carefully selected for feding the power inverter circuit.
If you have any problems understanding the above circuits, please feel free to comment and inquire.
Design#6: using only 3 IC 555
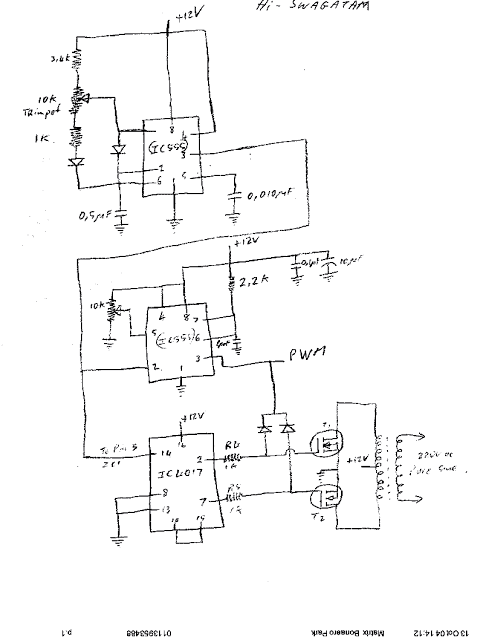
The following section discusses the 6th best modified sine wave inverter circuit with waveform images, confirming the credibility of the design. The concept was designed by me, the waveform being confirmed and submitted by Mr. Robin Peter.
The discussed concept was designed and presented in a few of my previously published posts: 300 watt sine wave inverter circuit, and 556 inverter circuit however since the waveform were not confirmed by me the relevant circuits weren't completely foolproof.Now it's been tested, and waveform verified by Mr. Robin Peter, the procedure revealed one hidden flaw in the design which has been hopefully sorted out here.
Let's go through the following email conversation between me and Mr. Robin Peter.
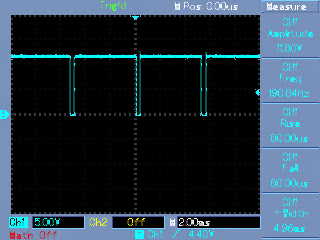
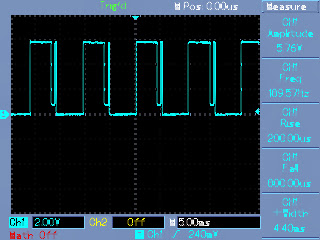
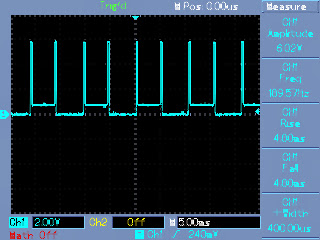
I built the simpler modified sine wave alternative version IC555's,with no transistor. I changed some of the values of the resistors and caps and did not use[D1 2v7,BC557,R3 470ohm]
I joined Pin2&7 of IC 4017 together to get the required waveform. IC1 produces the 200hz 90% duty cycle pulses(1 image), which clock IC2 (2-images) and therefore IC3(2 images, min duty cycle & max D/C)Are these the expected results, My concern is that it is a modified sine where you can vary the
RMS,not a pure sine
Regards
Robin
Hi Robin,
Your modified sine wave circuit diagram looks correct but the waveform isn't, I think we'll need to use a separate oscillator stage for clocking the 4017 with frequency fixed at 200Hz, and increase the frequency of the topmost 555 IC to many kHz, then check the waveform.Regards.
Hi Swagatam
I have attached a new circuit schematic with the changes you suggested along with the resultant wave forms.What do you think of the PWM waveform,the pulses don't seem to go all the way down to ground
level.
Regards
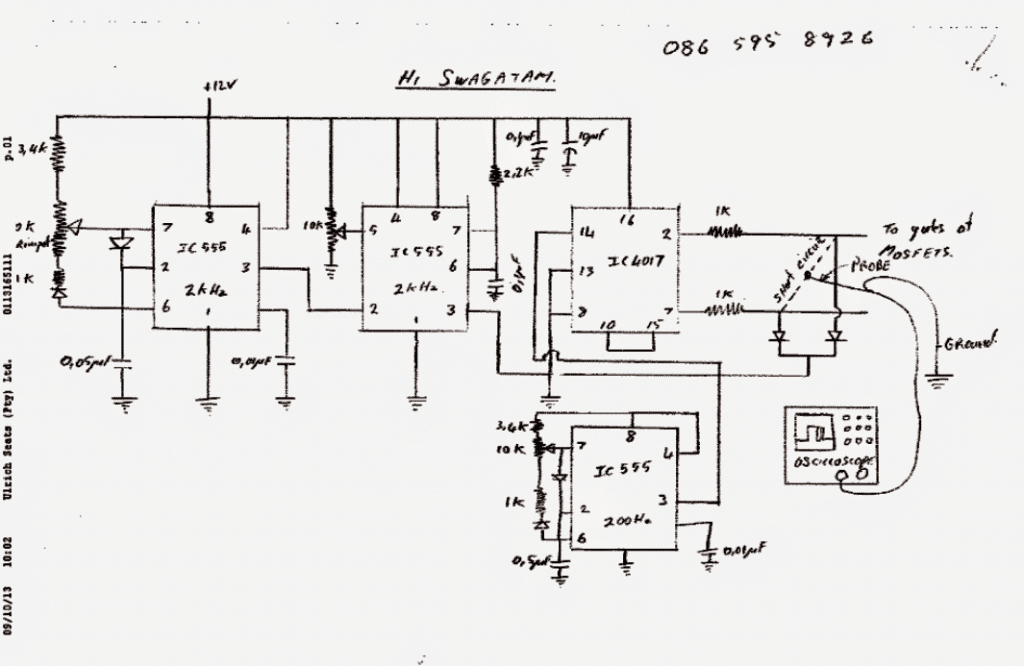
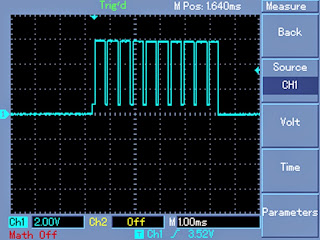
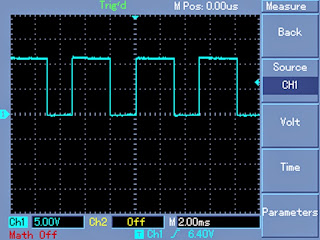
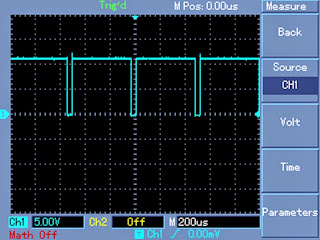
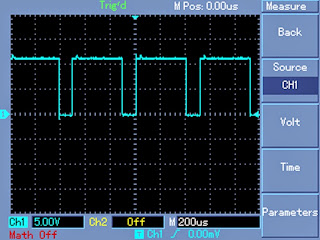
Hi Robin,
That's great, exactly what i was expecting, so it means a separate astable for the middle IC 555 must be employed for the intended results....by the way did you vary the RMS preset and check the waveforms, please do update by doing so.
So now it looks much better and you can go ahead with the inverter design by connecting the mosfets.
....it's not reaching the ground due to the diode 0.6V drop, I assume....Thanks very much
Actually a much easier circuit with similar results as above can be built as discussed in this post:https://www.homemade-circuits.com/2013/04/how-to-modify-square-wave-inverter-into.html
More Updates from Mr. Robin
Hi Swagatam
I varied the RMS preset and here are the attached waveforms.I would like to ask you what amplitude of triangle wave can you apply to pin 5,and how would you synchronise it so that when pin 2 or 7 go + the peak is in the middle
regards Robin
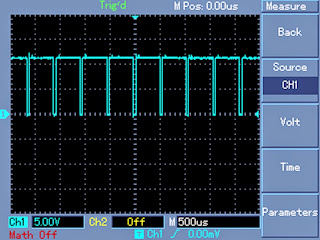
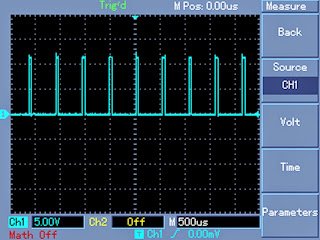
Here's some better modified sine waveform, maybe the guy's will understand them easier. It's up to you whether you publish them.
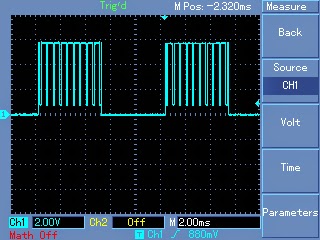
By the way i took a 10uf cap from pin2 to 10k resistor to .47uf cap to ground.And the triangular wave looked like this(attatched).Not too triangular,7v p-p.
I will investigate the 4047 option
cheers Robin
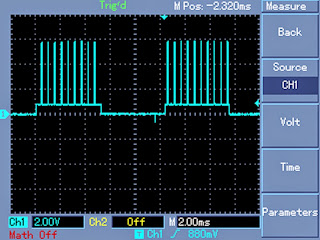
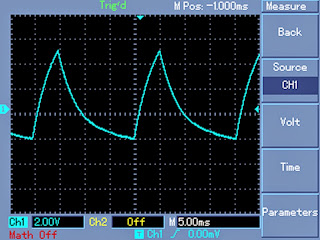
Output Waveform across Transformer Mains Output (220V)The following images show the various waveform images taken from across the output mains winding of the transformer.
Courtesy - Robin Peter
No PWM, no Load
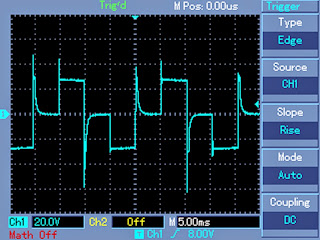
No PWM, with load
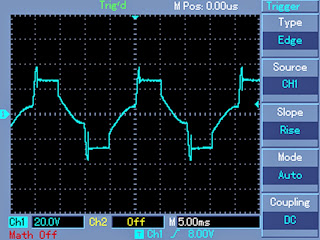
With PWM, without load
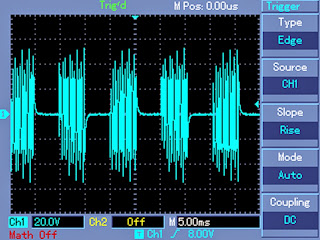
With PWM, with load
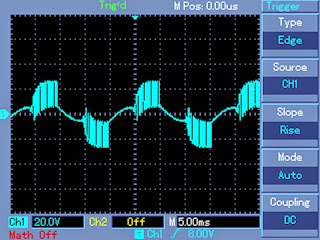
The above image magnified
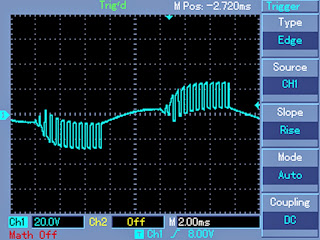
The above waveform images looked somewhat distorted and not quite like sinewaves. Adding a 0.45uF/400V capacitor across the output drastically improved the results, as can be witnessed from the following images.
Without load, with PWM ON, capacitor 0.45uF/400v added
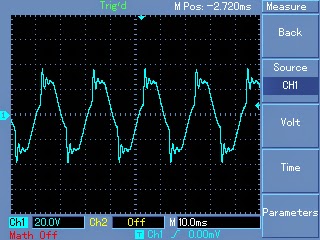
With PWM, with load, and with an output capacitor, this looks very much like an authentic sinewaveform.
All the above verification and testing were conducted by Mr. Robin Peters.
More Reports from Mr. Robin
Ok,I did some more testing and experimenting last night and found that if I increase the batt voltage to 24v the sinewave did not distort when I increased the duty/cycle.( ok,I've regained my confidence)I added that 2200uf cap between c/tapp and ground but that made no difference to the output waveform.
I noticed a few things that were taking place,as I increased the D/C the trafo makes a noisy humming sound(as if a relay is vibrating back and forth very quickly),The IRFZ44N's get hot very quickly even with no loadWhen I remove the cap there seems to be less stress on the system.The humming noise is not so bad and the Z44n's don't get so hot.[of course no sinewave}
The cap is across the output of the trafo not in series with one leg. I took (3 different windings) round inductors{I think they are toriodal} out of a switch-mode power supply.The result was no improvement in the output wave(no change),
The trafo output voltage also dropped.
Adding an automatic load correction feature to the above modified sine wave inverter circuit idea:
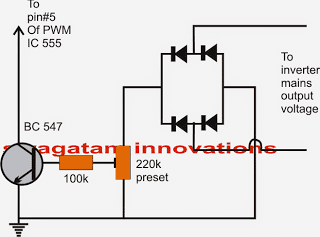
The above shown simple ad-on circuit can be used for enabling automatic voltage correction of the inverter output.
The fed voltage across the bridge is rectified and applied to the base of the NPN transistor. The preset is adjusted such that at no load the output voltage gets settled at the specified normal level.
To be more precise, initially the above preset should be kept at the ground level so that the transistor says switched OFF.
Next, the 10k RMS preset at pin#5 of the PWM 555 IC should be adjusted to generate around 300V at the transformer output.
Finally, the load correction 220K preset should be realigned to bring down the voltage to may be around 230V mark.
Done! Hopefully the above adjustments would be enough for setting up the circuit for the intended automatic load corrections.
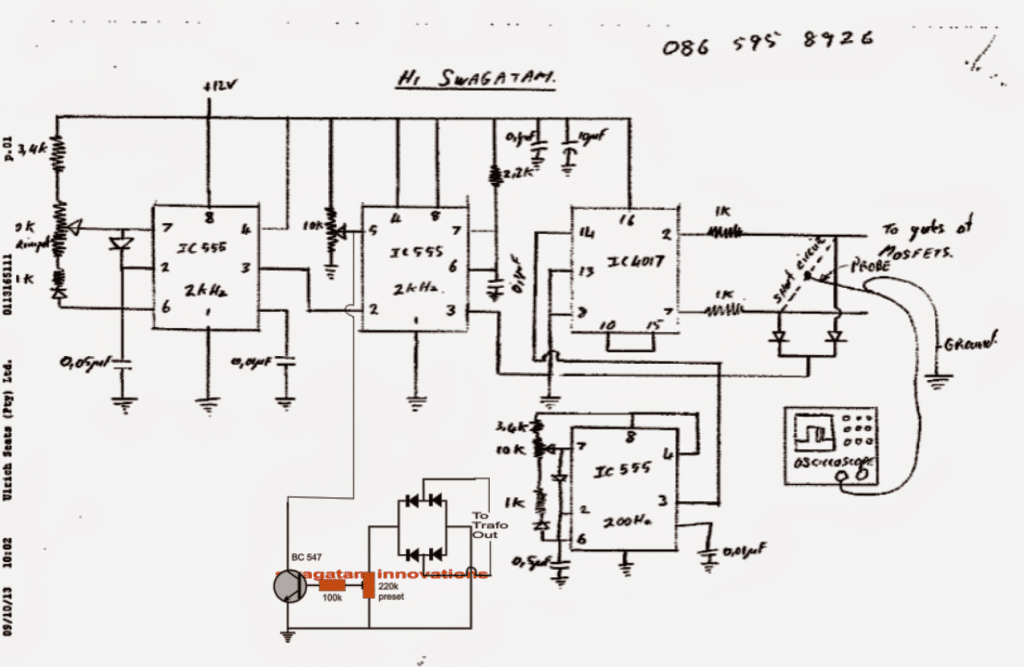
The final design might look like this:
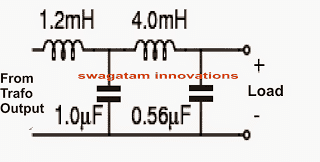
Filter Circuit
The following filter circuit can be employed at the output of the above inveter for controlling Harmonics and for enhancing a cleaner sinewave output
More Inputs:
The above design was studied and further improved by Mr Theofanakis, who is also an avid reader of this blog.
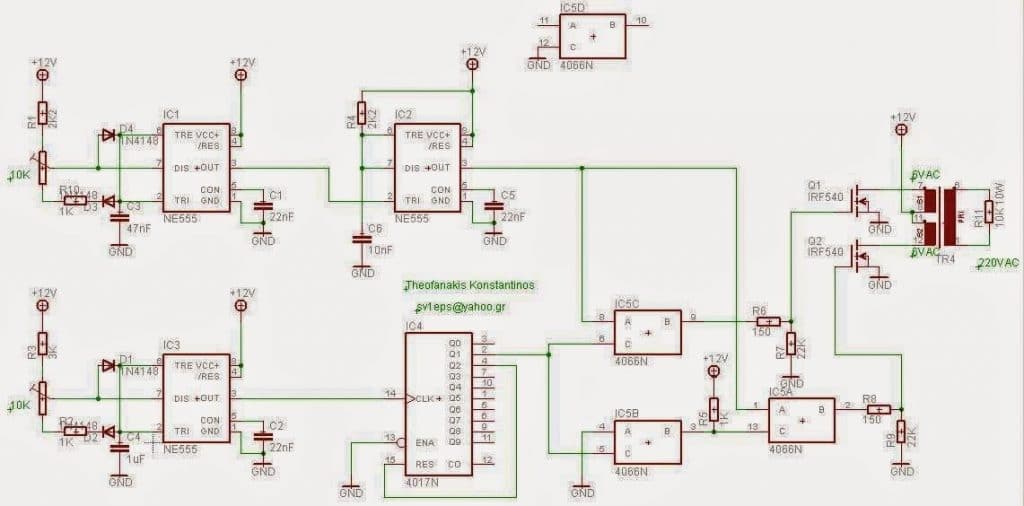
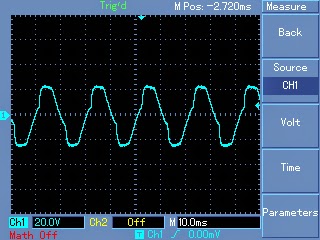
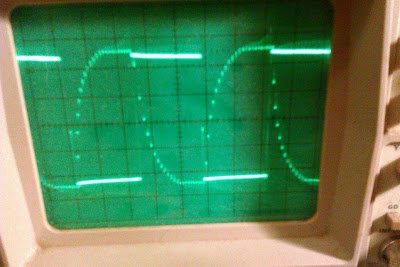
The oscilloscope trace depicts the modified waveform of the inverter across the 10k resistor connected at the mains output of the transformer.
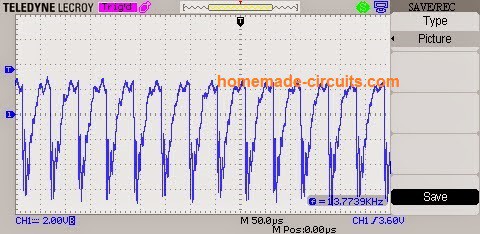
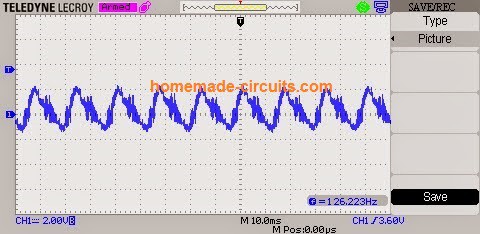
The above modified inverter design by Theofanakis inverter was tested and approved by one of the avid followers of this blog, Mr. Odon. The following test images by Odon confirm the sinewave nature of the above inverter circuit.
Design#7: Heavy Duty 3Kva Modified Inverter Design
The below explained content investigates a 3kva sine wave inverter circuit prototype made by Mr. Marcelin using only BJTs instead of the conventional mosfets. The PWM control circuit was designed by me.
In one of my previous posts I have explained a 555 pure sine wave equivalent inverter circuit, which was collectively designed by Mr.Marcelin and me.
How the Circuit was Built
In this design I have used strong cables to sustain the high currents, I used sections of 70 mm2, or more smaller sections in parallel. 3 KVA transformer is actually as solid weighs 35 kg. Dimensions and volume is not a drawback for me. Photos attached to the transformer and installation in progress.
The following assembly nearing completion, based on the 555 (SA 555) and CD 4017
On my first try, with mosfets, earlier this year, I used IRL 1404 which Vdss is 40 volts. In my opinion insufficient voltage. It would be better to use mosfets with a Vdss at least equal to or greater than 250 volts.
In this new installation, I foresee two diodes on the transformer windings.
There will also be a fan for cooling.
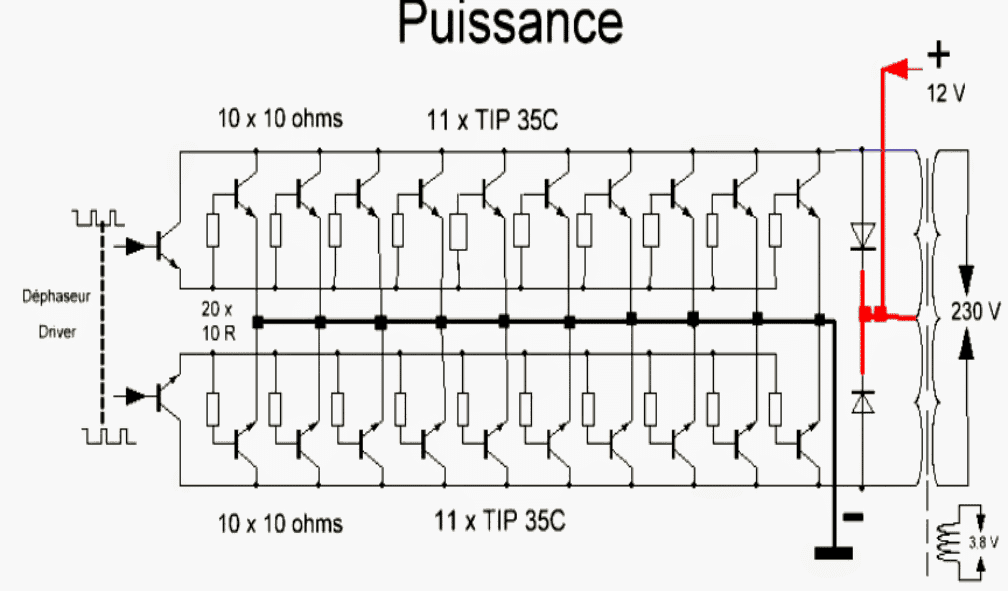
TIP 35 will be mounted by 10 in each branch, like this:
Complete Prototype Images
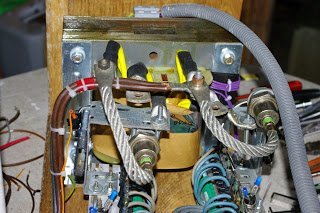
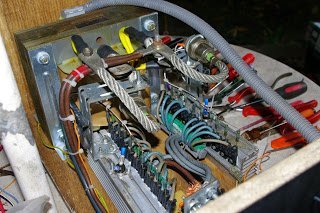
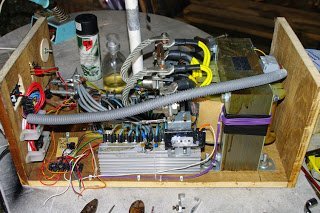
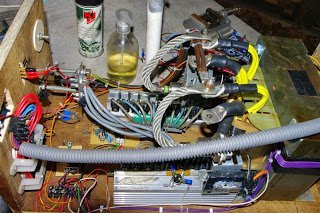
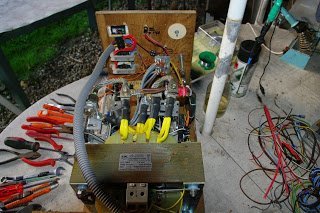
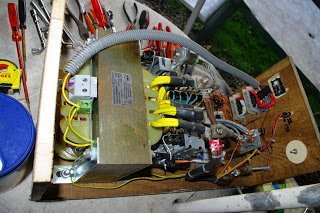
Finalized 3 KVA Inverter Circuit
The final circuit design of the 3 kva modified sine wave inverter should look like this:
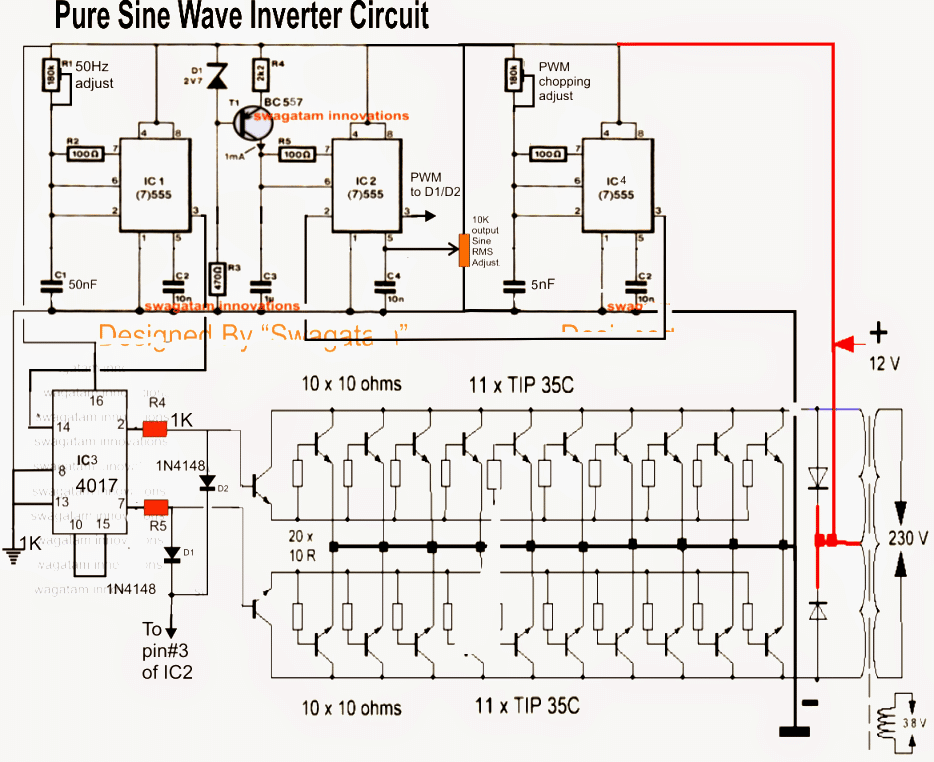
Parts List
All resistors are 1/4 watt 5%, unless specified.
- 100 Ohms - 2nos (value can be between 100 ohm and 1K)
- 1K - 2nos
- 470 ohms - 1no (can be any value upto 1K)
- 2K2 - 1nos (slightly higher value will also work)
- 180K preset - 2nos (any value between 200K and 330K will work)
- 10K preset - 1no (please 1k preset instead for better outcome)
- 10 Ohm 5 watt - 29nos
Capacitors
- 10nF - 2nos
- 5nF - 1no
- 50nF - 1no
- 1uF/25V - 1no
Semiconductors
- 2.7V zener diode - 1no (upto 4.7V can be used)
- 1N4148 - 2nos
- 6A4 diode - 2nos (near transformer)
- IC NE555 - 3 nos
- IC 4017 - 1no
- TIP142 - 2nos
- TIP35C - 20 nos
- Transformer 9-0-9V 350 amps or 48-0-48V / 60 amps
- Battery 12V / 3000 Ah, or 48V 600 Ah
If 48V supply is used then make sure to regulate it to 12V for the IC stages, and supply the 48V only to center tap of the transformer.
How to Safeguard the Transistors
Note: In order to safeguard the transistors from a thermal runaway, mount the individual channels over common heatsinks, meaning use a long single finned heatsink for the upper transistor array, and another similar single common heatsink for the lower transistor array.
Mica isolation would be fortunately not required since the collectors are joined together, and the body being the collector would get effectively connected through the heatsink itself. This would actually save a lot of hard work.
In order to obtain maximum power efficiency, the following output stage is recommended by me, and must be employed with the above explained PWM and 4017 stages.
Circuit Diagram
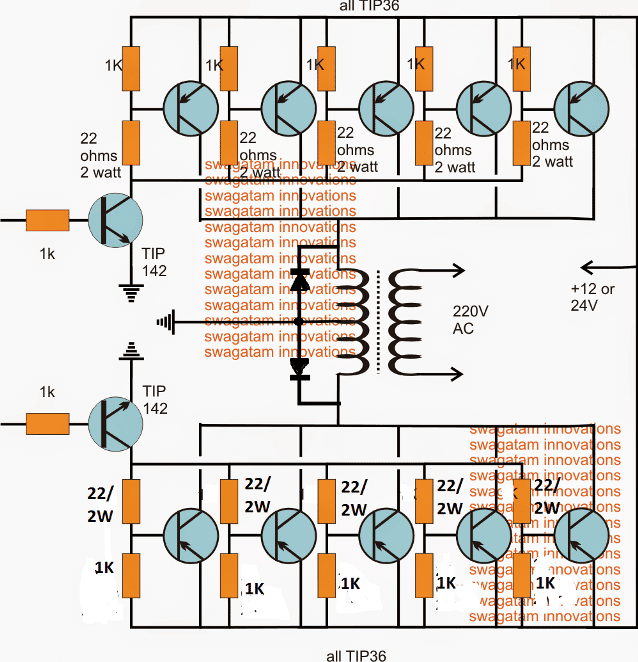
Note: Mount all the upper TIP36 over a larger finned common heatsink, DO NOT use mica isolator while implementing this.
The same must be done with the lower TIP36 arrays.
But make sure these two heatsinks never touch each other.
The TIP142 transistors must be mounted on separate individual large finned hearsinks.
since you like to design and help I ask you to help me in the design of a feedback for inverter the design needs to amplify the voltage amplitude without cycle modification or the time the wave has to remain original with comparator for voltage correction and automatic regulation.
The feedback cannot boost the output voltage, it can only regulate it to a fixed level, but only as long as the battery is not low, or the load is not an overload.
You can refer to the second concept presented in the following article:
https://www.homemade-circuits.com/load-independentoutput-corrected/
Thank you very much for your contributions, they have helped me a lot to understand certain aspects that have marked a great path.
You are most welcome Pablo, appreciate your kind feedback….
hello sir the voltage correction I need is for 4047 sine wave inverter system
Sure, you can try the second design from the following article:
https://www.homemade-circuits.com/load-independentoutput-corrected/
hello sir,,how do I build a feedback system for any diy inverter,,,cus the output of all I’ve built tends to get to 380v on no or less loads cus I’m using ups transformer ……I’m afraid to plug my TV,,,it even blew my phone charger.
Hi Ken, you can try implementing the second circuit design from the following article:
https://www.homemade-circuits.com/load-independentoutput-corrected/
hello i was wondering is it possible to use an inverter for 120v dc to 240v ac
if so can you guide me with a circuit diagram
Hi, I think you can try the following design. Just make sure to replace the MOSFETs with 400 V MOSFETs, and the transformer with a 120-0-120V (primary) transformer: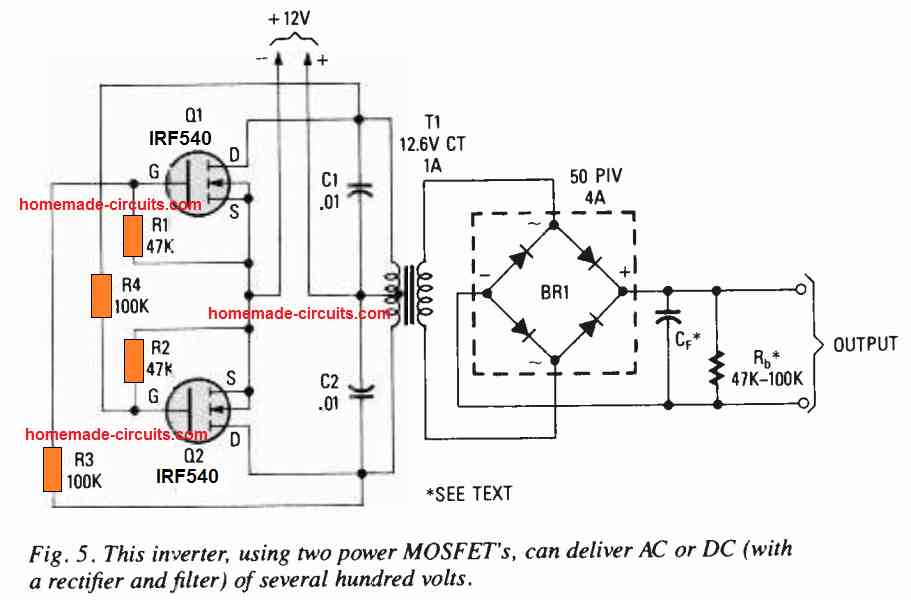
" rel="ugc">
Hi…
I have a Luminous 2800+ inverter/Ups with me. I keep it in UPS mode normally. But even in UPS mode also, my personal computer gets restarted since there is a dip in power during supply changeover ie, either from mains to UPS or vice versa. The unit has a conventional electro mechanical relay of TARA make, 12V, 40A. Is this due to this relay the changeover delay is happening? The technicain has visited and has replaced the main PCB. But it didnt solve the issue. The relay is kept separate and is not part of main PCB.
Hi, yes the problem is definitely because of the relay slow changeover response. Even if the delay is in milliseconds that could still cause the computer rebooting. Try using OEN type relays which are mostly fast and efficient. If the problem persists even after replacing the relays then the problem could be due to slight delay from the main PCB.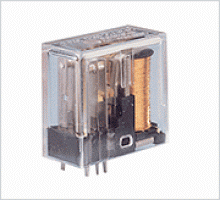
" rel="ugc">
Thanks for your instant reply. Definitely I will replace the relay and check. The options that I have are..
The first one has a transfer time of 10 milli seconds and the later has 20 milli seconds. I have opted the 16A or more variant since the max load that can be supplied is 8A plus 3A charging.
Will update later.
Thank you once again.
Thanks for the feedback. All the best to you!
Update:
Hi Swagat Ji,
I have changed the main relay to two variants of OEN relays as below.
However the issue still persists. Seems the issue is with the main PCB itself.
Eventhough Luminous has offered a replacement, I am not sure whether this issue will be resolved in that one too. I think it will be better to approach the consumer court to get the money back.
Hi Sanoj,
If the relay change is not helping then the issue could be with the main board. The manufacturer will be able to address the issue correctly, and help you to get a refund if the inverter does not respond as per the specifications.
Hello sir! Can I ask if the 3kVA is really pure sine wave?
It is not a sine wave, it is a modified sine wave.
Okay Sir. Cause it was written above “pure sine wave”. Do I really need an 3000ah battery?
Hi Diltone, I cannot see where it is written “pure sine wave”
In fact the heading is given as “Design#7: Heavy Duty 3Kva Modified Inverter Design”
If you are using a 12V battery then you may need a 3000 Ah battery. If you want to reduce the Ah value, then try increasing the battery voltage upto 48V.
Sir i want to use 24v battery should i use ic7812 for reducing it to 12voltage for the ic circuit
You can use 7812 for the IC circuit. Use an additional 100 ohm resistor in series with the output of the 7812 IC.
Sir please can i connect 1uf 400v capacitor at the output of the transformer
John, you will need 3nos of 1uF/400V in parallel.
can I use 1kva transformer for that first circuit with two irfp2907 in each channel
you can use it!
sir is there any different between irf260 and irf260n
I checked the datasheets of the two, they looked identical to me. So both are one and the same.
Sir please can use irfp2907 in that first diagram
Yes, it can be used on all the first 3 diagrams.
sir please is that first diagram a 50hz inverter
yes it is a 50Hz inverter
sir am getting 2.68 volt at the output pin of CD4017
It is average DC value due to the output frequency, the peak value will be always equal to the battery level….use an oscilloscope to test the peak value.
thanks for your reply but I don’t even have oscilloscope
Without an oscilloscope you cannot verify the waveform and you cannot proceed. You can easily buy a small oscilloscope online and use it.
sir everything is working but the problem is that i connect 1k resistor from gate to source and it burnt my mosfet
Hi John, I am not sure why that is happening. The gate/source 1K is supposed to discharge the mosfet internal capacitance quickly and prevent heating up of the mosfet.
If it is not working for you then you can go without it.
sir please can I connect 1N4814 at gate to source for protection
I have never seen a diode being used across gate/source for any kind of protection, it might not be relevant according to me.
sir connection of 20amp diodes between the center tap wire and the side wire does it help to protect the mosfet
Yes, that helps! It is same as connecting a diode across drain/source of the mosfet.
sir can i use that first diagram to power my freezer and CRT television
Yes you can according to me….
Hello Swagatam, in the first circuits in design 1 above. Can I use a single 100ohms to serve 5 Mosfet’s then the other side also a single 100 ohms or each mosfet should have its 100 ohms at the gate? Which connection is more efficient? Secondly, I want to use 10 Mosfet’s. Should i use blocking diodes across drain and source pins? Thanks in advance!
Hello Morris, The resistor value is actually 10 ohms, not 100 ohms. You can use a common gate resistor for all the MOSFETs, but using individual gate resistors for each MOSFET will be more efficient.
Thanks sir. What about the blocking diode across the drain and source pins of the Mosfets?
The diode can be a single diode across the parallel set of MOSFETs, although these diodes are already installed internally for each of the MOSFETs
Yes sir, at the output of ac now I only got 335j 400v instead of 3uf 400v(ppc). Can this 335j 400v work? Thanks in advance.
Hi Morris, you can try the 335j 400v at the output and see how it responds.
Hello sir, I tried the first design in this circuit but the output am getting is 127. I hv tried two different transformers 9-0-9 but still the same. What could be the problem?
Hi Morris,
Please check the average Dc across gate/source of the MOSFET, this value will indicate the actual required primary voltage of the transformer. For example if this voltage is 6V then the transformer should be 6-0-6V and so on.
Once you do this your output will be a perfect 220V or higher.
So you mean that I first connect the battery then I measure the screen voltage across gate/source of the MOSFETs. Then if i find it reads 8v then i use 8-0-8 transformer to get me an output of around 220v ac or higher?
Yes that will work!
Hello sir, I have thoroughly checked my circuit ten times to see where I did a mistake but it’s exactly as yours here. Whn I measure the voltage across gate/source as u said after connecting the battery without transformer only getting 2.2v and when I changed 4017 and 555 it is 3.4v ???????????? what’s your thought about that? I really wanted this modified sine wave inverter sir
Hello Morris,
please check the voltage across the 1K resistors in the following diagrams:
" rel="ugc">
Make sure to use a good multimeter.
Let me know the results.
Normally it should be around 50% of the voltage which is available at the positive rail of the ICs.
Hello sir the voltage am seeing at the output of 4017 across the 1k resistor is a sequence voltage running from 1.1v to 3.7v then starts again I hv checked and replaced several IC’s but still the same. The voltages at all the pins of 555 time are constant but at 4017 Pins is a running up and down voltage. Do u hv another efficient one pliz
Hello Morris, The frequency at these pinouts is supposed to be very fast and the DMM should show the average voltage only…so I cannot figure out how the voltage is fluctuating in your case.
Anyway, do you have an analogue voltmeter, please test the same with an analogue voltmeter.
Hello Swagatam.merry Christmas and a happy new year in advance! Pliz can you lecture me on something here. (1) I have four rooms to be supplied with light. What do you prefer in terms of battery safety whn you are using inverter for lighting or whn you’re using dc battery bulbs for lighting? If dc bulbs are good and u know in the four rooms there will be a voltage drop because of the long cables in the conduits (pipes) so do you have a 12v dc to 14 or 15v dc there about for each bulb to get at least 12v dc in the end? (2) if impossible, do u have best suited inverter circuit that will not affect battery life? Am abit confused my friend on which idea will save battery life. Pliz help. Thanks.
Hello Morris,
I think an inverter would be a better option than using DC for lighting LED bulbs with long cables. Since an inverter produces an AC, the length of the wires will have negligible impact on the performance. You can easily use any 4047 IC based square wave inverter to power your LEDs. If you use an inverter you can directly connect an AC 220V LED bulb at the outputs of the inverter.
A simple 4047 inverter circuit is discussed in the following article:
7 Simple Inverter Circuits you can Build at Home
So using a 200w or a 300w inverter will be just ok and will not shorten battery life as others say? But do u have dc-dc booster circuits to around 14v? What I fear with dc light is the drop of the voltage. So if u say inverter is the perfect one then I will just use the ac bulbs for lighting
If you use DC then using long wires might affect the illumination, that is why I suggested using an inverter.
Yes AC bulb will be good which can remain illuminated even if the AC drops to 100 V, which means even if the battery drops to 10 V from 12V still the LED bulbs will remains illuminated, although it is not recommended for a 12V battery to be discharged below 11V.
Why do you need a booster circuit?
I was considering which way can save battery life and which way will shorten battery life. That is why I seek advice from you between inverter and dc bulbs using dc booster to ensure that the 12v reaches the bulbs. Thanks sir for advice.
Since the inverter would e only 75% efficient, so I think connecting the battery directly with the LED would give better results. But I am sure about the impact of the wires resistance, that you will have to find out through a practical testing.
Hello Swagatam, I built another homemade inverter and the output voltage is 300 then whn i plugged in soldering iron it comes to around 240. Do you have any circuit diagram that I can connect to the inverter output to tame its voltage to be a constant 230 or 220v ac? Thanks in advance sir.
Hello Morris, you can try the second design from the following article:
https://www.homemade-circuits.com/load-independentoutput-corrected/
Thanks sir. So the trafo output is the inverter output of the transformer? Secondly, if we have two panels of the mosfets right and left, and the two in4007 connected to the bc transistor. Do I connect the gates of both left and right panels to each of the in4007 as indicated there?
Thanks
You will need to connect a separate diode with each of the mosfet gates and then connect the common cathode ends of the diodes with the BC547 collector. For indication purpose you can replace the 3V zener diode with a 3V RED LED.
Ok sir but can it work with the 24v inverter because mine is a 24v inverter? And how is the connection now?
Thanks.
Hi Morris, The IC 741 must be operated with 12V, so you may have to connect a 7812 IC for stepping down the 24V to 12V for the 741 IC.
Do the setup need a variable power supply before connecting to the transformer output or how is it set? Thanks anyway.
Please ask your question under the following article, I will try to help:
https://www.homemade-circuits.com/load-independentoutput-corrected/
Hellos sir, do I use IN4007 or just 4148 diode as indicated in this voltage auto correction circuit?
Thanks 🙏
Hello Morris, you can use 1N4148, or 1N4007, just make sure your MOSFET gate resistors are at least 100 ohms. And also connect reverse diodes parallel to these gate resistors.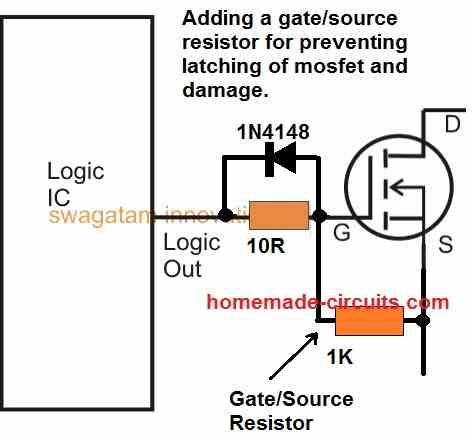
" rel="ugc">
Gate to source resistor is not required.
So the positive side of the diodes to face the gates of the mosfets??
Yes, the anodes of the diodes connect with the gates.
If you look at the symbol of a diode, the side with a bar or arrow point is the side facing the gate?🤣🤣🤣
Thanks
No, the other side without the bar (anode) goes to the gate, and the bar side (cathode) goes to the IC output.
Thank so much my teacher. But after paralleling all resistors with IN4148 do i need also to use a common IN4148 for each side of the set of the mosfets to the oscillator now or the parallel way is just enough?
Thanks
As shown in the following diagram, the “logic Out” refers to the oscillator output from the oscillator IC. You just have to connect the resistor//diode ends in this manner.
" rel="ugc">
Each resistor to be paralleled with a diode and the positive side to face the gate of a mosfet?
Thanks in advance sir.
Yes, that’s right, as shown in the previous diagram…
Hello Swagatam, am sorry for interruption in this different topic. My question is if I have 4pcs of 100ah 12v batteries. Two sets connected in parallel then connect them again in series. That will form 200ah each side. What is the advantage of that compared to when i just buy 2pcs of 200ah 12v batteries. Which is the best direction to go? 4pcs of 100ah or just 2 pcs of 200ah. Thanks sir.
Hello Morris,
According to me, using a 2pcs of 200Ah battery will be more efficient due to uniform charging/discharging and better power sharing characteristics.
So even if am using 4pcs of 150ah the two pieces of 200ah still stands a better position due to one uniform stength?
Thanks.
yes that’s correct…
You mentioned 4pcs of 100Ah in your previous comment, If you use 4nos of 150Ah then its capacity will be more than two 200Ah batts
OK thanks alot sir. Now, I have mains, inverter and a battery charger. Can you refer me to a better automatic changeover system which may act swiftly when mains goes off and when the mains comes back it picks to main line instantly.
Thanks in advance sir.
Hi Morris, you can try the following concept for the relay changeovers.
https://www.homemade-circuits.com/how-to-convert-inverter-to-ups/
Dear Swagatam
Can the outputs of the 4017drive 2 of ir2110 inorder to get a full h bridge configuration? In that case will the output be a pure sine wave?
Hi Richard,
We normally need 4 FETs to create a full bridge configuration. Using 2 FETs will give us a half wave configuration only. However neither can be built using a 4017 IC. Using full bridge configuration will not convert square wave to sine wave.
Hello Swagatam,
Thank you for your answer. In fact I have tried to modified the speed of the motor (describe 11/5/2022) with a positive (0 to +10 V) square wave to 30 to 1700 Hz through a transistor IRF730 and also a triac BT139 but the speed stays very very low (the motor stays always fed with the sine wave of 50 Hz from the net); that ‘s why I thought to use a sine wave (+ V to – V) to inject directly in the motor in thinking to your circuit in changing the frequency.
Best regards,
Hello Serge,
The modified inverter circuit cannot be used to control the speed of the motor. If your motor is a DC motor then you can try the following concept to control its speed:
3 Simple DC Motor Speed Controller Circuits Explained
thanks for ur educating us sir more longer life
My pleasure Moore!
Dear sir,
With the simplest modified sine wave inverter circuit, is it possible to modified the speed of an electric motor asynchronous 220 V AC 50 Hz 1 phase 50 W on which a 0.2 micro farad capacitor is connected (impossibility to remove it) or I must use a square wave to change the speed?
Best regards,
Hello Serge,
I can’t figure out how the simplest modified inverter can be used to modify the speed of your motor? But it can used to operate your motor normally even with the capacitor connected to the motor. The speed can be controlled either through a PWM system or a triac based speed controller.
hi sir swagatam my diy mod sinewave works fine but how can i remove transormer humming noise and harmonic noise when i power my amplifier with it?
Hi Kenbion,
If you have large filter capacitors with the bridge rectifier and still the hum sound is not going then you may have to attach a hum filter circuit at the input of the amplifier as explained in the following article. Also make sure to connect the ground line of the amplifier with the metal cabinet of the amplifier.
https://www.homemade-circuits.com/simple-hum-filter-circuit-for-amplifiers/
thanks,,but how can i make my inverter run quietly without noise,,,thats what i mean
You can try adding a 3uF/400V capacitor at the output of the inverter and check whether that helps or not.
Sir I have ferrite core transformer also have CD 4017 and timer 555 so which MOSFET use to make simple watt inverter
Hi Abdulkareem, You can use IRF540.
Please give me your WhatsApp number I talk to you
You can discuss with me here, through comments.
Like to have the PCB details for the pure sine wave inverter.
Your doing a good job keep it up thanks,
my inverter power mosfet blow up, it rated 60v 190a and I subtitude it with 60v 50a mosfet and it blows again what’s could cause it?
There can be many reasons, for example a malfunctioning oscillator, or a short circuit on the drain side of the mosfet, or the mosfet itself might be faulty. It will need to be checked with a multimeter to find the exact fault.
Hello Mr Swagatam.
I have a MODIFIED SINE WAVE INVERTER that has stopped working and is 3 months old, out of warranty.
When you turn it on, it lights up the red over voltage LED.
I checked all the MOSFETs and IGBTs and they are ALL good.
The INVERTER brand is GILGAL 4000W peak and 2000W real of the same brand as the KNUP INVERTER.
I reverse engineered it to try to understand how it works, to find the DEFECT.
But it’s very difficult because it’s a dual board and the components hide the tracks.
But still, I managed to lift the Circuit.
It has a DRIVER with 4 MOSFETs in the first stage, DC voltage riser.
And a DRIVER with 4 IGBT in the second stage of CA.
And a PWM BOARD.
But, I don’t understand, because he also has 2 MOSFET to provide the NEGATIVE side of the BATTERY, for the DRIVER.
Thanks.
 " alt="modified inverter mosfet problem" />
Hi Paulo,
The 4 mosfets and the center tap inverter transformer appears to be a standard inverter configuration, but even I cannot figure out why those two extra mosfets on the left side are provided?
I can see the drains of those 2 mosfets are connected with the ground symbol, so I am not sure what this ground symbol indicates?
Even I find it difficult to understand this schematic.
sir which mosfet is make
You can IRF540 or IRF3205, or IRF2907
ferrite trans to covert 200inveter circuit
You will have to calculate it, I don’t have the ready made example.
That’s it, thanks. I believe that if I follow all your instructions and video I will produce the 1k watts design with sinewave. Also through adding calculated capacitors at the output, sinewave is assured even without a scope around. I heard that there’s a software that can be used on the PC to check waveform and frequency of a.c. and other things
OK great! However for sinewave you will have to try the second schematic which has diodes connected across the 4017 output, the first diagram will produce crude modified only, whereas the second schematic will produce improved modified sine wave, or even pure sine wave.
I am not very sure about the software, you may have to search for it online.
Thank you sir very much sir for your advice. I have built a simple inverter before using only two mosfets, and it’s working very fine, no glitching or shaking but it’s square wave, not good for some of our equipments, that’s why I decided to go with the one in the article. Also is there anything like an alternative to oscilloscope, something that can substitute it as regards checking the waveform and output frequency. Getting one now is too costly, there’s huge inflation in my country as regards price of things
No problem Anthony, then you can go ahead with this modified design as discussed in the previous comments. Feedback link can be tested after you have checked the modified design output response.
Without oscilloscope it is not possible to check the waveform, whether it is square wave or modified square wave. You can only check the frequency with a multi-meter but waveform cannot be confirmed without an oscilloscope.
Thanks very much sir for this info ????, pls I do not have a freq. or hz meter or scope ????, is there any alternative that can help me to check frequency and even sine wave pattern output.
Again, sir pls for clarification, IF am to use 8 mosfets for example, you know am going to divide the mosfets into two “SETS” or “SIDES” i.e four on each set and side. So pls are you saying that I should connect only ONE 10- 100 ohms for each side or set of the mosfets gates making it total two.
Also pls do mean that I should connect Only ONE 1k Resistor each to the mosfets gate and source of each side or set,
sir pls if you can draw a circuit for the Resistor connection you explained in the above comment so that I can understand better. Thanks
Then sir pls should we connect the diodes in bridge format and should it go directly to the load. Sir there’s also a diagram of this same inverter we are discussing on now i.e under the first modified sine wave inverter circuits in this article I saw in another comment section where you included the feedback mechanism on it using BC557 transistor, 10k resistor, BC547 transistor, 1k preset, 1m Resistor and 5 1N4148 diodes, should I use exactly these components in the manner that you connected them in the diagram for the 1k watt design. Pls sir a diagram of it will help me to understand better thanks.
Hello Anthony, when you connect the mosfets in parallel you get one common gate, a common drain, and a common source for both the channels.
Connect the gate resistor between the common gate and the 4017 output, and connect the 1K between common gate and common source.
I think you should first build a single mosfet inverter and test its working
Without a small oscilloscope and digital multimeter you cannot build an inverter, and helping you might also be difficult.
If you connect a bridge at the output it will produce DC not AC to the load.
Please do not consider feedback at this moment, build the basic inverter first for confirmation using an oscilloscope, and then proceed with the next steps..
Happy New Year sir, may the year grant you increase all round for being good ✨. Sir I want to ask under the first modified sine wave circuit, you said that to increase it to 1k Watts I have to replace TIP122 AND TIP35 with few parallel mosfets, sir pls which mosfets should we use, again apart from the mosfets are we to add another set of transistors to the mosfets, then pls when connecting the mosfets should we follow the TIP122 AND TIP35 BCE as in the circuit and connect directly to the mosfet’s GDS or will it be any way combination.
Then sir, you said I should use 6-0-6 transformer to get 240v, is it a must that I must use it to produce 240v, if I use 12-0-12 transformer, how many volts will I produce. Again if you recommend that I can replace the 6-0-6 transf. with 12-0-12 transf . hope it won’t affect the inverter circuit. Thanks
Wish you too a Happy New Year Anthony, You can use IRF3205 mosfets. You can connect all the parallel gates to the 4017 output, drains to the transformer, and sources to the battery negative.
The transformer primary side voltage value should be equal to the DC generated across outputs of the 4017 IC. So please check the voltage between the 4017 output and the ground line, and then you can decide the transformer accordingly.
Thank you very much sir for responding, pls I want to be sure, since am going to connect the mosfets’ gates to pin 2 and 7 of the 4017 IC, for me to test the output DC of the 4017 IC, I guess I have to connect one of the terminals of the digital meter to either pin 2 or 7 of the 4017 IC and the other meter terminal to the battery negative inorder to confirm the voltage I will use to produce the transformer. Am I right pls, thanks.
Hello Anthony, that’s correct!
Make sure to adjust the 555 frequency so that you get 50 Hz on either of the pinouts of 4017, with respect to ground or the negative terminal. And also use resistor between 10 ohm and 100 ohm for the mosfet gate resistor, only one is required for each parallel mosfet channel. Also connect a 1K resistor between the gate/source of the parallel mosfet, again use only one resistor for each of the parallel combination.
Also do not forget to connect diodes between the center tap and the outer wires of the transformers, a 1N5408 will do.
Hello @ swagatam,thanks for your circuits and work, they are all good, pls I want to ask you based on this post’s first article ” Design 1#- using ic 4017″.
First I want to construct and improve it up to 1000watts for some of my home appliances, can I go on with the improvement using the circuit diagram you posted on it. Is it safe for the appliances.
2. Pls in the video you made on it, you used two Transistors ( tip35 and 8050) connected in Darlington mode instead of 4 Transistors according to the circuit diagram. You said we can use MOSFETs instead of the Transistors to improve the efficiency of the inverter. My question is pls in practical can I use only two Transistors as you used in the video or should I follow the circuit diagram you posted. Then pls can you specify for us the MOSFETs that we can use to improve the efficiency of the inverter and the diagram on how we can connect it. At the the end of my questions I will upload the circuit diagram to help you know the circuit am talking specifically about.
3. The inverter produces 500watts according to the diagram, pls how can I improve it to 1000watts. If am to add like 8 more MOSFETs or Transistors for the upgrade, can you pls draw for us the diagram of how we can connect it to suit the diagram and produce 1000watts. If we are to add some other components to produce the 1000watts, pls tell us the components and their specs and draw for us how to add those components to suit the diagram.
4. In the diagram you used 6-0-6 transformer ( 50 amps), can we use 12-0-12 transformer with higher amps
5. In the output side of the transformer, you added 3 capacitors in the video thus improving the sine wave form, you said we can improve it further by adding a calculated inductor also at the output side, pls can you specify for us the specs of the capacitors you used to improve the wave form, how many we are supposed to get for 1000watts output, the spec of the inductor we are to use for the 1000watts output and lastly the diagram on how we can connect all of them at that output side to improve the wave form.
Thanks very much sir as you answer these questions, I know it’s stressful God bless you as you answer them, I will upload the circuit diagram of the inverter am talking of from my email directly to you as I cannot upload it here to help you know the inverter specifically am talking about. Thank you ✅
Hello Anthony,
Please do not make a 1000 watt inverter at once, first build the smaller design shown in the above article, with your existing transformer/battery….if it works then you can upgrade to 1000 watts by replacing the transistors with a few parallel mosfets, and also by upgrading the transformer and battery accordingly.
for a 12V battery you will need a 6 V transformer, 12V will not produce 240 V AC.
The output waveform can be also experimented afterwards once the basic design is confirmed.
For the transistors TIP122 and TIP35 you can remove the TIP35 for the initial small scale experiment, which will yield only 50 watt power output.
Actually even with the shown TIP122 and TIP35 the output will be restricted to 200 watts. 500 watts as mentioned may be a bit too high.
Dear Swagatham,
I have a couple of questions.
1) You have used a transistor for the output. Why not Mosfet ?
2) How do one determine the no of Mosfets required for a specific inverter (squarewave or Sine wave ).
3) I have quisi-sinewave inverter that is now connected to solar. Since then it works on UPS mode since morning. It is supposed to be 2500va ie: 1750 watts with 70% efficiency which works out to 7.95 amps at 220volt. Till the MPPT kicks in it works on Mains mode. Once MPPT switches to solar mode, the inverter switches to UPS mode. With load (3.0 AMPS), the voltage drops to 213. But the voltage gradually drops to 178 volt by noon , perhaps something getting hot. I put a fan very the unit, it helps some.
Can you tell which component could be responsible for the gradual drop of output after 5 to 6 hours of working ?
Dear Suresh,
1) Transistors (BJTs) are easier to use and are much reliable, since they are not as unpredictable as MOSFETs. However mosfets can be also used as a replacement.
2) As a rule of thumb, the total product of ID x VDss of the mosfets must be 50% higher than the V X I of the maximum load, and the mosfets must be mounted on large heatsinks.
3) Voltage drop can happen because of MOSFETs getting hotter, or maybe due to load wattage exceeding the inverter wattage. You can try mounting the mosfets outside the cabinet with fan cooling, perhaps this might help solve the issue.
Dear Swagatam,
Thank you very much for the answers.
1) If BJT’s are easier to use , as stated, why every manufacturer is using mosfets ? I wonder. There has to be some advantage. Is the Surge current handling capacity ?
2) I have seen IRFP 150 Nchannel mosfets used – 4 nos. Vdd =25v Id is 41 amps
Hence Id * Vdd = 1025
Total of 4 mosfets = 4100 watts.
However this was used in 1000va inverters , actually capable of handling only about 750 watts. In reality they get fried with a load of 500 to 600 watts.
I wonder why they burned down inspite of total capacity of 4100 watts. What is it we could be missing.
With such huge difference in the total power Vs actual load, they shouldn’t even get heated with good heatsink.
3) You may be correct here. I did check on the Id specs of mosfets. They give two current ratings. One at 25deg centigrade (41 for the above ) and another at 100deg centigrade (29 amps). So as the temp rises, the power actually drops to almost 70% . Perhaps this is why the voltage drops with longer duration of use (temp rises and we can smell the heating components , including varnish of the transformer.).
I have fixed another heavy duty fan and it helps to keep the temp down. Yet the voltage goes down.
Perhaps a much higher rated mosfet might help.
pls answer when you find time. Thank you once again ( your reply made me look at specs more closely).
You are welcome Suresh,
1) BJT are easier to use but are not as efficient as MOSfETs, MOSFETs have extremely low resistance and have do not burn quickly due to heat since they have positive temperature coefficient.
2) You have to make sure their temperature is held below 30 degrees Celsius. Also, sometime the mosfets are duplicate and therefore don’t work correctly.
3) You can try IRF3205, they have high ID and VDS ratings
Dear Swagatam,
Thank you very much for clarifications.
Thank you Suresh, I am glad to help!
Dear Swagatam,
On the issue of Output voltage going down :
I think I found the issue.
In any case, it is not due to heat.
A) I fixed a heavier fan (B) I used a digital temperature meter to monitor temperature continuously.
I took the following data
1) Battery voltage
2) Output voltage
3) Output load current
4) temperature of the Inverter (I placed the sensor attached to the outside of the internal fan. This allows me to read the temperature of the air being blown through it , obviously from the hot components). It never went beyond 44deg centigrade).
5) Charging current from the MPPT.
I took the readings yesterday evening in an interval of 2 minutes.
15: 23
Battery v : 24.8v
Temp: 41.7
Out v : 203v
Out load : 2.5 A
Ch.Current : 30 A
15:25
Battery v : 24.4v
Temp: 41.8
Out v : 204v
Out load : 2.6 A
Ch.Current : 29 A
15:27
Battery v : 24.2v
Temp: 41.7
Out v : 210v
Out load : 2.3 A
Ch.Current : 10 A
15:30
Battery v : 24.0v
Temp: 41.3
Out v : 211v
Out load : 2.3 A
Ch.Current : 10.6 A
From the above it is pretty certain that reduction of output voltage is not due to rising temperature of mosfets or transformer or any other component.
It is actually due to battery voltage.
In the morning as the sun comes up and light intensity increases, the charging current increases and battery gets charged. MPPT charges the battery at its highest setting 29.5 v (being 24 volt ). A this time Ups keeps on drawing a steady 35 amps from the battery. Initially there is a struggle going on with UPS drawing more current and so the battery voltage going down. MPPT cannot keep pace with the demand. But after 9’oclock, if it is sunny day, MPPT could deliver upto 80 A more than enough for load + charging batteries. During this time battery voltage increases and again by 2:30 pm, the sun starts gown down and power delivery from MPPT slowly drops back and by 3:30 again the struggle starts – battery voltage dropping due to discharge (demand being more than supply).
I think when the batteries get charged and voltage increases beyong 24 volt, the internal circuit tries to adjust the ouput and somehow ends up reducing it. As the battery voltage dropw back to 24 voltage output voltage also comeback to 220 volt. I think this is design fault in the circuit monitoring the voltages ( input and output).
Today it was a rainy day and couldn’t monitor the system. I shall do it again to get a confirmation. If found anything different , I shall post it.
This should be an interesting info for some regarding such circuits.
Thank you.
Thank you Suresh, for the detailed description. Battery can be the primary cause for any voltage drop related issue. In our case we had probably assumed the battery to be OK, therefore we guessed the MOSFETs to be the culprit. Anyway glad the issue seems to be solved.
I have 600 va pic controlled inverter.Now pic ic programming corrupted,Power amplifier section is ok.Transistor 222A(2 number)& mosfet P55NF06(8 numbers)&power transformer is ok.I want pure sine wave 50 hz to base of transistor 222A.Please send the circuit Sir.
Sadashiv, You can try one of the circuits explained in the following article, and customize it appropriately.
https://www.homemade-circuits.com/phase-shift-oscillators-wien-bridge-buffered-quadrature-bubba/
Am happy with your circuit sir
I want to learn
Sir I to no how many turns of rewinding transformer but secondary & primary that would give me 3kva or 5kva
Hi Pam, I don’t have the calculations for high watt transformers, you may have to contact a professional transformer manufacturer.
60 Hz frequency is used so that the output AC from the inverter also produces 60 Hz frequency, which is the standard frequency for all 220 V AC source, 3KVA Power
for 220V the standard frequency is 50 Hz….for 110V it’s 60 Hz
Dear sir:
Pls Share or-CAD circuit file. And BOM list.
Best.
James
Dear James, please contribute the same to this site, I’ll update them quickly with your credentials..
good morning Mr Swagatam…How are you ? I don’t understand in your shematic diagram 3 KVA
why you used 50 HZ in the clock Cd 4017, and why you used pin 2 and 7 in the out stage of CD 4017. .. please help me .. thanks
Hello Nayel, 50 Hz frequency is used so that the output AC from the inverter also produces 50 Hz frequency, which is the standard frequency for all 220 V AC source. pin2 and pin7 are intentionally selected to generate the required modified sine wave at the output. For more info you can read the concepts explained at the beginning of the article.
Hi Vivek,
I appreciate your interest in the filed of electronics.
The first think you must learn is about how to use transistors, resistors, zener diode, diodes, SCRs and regarding all the basic elements of electronics.
Then learn how to join them to make new circuits.
All these stuffs are discussed in this website, you only have to search them and read them patiently, and of course, you may also have to build them practically to learn better!
I appreciate the great work you doing to people like me i must say thank you. My question is, for the last design (7) what if I use mosfets instead of BJT’s will they be any proplems with that? And secondly is there a way of providing feedback for voltage stabilization with this design? Thanks hope to hear from you soon.
Thank you and glad you liked my work, yes MOSFETs can be used instead of the parallel BJTs, however the first two BJTs (TIP142) shouldn’t be replaced with MOSFETs, rather with smaller BJTs such as BC547
Thanks for your quick reply sir. But am not very clear about the feedback back section of the design. Is it that if I want to prove feedback to pin 5 of ic2 I will ignore that 10k rms VR or i just have to add it to the pin 5 just like that? Thanks.
The 10k RMS setting will be as it is, and will ensure that the output RMS is always constant, however, in case the battery voltage is high, the RMS may setting may increase proportionately causing the output voltage to increase to unsafe levels, during such situations, the feedback will correct the RMS to the desired levels by momentarily grounding the pin5 of IC2
Hello Mr. Swagatam, how have you been? Thank you for your attention. I would like to share with you some images and video about the waveform that I have obtained at the output of the circuit so that you can appreciate what I have done and give me your impression. If possible, indicate an email to which I can send the data.
Best regards,
No problem Juan, you can send them to hitman2008 at live.in
Happy Sunday Sir;
Thank you for been always ready to reply.When one thinks he had explored most of your web domain,he has not even started based on your further revelations.
On that 3kva heavy duty inverter,is it not good to replace those bjts and use few fets like irf 150N (my favourite) may be 4 in each channel instead of many bjts which makes the whole concept bulky.
Thank You.
Thank you Patrick, yes MOSFETs are much efficient than BJTs and therefore it is a good idea to replace the BJTs with MOSFETs
Hi dear Swagatam.
I want to make an inverter according to your “Heavy Duty 3Kva Modified Inverter” Circuit, but I had an issue. You used an 3.8 volt small feedback transformer but it is not clear that where should the feedback output connect? and the other question, must the output transformer rectify or not ?
Please help me.
Thanks a lot
Amir Esmaeeli
Hi Amir, you can implement the following circuit for the feedback control:
You must rectify and filter the 3.8 V output through 4 1N4007 diode bridge and a 470uF/16 V capacitor
Hello sir, what’s the function of the feedback system. In case of the 3kva how can one apply a led perhaps meter to monitor the activities and rating of the inverter, thanks alot
Hello Sir, thank you for all your effort to educate us. Please Sir can you help. I am building a 3kva inverter, my voltage source is 24v. I have a transformer rated 24v but it is not a center tap. Although the on the other side it has about 4 different wires. my questions are
1) how can I use this transformer since it does not have a center tap to send in vcc?
2) can you help me with a change over circuit with relays since it is not a standalone inverter so that it can switch between AC mains, Solar and Battery DC.
3) An automatic charge circuit with (Lcd display optional)
Thank you.
Hello Emmy, you can try the last concept presented in the above article for a two wire transformer.
Changeover and charger circuits are already published in this website, you can search them through the search box and apply the most suitable one.
Hi sir,
Can we simply use one RC network to convert sqaure wave to an approximate sine wave?? Is it possible to do so???
Thanks in advance
Hi Hari, it is possible, it will produce saw tooth kind of wave.
Hi sir,
Thank you for the reply….so if we are able to produce a 50hz 220v output from our square wave inverter , resistors of how much rating(ohms and watts) required for it?? Also what should be the rating of the capacitor we have to use in the required RC circuit..Can you please explain??
Thanks in advance
Hi Hari, if you use resistor at the output of a transformer then all the power will be wasted in the resistor and you will not be able to operate any load from the inverter, so it is not a feasible option.
Dear Menthol, please, I need your assistance on the 3KW transformer seize that you used in this project for 3KW inverter.
I need the measurement in Cm (centimeters)
1. The length of the transformer piles.
2. The length of the “E” and “I” lamination..
3. The height of the “E” lamination, I mean the outside leg.
Thanks for your assistance.
Pls I make one of your inverter and it’s working fine,But how can I reduce the noisy sound from the transformer output using capacitor?
I did not find any noise in any of my inverter designs, which one did you exactly build? make sure the transformer is correctly rated and is tightly clamped.
Hello brother thenks for great job, pliz help me on how to combine two home made inverters of 500watts each to have a 1000watts output.be blessed
Hello Godfrey, joining them physically may not be recommended, the only thing that can be combined is the battery points, which could be joined and fed from a single higher capacity battery
Hii sir
I want complete circuit diagram of 200w inverter with parts specification
bit confused about it
i have a question , what will happen if i use 12-0-12 v 5A transformer
Hi Shubham, you can try the following concept:
https://www.homemade-circuits.com/how-to-make-simple-200-va-homemade/
Or you can also try the MOSFET version from this article:
https://www.homemade-circuits.com/mini-50-watt-mosfet-inverter-circuit/
12 x 5 = 60 watts so this transformer will not work for 200 watt
hi swag, i really appreciate your knowledge depth and passion about tech. my question is, can step down transformer, be used in reverse to implement inverter circuit? thanks in antiscipation.
Thanks Abba, all inverter transformers are actually step down transformers working in the reverse mode, so they can be used any way round.
Hello,
I want to make a simple 50Hz inverter that will be used as frequency converter in North America were the main supply is 60Hz. A stabilized DC power supply will charge and maintain a 12V lead-acid battery at the ideal standby voltage, while the 12V inverter connected to the battery will produce the 220V 50Hz AC I need. I don’t need a clean sinewave and I don’t need the output voltage and the peak voltage to be precise, but I need a very stable and precise frequency of 50Hz (none of the inverters commercially sold have a stable frequency unless you spent $$$$ for professional equipment). The only way to obtain a precise frequency is to start with a crystal oscillator and frequency dividers. I have once made a small one with a 3.2768 MHz crystal, a 4060 IC followed by a 4027 IC but I only can get a square wave. I can get a modified square wave by adding a 4001 connected with the other IC outputs, but a 50% on 50% off wave won’t work well for my need, what I need is something between a “modified sine wave” and a square wave, a wave with pulses larger than “modified sine wave” but not harsh like a square wave, something like a wave with 40% positive pulse, 10% off, 40% negative pulse, 10% off, that will just be roughtly smoothed at the output. Something simple, just with a very stable frequency. Is there an easy way to obtain such a wave form, maybe by adding more logic gates to the other pins of the frequency dividers?
. ┌───┐ ┌───┐ ┌───┐
└───┘ └───┘ └───┘ └───┘
Hi, I think the schematics shown in the first and the second diagrams using IC 555 and the IC 4017 will perfectly accomplish your requirement. The use of 7809 voltage regulator ensures that the frequency can never alter regardless of the battery voltage fluctuations. I don’t find any reason why the frequency would vary if the voltage is kept constant? The PWM can be easily modified as per your specifications, by determining the number of 4017 outputs which is to be included or skipped.
Dear Swagatam,
I’ve assembled a couple of the CD4093 NAND type inverter drivers because I thought my soldering might be at cause, but my problem appears @T5. I wired in a 2N3904, but NAND N2 develops a DC voltage across its input and output like they are shorted. NAND N2 otherwise develops a nice 1khz sawtooth on the input when I disconnect the emitter and properly gives a square wave at the output of N2.
I thought the device output might be over-current and causing the bad behavior, but the datasheet claims a minimum 26mA of output drive per NAND gate @15V Vdd( whereas the output would ideally drive 30mA across that 470 ohm resistor).
Do you have any suggestions?
Dear Metro, you try increasing the base resistor value of R5, R8 to 1K, and increase the value of R9 to 10K and then check the response again.
Hello sir. I was trying out the first design. When I set it up on the breadboard however, I received no output. The transistors get heated however, and there is voltage drop over them. When I touch the pins of the transistors with the probes of my multimeter, the 5w led bulb which I connected at the output flickers for an instant. Can you help me figure out what went wrong?
Hello Yasar, build it by connecting the parts directly by soldering, and make sure the transformer is correctly rated and weighing around 2 to 4 kgs. The battery Ah should be minimum 7 Ah and fully charged. Make sure the transistors are mounted on heatsinks and connected with correct polarity.
My dear mentor, quite a long time. Please I need circuit diagrams of: (1) A 500W inverter circuit with CD4047 (2) An automatic 12V Charger. Also Sir, to produce a 12V battery from 3.47V Li-ion batteries, should 3 (11.1V) be used or 4 (14.8V)?
Thank you Sodiq, I’ll try to post it soon in my website.
I think the Li-Ion configuration would be 12.6V, since the full charge level of 3.4V or 3.7V cells are 4.2V. So 3 in series should give 12.6V and good for a 12V inverter circuit.
Sir please i need an explanation on 3kva modified sine wave inverter…circuit
Kefas, there’s nothing critical about it.
You can even convert the 2nd circuit into a 3kva or 5kva simply by changing the power devices, the transformer and the battery.
Dear tutor, thanks slot for the knowledge shared, how can I determine the sizes of transformers used for the respective sizes of inverter.
Hello Aanu, the transformer wattage should be rated a little higher than the intended full load wattage
how do I calculate the wattage of the transformer intended to use
watts = V x I
The circuit diagram for the 3kva modified sine wave inverter is confusing me ….please send me the circuit diagram of how the tip36 is connected to the 4017 ic
The bases of TIP142 are connected to the IC 4017 outputs
What of the diodes and pin3 of ic 2 ……what will happen to them
connect pin3 with D1, D2 at the base of the transistors
Bjr est ce que vous pouvez me donnez un schéma inverseur a pont complet utilisant: tl494 et un transfo ferrite. Cordialement
Thanks, I have a TL494 full bridge design but it’s not a ferrite based design, here’s the link:
https://www.homemade-circuits.com/simplest-pwm-modified-sine-wave/
Thanks for the circuits. Pls how can I stabilize the output voltage of the 4017/555 inverter irrespective of the load. That is, is there any way to implement feedback?
Use this circuit:
" rel="ugc">
I have a circuit that needs the value of the components to be inserted can u do that if yes contact me by mail
Sorry, that may be difficult and time consuming, so won’t be possible at this moment!
Hi,
Mr Swagatam. I’m intrested to build this Design#7: Heavy Duty 3Kva Modified Inverter Design by you and Mr.Marcelin. Can you provide me the part list for it. I and my son are try to build it together. Thank you in advance. For your information I and my son are still beginers in this. Our previous project is just a hijected on UPS by APC with 2000va out put that are heavily mode at its DC input and it’s transformer so it can with stand 200ah acid battery to power bigger loads. With some add on for heat dissipation issues and trickle charger to charge the battery.
Hi Anrif, I’ll try to update it by tomorrow for your reference
Thank you for your kind assistant and quick response.
I have added the parts list, wish you all the best!
Thank You for the parts list
you are welcome!
Good day sir, I build an inverter but the transformer is gotten from ups and it rated 600watts on the casing.but the problem is the voltage drop at the output whenever load is apply. Pls help me with this few circuit 1. Circuit for the voltage drop. 2. Overload protection for my inverter. 3. Changeover circuit for my inverter and NEPA in the sense when there is power outage it will automatically switch to inverter. 4. Thunder protection for inverter. 5. Low battery cutoff and fully charge indicator LED that will monitor the battery and cut it off when it fully charge. I hope my request will be consider.
Voltage drop cannot be solved with a circuit. It happens if there’s a mismatch between the output RMS from the power devices and the transformer primary winding.
I have exlained it here: https://www.homemade-circuits.com/inverter-voltage-drop-issue-how-to-solve/
For overload cut off you can try this circuit:
https://www.homemade-circuits.com/low-battery-cut-off-and-overload/
For changeover circuit, you can try this:
https://www.homemade-circuits.com/how-to-convert-inverter-to-ups/
Full charge indicator and cut off has been already explained through many circuits in this blog, you can easily find them through the search box.
I want know more about your homemade electronic circuits
hello sir my name is ognonna, from Biafra, I love your work very much and I need you to help from you .I have been trying to build an invater circuit but I always have problem with the MOSFET side in fact all part, if you can teach me I will be glad. I have been working on many circuit but always falle please I need your help on invater and litum battery charger
Thank you ognonna, since you are new you must start with small inverters and then gradually go for the big ones. You can try the concepts explained in the following post and learn how these are designed to work:
https://www.homemade-circuits.com/7-simple-inverter-circuits/
Alright. Will add it today and pray it powers the fan. Thanks
hello, swagatam. please is there a filter i can make use of to convert a square wave inverter i got from a friend. its a STAB italia IQ 1005 inverter, 1kva and powers my tv, laptop and sound system,but my ceiling fan doesn’t work with it. it makes a very loud buzzing sound,but no rotation. i tried using a standing fan,but the speed was too low. please help. i really want to make use of the inverter until i can rework it with one of your circuits. thanks
ikenna, you can try adding a 2uF/400V capacitor at the output and see how it helps. I do not have a specific calculations for this.
Hi dear. I have a problem with this project. I made the finilized diagram. When I atrachrd all of parts, at the output I connected a 220v voltage protecror and after several seconds I took 220v AC from voltage protector output. But the main problem is here that when I connect a load (almost 60w) the voltage droped to near 150v. Please say to me that where is my problem.
Thanks alot.
Please mention which inveter did you try and also provide the transformer and the battery specifications.
sir, i commend your great work here. Am also an aspiring inventor( newbie) and an electronic hobbyist.
My question is, is it possible to loop an inverter to feed itself with its output for a continuous flow of power especially 2000 watt inverter?
Thanks Bode, no that’s not possible on this planet, and never will be.
Thanks a lot my mentor, for the quick response. Please can you give me a design (or link) for 1500 watt inverter that does not use transformer but inductor or choke with all the components specification.
Thanks Bode, but sorry a 1500 watt boost converter design is presently not available with me…
Thank you a lot sir, do you have any boost converter design of around 500 Watt? i just want an inverter design that will eliminate the weight of a conventional transformer. Thanks
bode, the second design from this article is a ferrite based compact design which you can try:
https://www.homemade-circuits.com/5kva-transformerless-inverter-circuit/
Thanks 4 d quick reply, am talking about the circuit u used N1—-N6 as ic4049, i want to know if N1—-6 is actually a diode or ic4049 am confused because Those N1—-N6 Looks like diode and at the top u wrote ic4049 please i need help to know if it’s ic and how to connect it, Thanks.
Those are gates which are present inside the IC 4049. Please see the IC layout here:
" rel="ugc">
you can connect those gates through the respective pin numbers which are assigned to those gates input/output….all the 6 gates are identical so you can use them anywhere across N1—N5, since only 5 are used, one gate will be spare so make sure to terminate its input pin to ground, output pin can be left open.
…sorry it seems all the 6 gates are included so need to worry about any spare gate…
Thank u very much 4 ur good teaching, i was able to build #Design2 500VA and it work perfectly well, at first i was 260v because i build my transformer by my self i think i wind it 260v instead of 220v/230v but after i put a capacitor 400v 4.5uf fan capacitor it later gave me 235 without load and with load of 395w it stays at 230v and its working perfectly well, but the problem am having is my battery charger, i have build so many circuit from different site but could noon of them have been able to charge the battery to 100% it will anly charge to a limit but if i use them to charge a smaller two 12v 20ah x2 which is equal to 12v 40 ah it will charge to 100% and my charging led will indicate full battery and the relay connected from the full charged led will cut off the battery from the charger, But if i connect the 150ah 12v constantly on changing for full day it will not change full, Please i need your help with a better changing circuit because i think those circuit are not compatible with the battery, my email: andrewegbemine@gmail.com looking forward to hear from u, Thanks.
Thank you Andrew! a 150 ah will require 15 to 20 amps current, are you using this much current for charging it? The circuit is only responsible for switching the current ON/OFF at full charge, it has nothing to do with the charging efficiency. The charging efficiency will depend on the voltage and the current level which must be as per the specifications.
Hello sir, I really appreciate u so much for sharing this circuit. Please i like to build the 500 VA but i do not no what u used to replace the ic 4049 if it’s diode or the ic i should use, please i need your help and i also love to know between VA and watts which is more higher? Thanks.
Thanks Andrew, can you please indicate exactly which diagram you are referring to?
Pls can I get PCB of Inverter sine wave or modified sine wave from you? This is my email. I will pay omoresther2008@gmail.com.
I am sorry Omor, I do not manufacture or sell PCBs
Hello, thank you very much for your quick response. I’m already building it. Circuit number 6 with 555 can be used?
Hello thanks, I would recommend the first circuit, you can replace IC1 with IC 555, if possible I’ll update the full diagram soon. For the first design make sure the transformer primary is rated at 50% lower than the battery, meaning if the battery is 12V, then the transformer will need to be 6-0-6V
Hello swagatam, I have successfully constructed 2KVA Inveter using CD4047 IC. But I want to use SG3524 IC cos of its features over CD 4047. I need a tested working circuit of SG3524.
Also I need an inverter battery charger circuit for 200AH battery.
Thanks.
Hello Pope,
You can find many good designs in the following link:
https://www.homemade-circuits.com/sg3525-pure-sinewave-inverter-circuit/
however, you can easily upgrade your 4047 inverter with all the features that you’d like to have from a SG3525 inverter, so actually there’s no need of changing the IC.
Thanks for your quick response Swagatam, the “Electronics guru”. I will keep to the 4047.
In the 4047, I want to add 7808 voltage regulator at the battery positive input to the 4047 oscillator cct. Should I add 7808 or 7812.
Also about the battery charger, How do I make use of the same inveter transformer to equally charge the battery when there is power source.
Thanks,
Pope.
Thank you Pope, you can use 7812 IC because 12V is the standard and the recommended supply voltage for most ICs and mosfets.
For using the same transformer for charging the battery, the best way is to have a separate winding on that transformer, this winding could have a voltage level same as the battery which will automatically reach the required higher level after rectification and filtration, and the current rating could be around 1/10th of the battery Ah if the battery is a lead acid one.
Once again thanks for your quick response, it’s highly appreciated.
As regards Using 7812, from the datasheet, LDO is 2V, which means to have 12V at the output of the 7812, we need to feed the input with 14V or higher. And the battery I’m using is 12V not 14V. Seems I’m confused with 78xx application. Pls shed more light.
The battery I’m using is 12V, 150Ah deep cycle. What battery charging circuit can I use to charge the battery?
Thank you pope, sorry I did not consider the source specifications while replying, so for a 12V battery you can use a 7808 or 7809, however as far as I know voltages within 5V and 12V is not going to have any effect in the output frequency of the IC 4047, therefore even if you connect the battery voltage directly with the IC, it would work normally
Hello Swagatam, I have 3 questions.
1. I need a working circuit of low battery cut off and how to connect with Inveter.
2. I need a working circuit of 12VDC, 160AH battery charger.
I tried to construct battery charger that can deliver 16.5A as charging current but I can’t find high current diode for full bridge rectifier and also voltage regulator that can withstand 20Amps current. Pls I need your help.
Hello Pope, you can try the last circuit from this article:
https://www.homemade-circuits.com/low-battery-indicator-circuit-using-two/
the load will be your inverter supply wires.
for the high diode replacement you could try a P channel mosfet such a IRF9540, connect its source with the positive input, drian towards the battery charger, and the gate to the ground line via a 1N4007 diode, cathode of the diode will connect with the ground line, anode with the gate.
Thanks for your response, you are the best.
I’m getting confused on how this calculation.
Assuming I have 50Hz 500VA Inveter with input 12VDC and output 220VAC, if I plugged a device that consume 2Amps current. And I’m using 100AH battery, how long will my Inveter work before the battery drain?
Is it 100/2 = 50hours.
Or
( 100AH * 220Vac ) / 500VA = 44hours
If the two is wrong, tell me how to calculate running hour.
Hi Pope, it will depend on the current consumed from the battery side, not from the AC side. You will have to measure from the battery side. If from the battery side it is 2 amp then yes it would be ideally 50 hours, but as you know batteries are never ideal, so practically it could be anywhere from 25 hours to 35 hours.
Hello Swagatam, the genius. I respect you sir.
Pls how can I limit current for charging 165AH deep cycle battery?
The transformer I’m using for the charging circuit is 1000W, it means it will deliver 83Amps to the battery while the battery only needs 16 to 17amps.
How do I limit the current going to the battery from the transformer?
Thank you Pope, you can try the last design from the following article:
https://www.homemade-circuits.com/universal-high-watt-led-current-limiter/
replace the LeD with your battery terminals, and also upgrade the BJTs accordingly
Sir, please specify the current rating of transformer used in 3kva inverter.Also,how many 12v 100ah batteries need to be used in order to obtain 3kva power output?
Abhinand, I would recommend you to use the following design for getting an efficient 3kva output.
https://www.homemade-circuits.com/1500-watt-pwm-sinewave-inverter-circuit/
you can create the 48V by joining four 12V batteries in series. Using 48V will allow you to use a relatively smaller transformer compared to a 12V design
Hi Swagatam, i must say i really appreciate what you are doing searched on the net for months now yours is the only clear, simple but yet powerful solution for what i was looking… please do you have a contact details i can use in reaching you, i would love to discuss some things with you thanks …
Hi EngrMichael, I am glad you liked my post and appreciate your interest, the best place to contact me is my website where i am online most of the time, you can use the comment box to express your thoughts and I’ll try my best to reply ASAP…
Sir, I have followed all steps and read all posts and comments carefully. I have been able to implement the inverter which gives me a pure sine wave as you can see in the attached picture. But i am having VOLTAGE DROP problem. I have adjusted the 10K pot at middle IC555 and i have 230V AC at transformer output. Now, i connected a load (60W/220V soldering iron) and the voltage at the output drop to 130V. I have used 6-0-6 transformer as instructed in the post. But still, anytime i connect load, the voltage drops. The transformer is a big transformer i removed from an old 700W UPS. The rating is not written on it, but i measured the core using a ruler and it is 3.8cm by 5cm. I also try to experiment by removing the PWM diodes and the voltage at the output of the trafo is too high, around 500+V i dare not connect any load. Every other thing works as expected aside from this voltage drop problem. Please help me about the voltage drop. I await your response… Thanks.
Joe, voltage will drop if the current is not sufficient make sure you are using a fully charged battery having at least 7AH current, 12V rating.
adjust the duty cycle of the 555 IC circuit which feeds the IC 4017 pin#14….do these and check the results again.
Hello swagatam, I followed this circuit, but I'm having a problem, I made the circuit on breadboard and the output at pin 2 and 7 of 4017 looks exactly like that of Robin's picture. But immediately I connect the pins to the gates of IRF3205, whose drain are connected to left/right of Transformer and source is grounded, the IC 4017 will just explode. I don't know what is going on. If I don't connect pin 2 nd 7 to gates of FETs, the output on scope looks nice, but immediately I connect it to FETs my IC 4017 will explode… What could be d cause? I have checked the diodes from PWM, they are fine.
Hello Joe, that's very strange and unlikely to happen,
are you sure you are connecting the mosfet with correct pinouts? because wrong pinouts can break the mosfet internal barrier and also damage the IC.
Instead of Mosfet try the same with BJTs such TIP142 and check whether it works or not?
Hello, I need to do a 12 volt 100amper from input 24 volts it occurred to me that I could use the rectified output of a high frequency inverter and rectify with a diode bridge the high frequency output for 12 volts 100amper … I'm right or not … please wait your comment
Greetings and thanks
Hello, your idea is feasible but the inverter transformer needs to be a 0-12V/0-24V rated transformer, or alternatively you can use a boost converter circuit for your purpose….boost converter will be the ideal solution for your need.
Hello
Perhaps you understand me wrong, I need to get 12volt 100 amper from a set of two 12-volt batteries 200Ah not have to raise voltage just have to lower voltage, that's why I asked if it is possible to make a converter DC- DC starting from a high frequency inverter with transformer core ferrite (obtained from ATX) relative to theoretical transformation of 2: 1, then rectified output alternating voltage high frequency to obtain an output value of voltage 12 volt DC approx 100amperios
for getting 12V from 24V you will need a buck converter circuit, as explained in this article, you can use the second diagram:
https://www.homemade-circuits.com/2015/10/calculating-inductor-value-in-smps.html
In 3KVA heavy duty Inverter Is the 1uf/25v electrolyte capacitor or ceramic capacitor(102) like others and what capacitor can I Use to replace 50uf(504) capacitor
It can be electrolytic or ceramic both will work….
I mean did pin 10 and 15 of IC4(CD 4017) not connected to the ground?
pin10 and 15 are not connected to ground.
What other capacitors value can I Use to replace 50nf and 5nf in 3KVA inverter
And did pin 5 and 6 of IC3(CD 4017) doesn’t connect to the ground
Any close value capacitor will work….
pls sir redraw d best of d circuit in a neater way.d above looks dirty.draw like ur other circuits.thanks
please refer to the last diagram made by Mr. theofanakis, you may follow this diagram.
,
hiya Swagatam 🙂
Iv been building the last revision of your circuit 2.bp.blogspot.com/-j_f23T5_4l4/UnxgdQS3eGI/AAAAAAAAFpY/0s7ogZHW1HA/s400/modified+sine+wave+a.JPG that one. i do not have any analogue switch ic's anywhere. can i just wire up the 555's like in the hand written diagrams after the 555's? and what frequencies should i be seeing out the 555's ?
im going to assume the 555 connected to the clock pin of the 4017 is 200hz. and that the other 555's are 50hz?
im really enjoying playing around with your circuits but a little bit more debugging information for idiot's like myself would be really useful.
Hi Goliath,
yes you can go for the first hand-drawn design since it's the one which has been used for generating the shown waveforms, and looks easier than the one proposed by me in one of the other articles.
the 555 associated with 4017 could be 200Hz, but the one linked with the PWM must be around 500Hz and not 50Hz, because the 200Hz is ultimately getting processed by the 4017 for generating the mains 50Hz for the trafo…..the PWM is the one which is responsible for chopping these 50Hz from the 4017 across the fet gates, in order to create the intended modified sine equivalents mains at the trafo output..
One more thing, just make sure the mosfets are not linked directly with the 4017 outputs and the PWM feed, rather are isolated with a BJT buffer stage as shown below:
1.bp.blogspot.com/-NgqlieM8TX8/U7zL0tGH6qI/AAAAAAAAHgE/WCKLVG9pVVs/s1600/mosfet+transistor+driver+circuit.png
this will ensure a proper functioning of the fets without heating up issues.
Hi sir
I am so glad to see ur interest towards electronic circuitry ..
So eagerly waiting for circuit which will be having following (few or all) features -Low Battery Cut-off
– Overloading protection
– Short Circuit protection
– Reverse current protection
– Reverse polarity protection
– Thunder protection
– Over discharge protection
– Auto battery shut-off at Low voltage detection
– Overcharge protection
– Auto charge stop/ High Volt Detection
– Battery capacity level display(SOC)
Making this circuit for underprivileged location as donation for poor via charity So hope I can have one ckt diagram with some or all features mentioned above or lts link.. Looking for ur reply ..
With full excitement
Thank you
Regards
Lokesh
If successful I am in plan to put ur & website name on my device As part of tribute to you sir
FB ID: Lokeshelectronic plz reply
Hi Lokesh, you can find it here:
https://www.homemade-circuits.com/2015/10/smart-emergency-lamp-circuit-with.html
Hi Swagatam,
You are one of the few bloggers I have come across, who can put the things in plain simple language which is equally enjoyable and understandable. Sharing your knowledge without any expectation is a rare quality these days. I wish you good luck.
I am a radiologist by qualification and do some activities to involve social NGOs so that they can assemble small projects regarding solar for their financial support.
We have given them ( the NGO ) many small items which they produce and sell for self reliance. Sometimes, we also make payments to buy the technology but we do NOT charge anything to the social groups.
Wish you good luck.
Thank you brutalblog,
I appreciate your excellent contribution and efforts to the needy ones. Keep up the good work.
I wish you all the best!
Best Regards.
Hello,Thank you for running the website. My question is can this inverter be run without a transformer. ie. 230 to the mosfets and to the load from there?
Also which component needs changing for 60HZ output.
Thanks for liking my website.
no, the above circuit cannot be used without a transformer, for your application you may have to opt for the following design:
https://www.homemade-circuits.com/2014/01/simplest-full-bridge-inverter-circuit.html
you may adjust Rt/Ct suitably to get the required 60 Hz in the above linked design.
Hello Mr Swagatam this is Alex from the mppt post sir. I tried back this circuit and as usual u get sine wae signal out but the problem with heating of the fets especially when the filter is connected but I find out something dont know if this can you to help us make it 100% complete project. As u have read other people have the similar problem sir . I give u an example of what I find out say u have 120v Ac without a filter connected and say a gate voltage of about 2.5v ur fets are ok . If u connected the filter the voltage goes up to about 169v Ac and gate v may be around the same but if u try to adjust the volt down back to 120 Ac the gate voltage also drops to about .8v and the fets start to run warm. Sir I figure at this gate volts the fets are not turned on enough to handle the load so they start to run hot please help us on this sir I await ur reply Alex
Hello Mr. Alex, according to me there's no need to worry about the 169V increase, it could be just superficial and would settle back to 120V or less in the persense of a load.
You can confirm this by connecting a load on the 169V output, the step up could be happening because of the coil capacitor in the filter effect
by the way did you use the following configuration at the output? try it if not for acquiring more efficient results
1.bp.blogspot.com/-NgqlieM8TX8/U7zL0tGH6qI/AAAAAAAAHgE/WCKLVG9pVVs/s1600/mosfet+transistor+driver+circuit.png
Dear Sam, It's great to see after a long time.
I am not sure about the circuit presented by Theofanakis because I could not simulate it, but the top diagrams which have been tested by Mr. Robin appears to be perfect. The second last diagram shows the incorporation of an over voltage protection in the design, you can try this design for the voltage correction feature.
Dont know if my last post was sent to u Sir but I was saying that today I had better results on the h bridge found some wrong connections so I am able to get pwm into the h bridge a nd get my Ac out. I know for sure now that it is the high side fets are running hotter while the low side is just cool and normal. If the high side was running like the low side ur inverter design would be complete today Sir. U could tell me what to check for and please give us some info on how to choose the right fets for the h bridge of a sine wave inverter because I know this is important especially in that the fets are switching at high frequency Sir. I will go to the link u refer in the mean time. Thank u for ur support alex
Alex, I think we should discontinue using this page for writing comments because it's overloaded with comments, you can post the same in some other relevant article.
Yes your previous comment reached me and I have answered it with a link, I'll repeat it for you:
the heat could be due to many different hidden factors that fets are typically prone to, I have discussed it in the following article:
https://www.homemade-circuits.com/2013/09/mosfet-protection-basics-explained-is.html
For an initial verification I would recommend using TIP142 BJTs,
BJTs are much easier to handle than mosfets, so you can try these just to make sure all is well with your basic design, later on you can replace them with mosfets for comparing the outcomes and then troubleshoot the difference.
All FETs are identical with their basic characteristics, they only differ with voltage and amp values which must be chosen as per the wattage of the application.
thank u Mr Swagatam.
Ok let me understand now our design is pwm version
I was thinkg of how to increasing efficiency in our design I have finally settled with ur design with the h bridge using the transformer with no center tap. but I am supplying the h bridge with low voltage like 24 or 48 v Not using the small ferite transformers and little fets using high frequency power supply section not that design. I was able to induce pwm also on the high side today but i need to sort out some unbalance voltage in the h bridge before I give u a better report. So it is here when i induce the high frequency I start to experience some heat so I ask about sine wave inverters and heating Sir.
Hello Alex, the heat could be due to many different hidden factors that fets are typically prone to, I have discussed it in the following article:
https://www.homemade-circuits.com/2013/09/mosfet-protection-basics-explained-is.html
For an initial verification I would recommend using TIP142 BJTs,
BJTs are much easier to handle than mosfets, so you can try these just to make sure all is well with your basic design, later on you can replace them with mosfets for comparing the outcomes and then troubleshoot the difference.
hello Mr swagatam I did some more work today on the h bridge and was able to get the high frequency pwm into the h bridge by connecting to the low side gates. Just need to do some more testing tomorrow and let u know the results Sir. A question that i need u to answer clearly that has been bothering me since i started to build sine wave inverters.
1) do sine wave inverters produce more heat than square wave inverters
2) What contribute to the efficiency of an inverter and what can we do to make an inverter more efficient. Thank u for ur usual support Sir . I await ur reply
Alex, If a PWM version of sinewave is used then the heat will be minimum, if sinusoidal waveform is used for the triggering as we have in power amplifiers, it will generate a lot of heat.
use ferrite trafo for increasing the efficiency to 95%.
ok thank u Sir i am working on a h bridge because I tried two more ir1210 ic and it still not work for me no power out . as soom as i finish this h bridge I will try inducing the pwm again and let u know the results Sir. Have a good weekend Alex
Sure Alex…Thanks!
thank u Sir for ur time always. I will try this today again because I think I tried itt that way but was not getting no high frequency on the output. So the fets must still be connected to the square wave drive circuit but the diodes connected to the gates also at the same time. Just checking on the circuit which uuse the ir2110 mosfet driver to make the pure sinewave inverter u designed I see where u sent the pwm on the high side Sir so I just want to double check which is the right side. We await ur reply
Alex, OK now I go it, you are referring to the HIN pin of the IC in the following diagram right?
easy-electronic-circuits.blogspot.in/2014/05/100-watt-to-1000-watt-pure-sinewave.html
….yes the PWMs are injected here, even if it was injected at LIN it would have produced the same results.
Actually previously I was referring to the gates of the low side mosfets not the IC pins, if the PWMs are intended to be integrated with mosfet gates then the low side mosfets must the chosen
Thank u Mr Swagatam for ur support. Now I have a better understanding on the concept because I notice the commercial inverters that us e transformer are not center tap but two wire using h bridge topology. I built the new inverter u designed the 100 to 1000watt using the ir2110 but I am having some problems . Not sure if the ics are good because I remember buying some some long time ago and they were not good. What is happing also is where i feed the 5v this voltage rises to 9v and the regulator works well when one of the ic is not in place. Question could i use the same principle with the 555 pwm using the two diodes to feed the h side as u stated . In a previous post i think u said the low side please help me here Sir. I post the message on the page but I am not seeing it coming up. I await ur reply. Thank u
Alex, the PWMs should be applied to the devices that are directly referenced to ground, since the low side mosfet sources are connected with the ground these become suitable for the PWM integration.
Not sure what may be the problem with your ICs, the layout of these circuits are too critical and require a lot of care while designing and assembling, a PCB becomes a must for making these work correctly.
This page is loaded with comments and therefore half of them are hidden, press "load more" until all the comments are opened,
you may quit this article and start posting under some other similar article which has less than 200 comments for avoiding this trouble.
Thank u Mr Swagatam for ur support Sir. One question to settle my mind on my final design. Is it better or more efficient to use a h bridge output to produce sinewave over a pushpull transformer output in building this inverter. I really need to know so we can consentrate on a certain design to complete ur sine wave inverter sir. especially to overcome the heating problem. Thank u
H bridge is more efficient since it allows the push pull effect to pass through the entire winding whereas in center tap the effect is only across half winding making it necessary for a bigger trafo compared to full bridge topology.
But in the present case we are using center tap at the primary, so the concept does not apply in our case….you may have to use full bridge on both the sides to make it truly efficient.
is there another compatable ic we could use because this irs2453 is kind of difficult to get in my country. Sir
there's no other reliable IC or method without the shown full bridge driver IC, you can try using two half bridge drivers as shown in the following design:
easy-electronic-circuits.blogspot.in/2014/05/100-watt-to-1000-watt-pure-sinewave.html
Thank u Mr Swagatam for this link using this ir2110 I will try and get this ic and see how well this circuit works. I saw ur new circuit with the triac it looks real interesting. so you are saying with this design we should have less harmonics to content with so we should not have the heating problem that wea re having now i guess. we really appreciate the different concepts u show to us that no one esle does because this is always a hush hush topic I dont know why.. (So we would inject the pwm through the diodes from the 555 into the high side of the ic in this case.In the one before u said we could inject it at the low side fets. Question the pwm should be only injected on one side of the h bridge and not on both sides as in the inverter that uses transformer with centre tap . I am making these refereces to the circuit that uses the ir2110 fet driver. Thank u for ur support Sir
thank you Mr. Alex,
yes according to me this idea will be free from harmonics, although I am only assuming it, let's be hopeful.
since a full bridge is, both the low side will need to be injected with the pwms for getting a uniform sine wave on both the halves of the AC cycle.
the center tap side will not require any PWM feed, the primary side is only for creating a 500Hz square wave for the required 300V step up at the full bridge side.
I see the design Sir but not sure how to do the connections to the original inverter could u help me here .Should u build that H bridge circuit with 50hz oscillator and then rectify the voltage fromm the original inverter AC output voltage to 320DC and apply to the fets in the h bridge ? SO would u connect the diodes now from the ppwm to the gates of the fets in the h bridge. Please give us a clear understanding here Sir . Thank u
take any square wave inverter with frequency anywhere from 100hZ to 1kHz if an iron trafo is used.
rectify the 220V AC output of this inverter to get around 310V DC.
Now use this 310V across the full bridge mosfets as shown the above link for getting the required 50Hz 220V AC back.
the gates of the two lower mosfets could be triggered with the 555 PWMs for getting the required undistorted PWM sine wave output directly for feeding the connected load.
thank u Mr Swagatam well I was more thinking about the ratio as u say so as to get a wider range of adjustment I agree.I will just wait to see if u come up with anything soon for the heating cause. and in the mean time if there is a link u can refer me to for an online sine wave output filter calculator where I can plug in my parameters to get the values for my inverter filter I would appreciate Sir
Alex, as suggested earlier you can try using the PWM processing at the secondary of the transformer through a full bridge driver network as given here:
https://www.homemade-circuits.com/2014/01/simplest-full-bridge-inverter-circuit.html
the above must be used across the output of any ordinary square wave inverter for getting the intended modified pure sine wave without hopefully worrying about the mosfet heating and/or harmonic disturbances.
hello Mr swagatam would u agree with me that in a sine wave inverter the output transformer is one of the most critical component to be designed so that u have a stable sine output at all times. To me it seems it has to be designed better than in a square wave inverter to deliver the required power as u recomend using 6-0-6 transformer for 12v inverter when building it for sinewave. If I am wrong be help me here Sir thank u. Alex
thank you alex, a 6-0-6 or 9-0-9V ratio is recommended for a 12V battery inverter so that the Pwm RMS control is able to get a wider range of adjustment, but the design of the transformer has no significance with sine wave or square wave inverter, it's basic job is to step up the voltage as per its winding rating across the output, with a waveform that's been applied at its primary, ……….nothing more than this.
ok now I understand fully Mr Swagatam so in my case I dont need to have 300v I will try to reduce this and tell u the result Sir and also try the earth . Thank u for ur support
ok Mr Swagatam as soon as u get this design ready please post us the circuit so we can test it and see which one works better.I had asked u a question some post further up but i still did not fully understand ur answer. The inverter u designed was to deliver 220v Ac and u said we should have about 300+v square wave before we appliy pwm to get the 220v AC so i was asking u if like in my country herewe use 120v AC so should we still have to have 300v+ AC before we apply pwm to get 120v Ac sine wave of our square wave v would be less. Please make this clear to me Sir . Thank u
300 is the approximate RMS for 220V
for 120V it's 155V approximately.
There's another idea which could be tried to eliminate the harmonics without adding anything to the existing design.
I was thinking of using a center tap winding at the secondary also, and connect the center tap to a good external earthing such as a home water pipe line.
Then connect the load across this center tap and any of the outer winding or two different loads across the outer taps of the winding and the center tap (earthing).
The earthing would hopefully sink the harmonics, I am only guessing… not sure, though.
ok Mr Swagatam so would the output be transformer based or fets in a H bridge configuration. As u know Mr Swagatam the transformer output is the better type for heavy loads thats why we stick to ur design. Sir.
Mr. Alex, output and input are proportionate with their power.
input is low in voltage high in current, the output is just the opposite.
we have to simply select fets having high voltage and low current specs.
Than u MR Swagatam for ur support I will do the adjustment on the voltage but i still await ur help on the heating as soon as u can find the problem. Please dont forget this problem because it will help us to complete one of ur Best designs Sir.Thank u so as soon as u find please post it to us.
sure! thanks
Hello Mr Swagatam just a reminder to u on the heating problem. thank u Sir
Hello Alex,
we have to employ an entirely different topology for avoiding this:
use an ordinary square wave inverter, filter and convert its output 220V AC into 310 RMS DC and then again switch this DC through a PWM circuit for achieving an undistorted hassle free 220V sine wave AC
you will need a full bridge mosfet driver for this application.
hello sir
pls could you just explain this statement a bit more. it seems interesting
"I think instead of chopping the battery voltage at the primary, it would be interesting to see what happens if the PWMs are fed to a triac circuit controlling the secondary or the output of the trafo."
micheal
sure Michael, I'll post this article soon in this blog,,,,,"PWM inverter using triac"
hello sir,
its been a while.
putting a capacitor directly at the output of the inverter will cause heating of the mosfets due to the fact that the capacitors have to charge and discharge very fast at high frequencies every second and so it may not be fully charged or discharged before each cycle begins again causing the fets to heat up.
an LC filter is used instead.
micheal.
Thanks Michael, It could be true, I'll investigate further about it and post the info soon…
Thank u mr Swagatam let me try to understand the concept. U are saying a transformer set for primary volt 12 battery voltage winding and 300 secondary will work diferrently from one that has a primary voltage set for 6 v but operated still with a12 volt battery and have a secondary volt of 300v will work diferrently when it comes to RMS in a sine wave inverter ??????? The other part about reverse transient or spikes please check to see what could be the solution SIR. Please tell me now if I should still have 300v for operating a 120v inverter or it would be less for 120v. Thanks for ur support
Alex, either the primary voltage rating should be less than the battery voltage or the secondary voltage rating should be more than required normal voltage, any of the two will result in an increased output, both together is not required. This increased output range then could be reduced through the RMS setting, until it shows the required normal range, 120V in your case.
The transient problem is difficult to solve, presently I do not have the info regarding it, I'll try to look for it if possible.
Mr Swagatam a very important question here Sir i use 120v in my country so according ur circuit how much volt square wave should i have before introducing pwm I see u use about 300v how much should we be using Alex just checking to see what could be our heating problem . Thank u
Mr Alex, the heating problem could be due to reverse transients or spikes genearted due to the introduction of the output capacitor, which will need to be investigated alot before a proper solution could be found.
the transformer voltage should be rated below the battery voltage to allow a settable PWM control margin, so it's the trafo rating which needs to be matched (lowered) correctly for allowing RMS control, not the squarewave voltage or the battery voltage.
this has no connection with the heating of the mosfets, if set correctly.
Thank u Mr Swagatam. I am using 24v system not 12 v.I see further up in the post other people were having the same heating problem sir. but I dont know if they found a solution so please see if there is anything can be done to help this problem because it gets hotter when u put a load on. we await ur help here
Thank U Mr Swagatam this is a project that is well appreciated all over. As I say It works to some extent only the heating is a major concern dont know if anyone has the same problem and can shed some light on this but please see if u can help us here Sir. Without the filter u can run for a Month and no heat. So dont know if the fets are not turn on enough or what but we await ur support.
you are welcome Alex, the only way to reduce mosfet heat with filters on is by using much high operating voltage for the inverter which would allow a reduced current to be used.
so may be we can use a 48V/5 amp parameters, instead of 12V, 20amps, any other solution looks difficulty with passive filters included.
thank u Mr Swagatam the other problem I am having still is the heat the fets are giving off when the filter is connected. If u use smaller values u may get less heat but ur wave form is really not pretty . The bigger values we use like 5uf we get a more smoothe wave form but more heat and when load is applied it gets hotter . Could u tell us what area we could experiment with to see how we can overcome this problem. I want to correct this first before I go further with the frequency problem Sir. Thank u for ur usual support
Hi Alex, I'll try to figure out a suitable solution for this issue.
I think instead of chopping the battery voltage at the primary, it would be interesting to see what happens if the PWMs are fed to a triac circuit controlling the secondary or the output of the trafo.
Chopping the output AC instead of the input DC could result in a much improved waveform and all additional inefficient passive filters could be avoided.
Let's think about it and find a solution.
thank u Mr Swagatm I just see my post now. Ok i know that the inductive load was more than the bulbs and other loads but the back emf as u say would this be cause from the filter being not the correct designed filter for this load. The inductive load was a fridge compressor it start yes but the frequency as i said went uo to about 800hz so I had to plug it out Sir. Please helpn us here
Since inverter is a small unit it won't be able to overcome the back emfs generated from the compressor so it cannot be rectified. It won't affect the inverter or the compressor in anyway, according to me.
our mains AC is also flooded with such back emfs from motors, fans, fridges etc that's why we require a power factor corrector installed in our homes to counter this effect from inductive loads.
hello Mr Swagatam I just found how to comget to this point in ur forum after many Months. Thank u for tell me how on ur mppt site. I built a filter for the inverter what is happening is on certain loads like a bulb solder iron I will still have 50hz but with like an inductive load my voltage falls and the frequency fluctuate and goes up like to 800hz . is this cause from the design of the filter Sir. Thank u for ur help here
Hello Alex, did you check the wattage of the inductive loads? if it's also same as the bulb or the soldering then I don't think the voltage would drop,…the inductive load that you have used could be much heavier in amps that's what is causing the drop may be.
the frequency change could be due to back emfs from the load, it's nothing to worry about according to me.
hello Mr Swagatam I have been trying to post a question for the past few Months but unable to get into ur forum. I was asking u to send us a link or give us the calculation to design a filter for the sine wave inverter , we have partially completed this ur design but the pwm frequency is 40khz so we need a filter for this frequency and running at 60hz. Thank u sir
hello unknown, as you can see all your comments are successfully posted so far, so it isn't a problem….on this page over 200 comments are hidden and may be seen by clicking "load more"
I do not have any info regarding filter calculations but I'll surely try to find it somewhere online and provide it to you if I find any.
hello Mr Swagatam I could not get on to post my comments for months. Anyway we were able to put this circuit to a certain stage but now we are asking u if u could post the calculations to build a output filter for the inverter. we are using higher frequency 40khz. or u could send us a link Sir. Thank u for ur help
Hi Swagatam,
just wondering how Mr. Theofanakis' circuit could be modified to yield a true sine wave, like the one Robin's seems to provide.
Hi Pat,
What I have tried to do with the two 1N4148 diodes, the same has been applied using two 4066 electronic switches in Theofanakis circuit.
no matter how much accurate you make the switching, you cannot avoid the harmonics, which will be generated by the trafo coil and will need to be suppressed using capacitve/inductive filters.
Thanks for the reply Sir.
But why did Mr. Mexzony ask you about conversion of the high frequency ac output to 50 hz pure sine wave in the last comment ?
Which means i will get high frequency ac wave if the LC filter section is kept disconnected ??
The doubt is still not cleared sir. Can u help me ???
Deva, 30 kHz is not a part of the circuits discussed in the above post, so it has nothing to do with the above 555 circuit designs.
Please go through the entire post and the waveform images to know the exact details of the circuit functioning.
hello sir,
is it possible to rectify a very high frequency AC voltage up to 30Khz like for example if we have a 220vAC at 30Khz can we use a voltage divider network to step down the voltage and then using a diode bridge network to rectify it.
The reason i am asking is that when i put an LC filter at the output of the inverter i will get a clean 50Hz sine wave so am just wondering where it is best to put the feedback loop.
Do i put it before the LC filter so that it is high frequency PWM AC that gets rectified ?
or after the filter so it is low frequency AC sine wave that gets rectified?
i am just looking at which will have a faster response as to correcting the output voltage as per load specifications.Hope you get my point Sir
Micheal
helo mexzony
the 30kHz frequency is not relevant to my above artice, so i'm sure what you are referring to.
anyway, the load correction is not dependent on frequency, it just needs a proportionately stepped down DC input which can be done as given in my "load regulator" post.
for high frequencies, the rectifier diode must be a fast recovery type, example BA159 diode.
Sir, Could you plz explain the function of two diodes connected at the output stage ( to the gates of mosfets ) ???
I got exact 50 Hz frequency at the gates of mosfets by adjusting the pot, without connecting the pwm stage.
But when i connected the pwm stage , i got approx. 1585 Hz at the gates ?
I have read the process of splitting the square wave into small pieces by high frequency wave (2 Khz ). But being a person not having deep knowledge in electronics but having enthusiasm to know much, could you plz clear ma doubt, that this high frequency (1585 Hz ) wave ( after connecting pwm stage ) will affect the frequency of the ac output to deviate highly from 50 Hz ??? Will it be as high as 1585 Hz ac sir and will it affecf the sophisticated components…….
Sorry 4 the bad english
Deva, the meter will indicate high frequency at the gates due to the chopping of the 50Hz frequency.
This will not affect the actual 50Hz frequency at the output.
you can confirm by measuring the frequency at the output after including a 1uF/400V capacitor across the output winding.
Sir,
On checking the gate voltage when the pwm stage is kept disconnected was found to be 6.16 V approaximately, but when it is again checked while keeping the pwm stage come to act, decreased to 2.4 V , that is why i have asked you the last doubt sir
Arun,
the pwm stage is specifically introduced so that the power (RMS) can be reduced or increased as per user demand.
you must use a transformer whose voltage rating is 50% less than the battery voltage, and then adjust the PWM pot for getting the required output.
Pls go through all the comments/replies above posted by mexzony.
Sir,
Will the amount of voltage and current fed to the gates of the MOSFETs ( I used IRF540N here ) will influence the power delivered at the output ??
Will it be the reason for change of power obtained in my two configurations ( with pwm and without pwm ) ?????? hope you will reply to all ma doubts soon
Hellow sir,
I have tried the finalized circuit in this page proposed by Mr. ROBIN, but didn't get much power output. I have also tried one of your circuit in this post
https://www.homemade-circuits.com/2013/10/pure-sine-wave-inverter-circuit-using.html?m=1
But the result was same – less power output.
But when i again arranged your circuit , this time without connecting the PWM stage ( only the ic 4047 section was used ) i got much more power output than before indicated by much more brightness in 100 W bulb connected across the output terminal.
I have tried the circuits many times. But didn't get any improvements. Could you please help me sir
hello sir,
what is the difference between using a single diode for rectification as opposed to using the normal 4 diode bridge connection since after rectification they will both produce clean DC voltage?
one more thing what type of capacitor do you recommend i put from centre tap of trafo to ground?
hello mexzoy,
a bridge network will produce much cleaner DC than a single diode/capacitor network, but since here the filtration level is not critical we can go for a single diode config.
use a high value, around 200uF/50V capacitor across the center tap.
hello sir,
i wanted to ask what i the advantage of putting a filter capacitor from centre tap of the trafo to ground.i hear it will ensure that we have a clean AC.
if this is possible what type of capacitor and what value is recommended.
Micheal
Thanks for the detailed information about your progress, I think you are heading in the right direction and will succeed soon.
Yes that's true adding a cap across the center tap and ground improves the output response, because the rapid voltage/current switching induction across the trafo winding creates a lot of noise which could amplified at the output….a capacitor will suppress this considerably.
hello sir,
i and my friend have made progress on this inverter so here is some news
remember the voltage correction circuit i sent you using an error amplifier.
The good news is that we were able to test it and here are the test parameters
1) FETS switching at high frequency PWM with a filter capacitor at the outptut of a 9-0-9/145V trafo which is ideally designed to give out 120VAC RMS
2)we used a pair of IRFP260N FETS meaning one on each side so the inverter is capable of giving out a 250watt output based on the specification of the FETS
3)a small filter cap was used and we had a very reasonable sine wave just like Mr robins.
4)output voltage was at 130VAC
5)loads powered were a 60watt bulb and a 60watt soldering iron a total of 120Watt load and the voltage dipped and immediately corrected it self to 130VAC modified sine(digital sine wave) and stayed there for as long as we wanted.
6) we then tested a radio that usually buzzes with a square wave inverter which we have available
so as to compare performance and the radio buzzing stopped totally with stable voltage.
Now the problem which we faced before was that without feedback and with PWM ON the voltage used to dip from 130VAC all the way down to as low as 56VAV even atimes to 20VAC when we powered both the bulb and soldering iron but this is a major leap for us although i still have to do some tweaks.
One more thing i have to say is that i used a totem pole driver using power transistors and the basic 50Hz square wave pulses was first broken down via the PWM diodes and then introduced to the base of the totem pole drives since thay can handle high frequency input, so basically the PWM diodes are in between the square wave oscilltor and the totem driver so the output of the totem just goes into the gate of the FETS.
We are getting there though it has not been easy but i like the challenge besides it is a learning experience and one i am willing to see through to the end.
Once i have more news i will post.
Micheal
hello sir,
so technically i can power the LED with AC voltage,i only just have to step it down to an acceptable input AC level.
i think i wont need to rectify it to DC because looking at the your article where you connected it directly via a 56k it got me thinking that the response will be faster and more accurate as it is powered dircectly with a stepped down AC and whatever happens at the output of the inverter it will accuratey reflect on the LDR.
i am just saying that a rectifier stage might not be neccesary as the LDR should get accurate signals and allow proprtionate current to flow.
Hello Mexzony,
I think a rectified input would give better results, so it must be rectified and filtered using a single 1N4007 diode and probably a 1uF/100V capacitor
Because the pin5 of IC555 or ay PWM IC would process a rectified input level better than pulsating one.
hello sir,
i have seen the article on how to use the LED/LDR combo but what i want to confirm somethings
1)what type of LED do i use is it an ordinary or the infrared type?
in the article according to your drawing you indicated that we connect the LED directly to the 220V output of the inverter through a resistor.
but i want to ask
2)what is the maximum voltage i can pass into the LED
3) can i step down the voltage to an acceptable voltage range and then rectify it to DC and then power the LED with DC instead of powering directly with 220VAC.hope this approach does not affect quick response of the whole system.
Hello Mexzony,
Any LED that emits visible light can be used.
A potential divider using resistor network is more preferable.
The voltage to LED should be as per its rated specifications.
The shown 56k or any high value resistor limits the current to an extent where the voltage to the LED automatically drops and gets adjusted to the specified limit.
hello sir,
i have decided to go for the LED/LDR arrangement as it is more effective but help me understand this statement more.
"4n35 type of optocoupler can be used for voltage corrections but it won't behave like the one made by using LED/LDR which adjusts both ways, in case if the load increases or decreases.
4n35 will only keep the voltage at some constant level,"
what do you mean by the LED/LDR adjust both ways?
also what does the statement the 4n35 will only keep the voltage at some constant level?
i thought both optos do the same thing.a little help here.
also how do i implement the LED/LDR connection?
hello mexzony,
the conventional phototransistor type optocouplers will correct the output voltage by shutting and restoring the DC circuit rapidly at the thresholds…., whereas the LDR/LED combination would do quite the same but instead of shutting/restoring it would adjust the PWMs accordingly for implementing the corrections.
please see the last diagram shown in the following article:
https://www.homemade-circuits.com/2013/01/300-watts-pwm-controlled-pure-sine-wave.html
hello sir,
thanks as i understand how to step down the voltage using a voltage divider so basically i will step down the AC voltage before feeding a bridge rectifier the only thing is that it will not be isolated from mains so i will have to be careful there.
hello sir,
1)i forgot to ask,the LDR/LED combination is called what?
2)hope this combo eliminates the need for step down trafo?
if you have a diagram or something to properly explain how i should use this combo i would be glad.
3)hope you understand my error amplifier explanation
thanks so far for the knowledge you have impacted in me.
hello mexzony,
it will be also called an optocoupler since the coupling is done optically.
Yes i understood the error amplifier circuit.
you can eliminate the use of a stepdown transformer for all the methods that we have discussed so far by employing a voltage divider network as clearly shown and explained in this article:
https://www.homemade-circuits.com/2014/01/automatic-output-voltage-regulator.html
hello sir,
thank you for taking time out to access the diagrams i am grateful.
You said that an optocoupler cant be used for voltage correction,anyway that diagram involving the 4N35 optocoupler was actually gotten from a site which used the SG3524 IC and it was configured in an emmitter follower mode so i did not design it myself. you know better than me anyway as you are the Boss.
Ok so heres the thing,Sir in this inverter i want to have space as much as possible that is why i was exploring using optocoupler so that i dont have to use a step down trafo and you just said that you have used a LDR/LED so i want to know "how i should go about using an LDR/LED" for inverter voltage corection and most importantly "what type of LED"because we have different types in the market.
hellp mexzony,
4n35 type of optocoupler can be used for voltage corrections but it won't behave like the one made by using LED/LDR which adjusts both ways, in case if the load increases or decreases.
4n35 will only keep the voltage at some constant level, it's as good as the transistor circuit which is shown above in the article.
You will use a voltage divider network for it as done in one of the related articles using an opamp.
hello sir,
sir the left opamp is configured as an error amplifier which is intended to increase or decrease duty cycle just like how the SG3525 chip contains an onboard error amplifier.
this one is fed with a 5v reference which compares with the sample voltage from the output and amplifies their differences.
it is supposed to behave just like the SG3525 error amplifier
hello sir,
pls check for two mails from mexzony@gmail.com
i sent you some circuits on how i intend implement auto voltage regulation using error amplifier with an optocoupler.
you can access it for your opinion.
micheal
I have sen your sent diagrams, an opto coupler cannot be used for voltage corrections as I have already mentioned so the relevant diagram is not appropriate.
I could not understand the second diagram where you ahve two opamps.
The right hand side opamp is used as a PWM generator, but how's the left opamp is configured? I could not get it.
hello sir,
quick question
an optocoupler can accept very high input voltage so in one of your circuits using optocoupler the 220VAC is converted to DC voltage without using a step down trafo so i am assuming that the DC voltage is about 220VDC and above.
now this high volt DC is passed into the optocoupler LED which transmits a light signal and i know that the optocoupler is also powered from a 12V source.
my question is this,
what range of voltage would come out of the optocoupler?
will it be in the range of 0 – 200VDC or 0-12VDC from which it is powered.
basiaclly since i see the optocoupler accepting almost 230V input and at thesame time being powered from the 12V source,what will be output voltage range of the opto in proportion to the output voltage of the inverter
hello mexzony,
an optocoupler is specified for 3V operations.
I have never used optocoupler for inverter voltage control application, because optocoupler will not work correctly.
I have usec an LDR/LED for the corrections.
….if 220V DC is used as the input then it will need to be dropped to 3V by using potential divider network before applying to an optocoupler or an LED
hello sir,
is it possible that after a brigde rectifier that gives say 40VDC one can use 2 different variable resistors connected after the bridge so 40VDC goes into the 2 pots but then the pots are adjusted to give different voltages from thesame 40VDC source
hello mexzony,
you can chop 5V with 12 and 12V with 5V if you use diodes and transistors because in both the cases we are only using the space of the duty cycles for cutting the voltages into blocks.
you cannot chop 50Hz signals with a 50Hz input, so alone sg3525 cannot be used for this. you can use a sg3524 and a 555 circuit together for achieving the feature.
yes two pots can be used from a single voltage source for providing two separate potentially divided voltage outputs.
hello sir,
it is possble for the SG3524 iC to replace the 555 and 4017 square wave oscillator circuit so now the SG IC is now the new square wave oscillator and then the PWM circuit can be introduced to chop the individual 50Hz square waves coming out of the SG3524.
the reason i am suggesting this is so that we can take advantage of the SG's soft start feature especially when we power loads that draw a lot of current.
Hello sir,
if i have a 50Hz square wave oscillator powered with a 5V supply we can assume that the peak voltage of the square wave pulses are 5v(up to supply voltage).
Now if i were to produce PWM from a 12V source such as a triangle/Dc PWM,will it be possible to chop the peak 5v square waves into smaller blocks using the PWM wave from being powered from the 12V source.
basically using a 12V source PWM to chop a 5V source square wave?
i do know that we cant chop a 12V square wave with a 5v source PWM but will what i just asked work.
hello sir,
if i have a comparator which accepts DC input into its inverting input and i have two potentiometers or variable resistors and i wanted to use these two pots to pass voltage into thesame inverting input but not at thesame time instead one pot passes DC voltage into the inverting input and then the other pot then takes over.
basically its like a turn by turn basis,so i was wondering if i could use a relay or something that will link both of them that will make both pots take turns in passing input into the comparator
Hello mexzony,
yes that can be done.
sir i want to try this circuit but my question is all the 12v sign should be connect together? as well as negative? i want to build 3500W how many of IRF540N should i need please help me with that i have a 3000W transformer including the pats list its right here on my table so im waiting for your respond be for i will starts thank you
Biannz, Dont try this circuit, it's even more difficult than the one you tried before.
Try a simpler one first, and gradually upgrade it as per your specifications.
you can try the following one to begin with:
https://www.homemade-circuits.com/2012/09/mini-50-watt-mosfet-inverter-circuit.html
Sir which one is better for me.
I want to try 600W inverter using center trap
transformer 12v 0v 12V.
https://www.homemade-circuits.com/pure-sine-wave-inverter-circuit-using/
Min, the second design is the recommended one.
hello Sir,
you just took the word out of my mouth because the reason i was asking about trying to bring the voltage all the way to 0v or ground instead of 0.6V above ground was because i actually thought if the PWM went all the way down the eventual pure sine waveform after filtering would really improve but you just made this statement :
"the 0.6V drop across resistors in fact helps to create better modified sine waves"
please sir could you enlighten and convince me(cheeky laugh) me on how exactly it does this?
Thanks
Sorry, I think it won't work, i realized this after some thinking, because the mosfets will start conducting abruptly and fully after 4V and will not respond to the diode voltage steps.
then i guess it does not matter if i use a schottkey or a normal signal diode then
that's correct, only the RMS value is what gets implemented here with the diodes
hello sir,
1)what type of transistor and how do we connect it.
2)what type of schotky diode and will it effectively chop the square wave pulses.
i am exploring options so bear with me.
1) use BC557 (PNP), short base with collector, this becomes the cathode, while the emitter becomes the anode.
2)their are plenty of them you can Google, according to curret ratings, but these are costly.
the 0.6V drop across resistors in fact helps to create better modified sine waves.
Hello Sir,
i know this may sound like a silly question but what happens if we connected two 1n4148 diodes in parallel?
would this allow the PWM to reach very close to 0V or ground as right now they are at 0.6V above ground?
also would this have an effect on how it effectively chops the square wave pulses.
Hello Michael,
even if you connect 100nos in parallel it will still show a drop of 0.6V, you have to substitute it with a transistor or a scotky diode for getting around zero drop
hello Sir,
when operating the 4047 circuit as a normal square wave inverter i want to know
1)can i use a mosfet driver like ir2110 after the 4047 circuit to drive the mosfets as a basic square wave inverter and if so how do i connect this mosfet driver in push pull mode since i noticed that this drivers are normally used in half bridge designs where we have high and low side but for a push pull configuration it is usually low side driving that is involved.
hello michael, a suitable example can be seen in the following article.
https://www.homemade-circuits.com/2013/09/half-bridge-mosfet-driver-ic-irs21531d.html
hello sir,
i want to ask if in all these battery charger circuits that have to use step down trafo capable of delivering high current needed to charge the trafo.for example a 12V/1000AH battery will need a step down trafo of maybe 15-0-15/220V rated at say 10A to be able to charge the battery and this trafo is installed into the charger bridge ciruit for rectification.
Any way what i am trying to say is that,
1)is there a circuit where i dont need to use a step down trafo instead the circuit can step down 220VAC to a lower AC value and then rectified with a bridge
2) the most important thing is that this circuit can deliver very high current maybe up to 100Amp if possible after the bridge rectifier needed to charge the battery and we should then be able to increase or reduce this current depending on the number of batteries we want to charge.
3) it should have automatic features that monitor battery level and things that make up a good battery charger.
i just dont want to use another trafo after the main inverter trafo if possible.
Micheal
helo Michael, a trafo does all these things together, it steps down 220v AC to 15v AC, allows the current to the required level, it also keeps the lethal mains isolated from the DC circuit and battery….so a trafo is a must and the only solution
hello Sir,
is it possible for me to wind a trafo like a 10-0-10/300V or even if possible 10-0-10/350V
and it will be efficient or even 10-0-10/500v.
i just want to know if all we have to do is just increase the windings of the secondary.
hello mexzony, transformers can be wound as per individual preferences and specs, so it's possible.
Hello Sir,
i want to ask a technical question
I have this big 15-0-15/240V 800w trafo and i use it to test this inverter.
is it possible that when testing the voltage correction circuit to see if it will regulate voltage under different loads that this trafo may pose a problem in finding out if the voltage will remain stable because the input voltage of the trafo is way beyond the power supply voltage and it is always recommended that the trafo input voltage be equal to or less than the power supply voltage.
So in my case i use a 12V power supply yet using a 15-0-15 but in reality i should be using a 12-0-12 or 10-0-10 so this may affect me determining if the voltage correction system is working or not.
i even tested the trafo with the popular SG stablle inverter circuit.
Am i making any sense sir.
Hello Mexzony,
the voltage regulation which I have explained has no relevance with the primary (15/0/15) it's associated with the output voltage (240V) which is used to drive the IC after stepping it down and also for sensing the proportionate amount of rise or fall for the required correction.
hello sir,
just wanted to let you know that i and my friend we are still working on this inverter and as soon as we have better news we will let everyone know.
Micheal
OK, thanks Michael.
Hello Sir,
You know i have been thinking alot about this SG3524 circuit.Since it has inbuilt voltage correction which has proven very effective and fast this means that when we connect the diodes and break the square wave pulses it means that when the IC SG3524 adjust the width of the square wave pulses this will proportionately adjust the width of the broken pulses thereby maintaining stable output voltage so we will take advantage of the SG3524 IC.
Instead of trying to manipulate the main PWM IC the SG3524 just does the job for us.
I will study it in detail and let you know my mind but i honestly think it will work.
This might solve this issue of voltage corretion.
What do you think Sir
Micheal
Hello Mexzony, 3524 IC won't break the pulses into small blocks, it will only reduce or increase the basic 50Hz pulses resulting the required RMS control with crude sine wave optimization.
Hello Sir,
i meant that we use the SG as the basic square wave oscillator but with the added advantage of its Automatic voltage regulation and then we introduce the PWM circuit to the gates so my thinking is that when the SG increases the basic 50Hz pulses the avreage PWM blocks will also increase and when the SG reduces the basic 50Hz block the avrage PWM blocks also reduces.
this is just a thinking.
sir if you think it is feasible and you have anything to add i am all ears.like i said its just a thinking.
Hello mexzony,
SG3524 will not increase or decrease the 50Hz freq, this frequency will be fixed as per the selection of Rt/Ct. and the 50Hz frequency has no utility in the above explained 555 pwm circuit.
Sir is it possible that this heating has something to do with flaw in the circuit because i have not had any unusual heating when using opamps and a comparator even with a capacitor at the output and i even plugged my laptop charger to test the circuit and the mosfets still ran normal.
Anyway its just my opinion.
Mexzony can you show me your circuit design (using opamps)? I can assess both the designs and infer my opinion about them.
Mr Swagatam I tried the filter it works but it causes the fets to run very hot please help us here Sir
try reducing the values of the capacitors until an optimal condition is reached.
The reason i asked about the diodes was whether it would make any difference to the speed at which they break the 50Hz square wave pulses. like i said just playing around.
No it will not make any difference, the waveform blocks will not reach ground competely and will stay at 1.2V above the zero line during zero PWMs.
Sir can two diodes be joined is series just like two batteries so we join the anode of one diode to the cathode of the other making it seem like one new diode and if so is there any advantage to it.
2)also can we buffer the PWM wave form if possible.
Dont mind me just palying around as i try to understand some things regarding circuits
Sir is it possible to push more than up to 90% duty cycle into a trafo to make up the positive and negative cycles at an AC output.
i noticed that almost every inverter using push pull trafo uses a 50% duty cycle and i noticed that with 50% duty cycle there will be equal amount of spaces between the postive and negative AC cycles
you are referring to a crude modified inverter design, it can be implemented in the above explained design simply by removing the 555 PWM input. The spacing between the mosfet gate inputs from the 4017 IC will provide the required spacing that you are referring to.
Hello Sir,
right now i am at a stalemate because as per the main PWM circuit i have confirmed it working and wave form confirmed and inshort the inverter works as intended but the only thing holding me back right now is the choice of core for the trafo.
i have made enquiries and i have seen true sine wave inverters made by companies even where i just had my industrial training as a student because i study physics on school and did some electronics courses the past semester which made me end up in this companies.
Anyway i have opened many commercial sine wave inverters and i saw that this inverters use iron core trafos so i am kind of confused now as to whether i should go ahead and wind an iron core or should still do more and more research.
Sir if you have got professionals who know about commercial sine wave inverters maybe you could ask them if iron cores are used and the frequency they are being switched at.
Honestly this trafo issue is what is holding me back for working further
i have also made inquiries about ferrite too am just waiting for answers.
Efficiency i what i am after here hence the confusion
MIcheal
Helo Michael,
you can also use a iron core trafo for the above expained design, just make sure the number of chopped pillars are restricted to two or three at the most.
i think that while the filter will work one should first of all know that LC filters have cut off frequencies so using a filter one should know its cut off frequency.
Mr Swagatam has given us a blueprint on how the filter should look like but it does not have to be the values exactly as it was posted so what you should do alex is find out the frequency st which the FETs are switching and then design the filter to have a cut off frequency proportional to the switching frequency of the FETS.
for example if the FETs switch at 2000HZ bearing in mind that the fundamental frequency we need is 50HZ sine wave the LC filter should be constructed such that the cut off frequency is at say 500HZ meaning it should be slightly higher than the needed 50HZ but at thesame time not too close to the switching frequency.
Personally i have found out that if the original PWM frequency is say 2000Hz then when we then apply the diodes to the gates of the FETs the switching frequency of the FETs is usually half or slightly more than half the original PWM wave form.
So for a PWM wave form of 2000HZ and when diodes applied to the gates of the FETS we should have a FET switching frequency of say 1000Hz -1100Hz.
Hope this helps.
Micheal
thanks Michael!
hello Mr Swagatam I tried the filter this improved the wave form to a sine wave signal but the fets arew running reall hot . Could u help us here again. Foor sure the filter works (alex)
hello mr.unknown thanks for the info, you can try reducing the values of the capacitors to some optimal value and check the results.
Hello Mr Swagatam I see its kind of different to post our comments but the comment about saying thanks for the filter came from alex
hello unknown, comments are sent for moderation, so you won't see them immediately….what you are seeing could be a part of previously published comment……the recent comments can be seen by pressing the "load more" link at the bottom of the page.
thank u Mr Swagatam for the filter circuit I know ur bright students will soon respond to this have a prosperous New Year
thanks unknown! Happy New Year to you too!
Hello Sir,
i want to establish some facts with you
sir when i tested out the voltage correction system on the inverter with PWM diodes connected here is what i noticed using a 15-0-15/220v 1000w trafo
1)the gate voltageof the FETs read 2VDC with me viewing the 50HZ pulses broken down nicely into small calculated blocks and remember i could adjust gate voltage using the preset of the voltage correction circuit.
any way my first test was to adjust the preset up or down and it controlled the AC voltage nicely by adjusting the width of the pulses as i viewed it on my PC scope and so that is a pass mark.
2)at gate voltage of 2VDC with PWM on the output AC voltage read say about 157VAC. Now the 2VDC gate voltage means the average conduction voltage of the PWM waveform hitting the gates of the FETS so when i applied a load(a rechargeable lantern) the gate voltage still remained the same which is good.
3)Now the aim of voltage correction is to adjust the width of the pulses when load is applied so as to increase the average voltage at the gates of the FETs which will in turn increase conduction of the FETs automatically correcting the AC voltage output.Am i Right?
4)here is the main part
so with the first load plugged in,i then plugged in another rechargeable lantern maiking 2 loads and according to my assumptions the gate voltage increased from 2VDC to 2.41VDC which makes sense as the width of the pulses has become wider a bit so as to compensate for the extra load and i even viewed as the width (on time)increased on my PC scope which means so far so good.
5)Now heres the mini strange part
with increased width thereby increasing average PWM wave voltage to 2.4VDC i expected to get a slight increase in output AC voltage from 157VAC to say 157.5VAC since 2VDC is not far off from 2.4VDC.my assumption should make sense right?
6)Now what i got was a reduced AC voltage of about 153VAC and it stayed steady at that voltage but the gate voltage was still reading 2.4VDC so why the voltage drop when at 2VDC i got 157VAC.
it then occurred to me that a few factors might cause this and here they are
a)the iron core trafo which experiences increase in losses as frequency increases(proportional) which is why iron cores are not recommended for high frequency switching and this should make sense because gate voltage still remained at 2.4DCV so it acknowledges the extra load and adjusts the width which should mean slight increase in conduction yet output voltage reduced slightly.
i suspect the FETS are conducting more but the losses are occurring in the core of the trafo.
Based on this facts it is safe to assume that voltage correction adjust the width in proportion to the load but some how this is not fully reflected at the output due to iron core losses.
Sir what is your opinion since you are more knowledgeable than i.
i would really appreciate it if you could address each point i numbered with questions ending it.
by the way i used a parallel combination of two 12V/7AH batteries as power source.
Micheal.
Hello Michael, please note that the voltage correction is not handle a drop in output voltage.
If the batts current is unable to cope up with the load curret requirement, the correction feature will become helpless, even though the mosfets would conduct more,it wouldn't be able to supply the required current resulting in a proportionate drop in the output voltage.
Another point with the above load correction feature is that it won't help to increase the voltage, it's designed only to cut-off the gate conduction by reducing the 555 pin#5 voltage to zero at a predetermined limit.
Meaning once the output is set to say 240V, the correction will not allow the voltage to go beyond this level irrespective of the load wattage, however if the load wattage goes beyond the battery capacity and due to this if the output voltage drops below the set 240V mark….in this situation the load correction will do nothing or rather will not respond as it would be beyond its control.
By the way I have recently posted a more responsive and accurate load regulator circuit, you can find it here:
https://www.homemade-circuits.com/2014/01/automatic-output-voltage-regulator.html
Hello Sir,
everything i typed was in the assumption that the battery current is able to cope with the load current requirement.
Also i agree that if the output is set to say 240V then no matter the load wattage as long as battery current is able to cope it should maintain 240V and yes it should not exceed 240V but maintain it and that was the point i was trying to make.
The fact that the mosfets conducted more with increase in gate voltage say that indeed the correction feature responded as it should but from your explanation since i set mine to 157VAC and it droped to 153VAC i think it has to do with the battery current as the battery is an old battery anyway.
My only encouragement is that the width of the pulses became wider alllowing for more conduction at the gate of the FETs.
I will look into your new post about the more responsive and accurate load regulator ciruit.Am already on it as a matter of fact.
MIcheal
hello sir
is the above inductor diagram a second order low pass filter?
first order, double pole filter
Sir actually its not about just the design but about the process of winding one ourselves like a step by step instructions so that we can adjust the inductor because the inductor values will depend on the switching and cut off frequency which could be different for some of us..
You will have to do it by some trial and error, presently i have no formulas with me. the shown filter is a first order double pole filter circuit.
hello Sir,
A very happy new year to you and your family.
I was wondering if you know any links on how to make an inductor and LC filter circuits so that i can test the inverter using a proper LC filter at the AC output of the inveter trafo
basically i want to make an inductor on my own if possible.
Micheal
Hello Michael,
Happy New Year to you too!
I'll try to update the design very soon in the above article itself.
Please wats d name of d textbook u made reference to in d link below….. Can u send the pdf to tonisage321@gmail.com. Or get a link for the direct download. Thanks
4.bp.blogspot.com/-khKat0UA8Jw/UITpCnNd7yI/AAAAAAAAA_A/8x-KAD2aHLE/s1600/simplest60%20Hz%20Inverter%20circuit%20diagram.jpg
Sorry, i don't have this book with me, i had only only a page of it.
Continuation,
Now i used a BC557 PNP configured in the common collector or emitter follower and it worked in controlling the voltage after the initial voltage had been set using the 10k preset to give us a high voltage at the output.
but here is how it should be done.
on a side note i used a step down trafo 9-0-9/300ma/220V as feedback as i am not comfortable feeding 220V directly to the rectifier diodes.
1)after the whole set up has been wired both the 10k preset and the 220k preset should be at Ground or 0V.
2) remembering that the amplitide of the triangle waves have to be very high for effectiveness and also the fact that as i increase the voltage using the 10k preset the width decreases and as i lower the voltage the width increases this means that for low DC voltage into the comparator the PWM pulses would be longer and result in high AC voltage at the output and this is due to the fact the the triangle is very high in ampltude.
3)As i said after wiring up every thing with both preset set to Ground or 0V,
we then put on the inverter and then we wont get AC voltage at the output yet so we now slowly begin to adjust the 10k preset just until it just begins to conduct and i siad slowly because the 10k preset will get hot if we fully adjusted it especially now that it has been connected to a transistor so that changes how it works now.
Now once it begins to conduct we should have PWM with AC voltage very high using appropriate trafos and the DC voltage gotten by adjusting the 10k preset should be about 1.5VDC-2VDC max resulting in wider pulse width and high AC voltage.
Now as this AC voltage is fed back through the feedback trafo we begin to adjust the voltage correction preset such that as we increase the voltage at the base of the PNP transistor, the DC voltage which is being compared to the triangle wave increases and this results in reduction of the width of the pulses as DC voltage increases ultimately correcting the output AC voltage to the desired 220VAC or 230VAC we want.
So now the voltage correction preset long with the transistor is now responsible for ultimately correcting the output voltage automatically as the required voltage level info is fed to the base of the transistor and this in turn corrects the input DC voltage which adjusts the width of the pulses to give our desired output AC.
Hope everyone understands.
if anything comes up i will post
Micheal
That's great, thanks Micheal, I hope this version helps the readers to get an alternate view of the design.
hello Sir,
i decided to discard using a sinusoidal pwm because of the fact that i was not getting constant voltage after connecting the PWM diodes as this made the output voltage fluctuate a lot.At first i thought it was because of the high frequency hitting my digital meter but no it was not so.
Any way here are my adjustments
1)triangle wave using opamp compared with DC voltage using a 10k slider just like yours at more than 16Khz and when applying PWM diodes gate of FETs the voltage was stable.
2)As i increased the voltage using the 10k slider up to nearly maximum supply voltage the width of the pulses reduced causing reduction in output voltage and Vice versa.
3)i had to amplify the triangle wave signal so that its peak to peak voltage is very high about 11Vp-p as this will mean that with even the slightest adjustment of the 10k slider up or down i get PWM signal,the only thing is how wide the width will be but a good PWM signal.
This amplification will play a crucial role in the voltage correction circuit.
Now to the voltage correction circuitry,
Sir like i suspected the BC557 NPN configuration did not work at all as i tested it and instead of adjusting voltage it pulled the voltage down to 0V no matter how i tried adjusting both the both preset it did not work and eventually the transistor burned along with the 10k preset when trying to adjust them giving me a painful jolt on my fingers.
Micheal
OK got it, thanks however the transistor protection circuit will surely work provided the potential divider is set correctly. It's only a rough concept that I have provided, it will some tweaking until perfection. And yes the 10k preset PWM at the relevant pin#5 should be applied through a 0.22uF or a suitable low value capacitor so that it doesn't load the transistor and burn it.
..it's BC547, not BC557.
when you say the 10k preset PWM at the relevant pin#5 should be applied through a 0.22uF or a suitable low value capacitor so that it doesn't load the transistor and burn it, how do i apply it
I meant that the triangle waves should be fed via a 0.22uF or any small value capacitor to the pin#5 of the relevant 555 IC, and this pin5 should be also used as the load correction input
….a 10k resistor will need to be connected from the above pin5 to ground for correct operation
Sir please i still dont get it.
1)triangle waves are fed to pin 2 of the relevant 555 while the 10k preset controls the input DC voltage into pin 5 of the relevant 555 so i dont get what you mean by "triangle waves should be fed via a 0.22uF or any small value capacitor to the pin#5 of the relevant 555 IC" as pin 5 is for inputing DC voltage.
2).a 10k resistor will need to be connected from the above pin5 to ground for correct operation.
if we connect an ordinary 10k resistor from pin 5 to ground then we then connect the 10k potentiometer or preset to thesame pin 5 and then connecting the emitter of the transistor to thesame pin 5 to enable voltage correction.is that it
Sir please explain how exactly step by step do we do all this as i am a bit confused with what you said we should do.
Actually the 0.22uF cap suggestion is not for the above explained design, it's for the pure sine wave version where we would want to use a modulating triangle or sine wave at the pin#5 of the 555 IC.
For the above design we can simply add a 10k resistor in series with the slider arm connection which connects with pin#5 of the 555 IC for preventing the burning of the load protection transistor
hello sir,
is it recommended to use a non polarized capacitor at the output of a inverter when filtering.
i noticed that when i used a polarized 2.2uf/400v cap at the output it blew after some seconds and brought out some sprayed some liquid especially whem i used a 15-0-15/220V trafo that was used in a 1kVA inverter.The capacitor just could not withstand it..i then looked at schematics for capacitors placed at the output of inverters and notice that they are usually non polarized.
Why does polarised cause issues lihe this?
Micheal
Helo Michael,
the output from an inverter is always an alternating voltage consisting of alternating positive and negative cycles, so a polarized cap will never work in such conditions, therefore a nonpolar cap is only recomended.
thanks for the waveforms..
Sir could you please suggest three modifications in this circuit as said below
1). to suppress the noise produced by the transfomer due to high harmonics
2). An automatic overload protector
3). Low battery cut off feature
Arun, I would suggest that you should first complete the basic circuit of an inverter having 100 watt output, once you succeed then we can proceed with the other additional features.
Sir should an electrolytic capaicitor be put at the output or a non electrolytic capaitor.
i noticed that when i put an electrolytic capacitor at the output it gets hot quickly.
It should be a non-polar strictly….use a metallized polyester capacitor for perfect results.
hello Mr Swagatam I am sort of busy at the moment so I am not able to do any more test on the circuit. Have u got any more update from Mr Robins or Michael on their side . As soon as I can I will post a report
Alex, no further updates received, however the situation looks quite convincing now and there's hardly any doubt regarding the circuit except the issue of using a ferrite cored trafo
Hi Swagatam
I would like to wish everybody a prosperous and happy new year,I really have been following the progress on these inverters and if I can help in any way I will,be assured,up untill now I realize I"ve got a lot of studying to do,With the guidance and expertise of our friend Swagatam I'm sure we can achieve what we want
Best wishes to everyone
Robin.
Hi Robin,
Wish you too a merry Christmas and a Happy New Year from all here.
We all very much appreciate your valuable inputs to this blog and will keep cooperating with you whenever you need us.
Thanks and best wishes.
Hello swagatam, I use 2pairs of IRF3205 mosfet, how can I connect the PWM accross the 4 mosfet gate.
use separate resistors on each gate of the mosfets, and connect separate diodes on each gate, then terminate the common diode cathodes with the PWM source
Hello swgatam, I got an idea. Can we set our 555IC to 200Hz, 25% duty cycle to make the wave resemble a PWM?
Hi ifeanyi, yes it can be done, the circuit has a wide option one can play with.
Hello, do u have any inverter design using feritte transformers?
you can the try the design given in this article:
https://www.homemade-circuits.com/2013/09/half-bridge-mosfet-driver-ic-irs21531d.html
thank u for ur caution yes I have like a 1meg in series with the signal line of the probe now I know u have similar wave form so tomorrow I will test it on the inverter and see the response and post it here because this is one of the most important circuits online and hard to find.
Hello Michael I tested the analyser today but dont know if its something with my probe or thats so it works. When i plug a small transformer into my house power outlet The wave form I get well somewhat looks like a sine wave its clean but some of the lines are croocked not straight is it that way urs show not able to post it here that others can see because not sure how to view the format it is saved in just want to clear this up but it works Thank u
hello Mr Swagatam I am putting together a proble to use on the pc scope Mr Michaeil recomended so I will be able to give u a better report on the project. Thank u for ur help to us
The frequency will influence the voltage so I think you cannot change the frequency once it has been decided in the design.
The cdi circuit gives an idea regarding making a basic inverter ferrite trafo which can be studied and modified further through trial and error, however taking a professional help could be even better.
yes the formula would hold good even for a ferrite trafo.
Hello Michael,
You can take the help of the following circuit which is actually a CDI circuit, however it can be referred to as a classic mini Ferrite core inverter.
https://www.homemade-circuits.com/2013/10/universal-multi-spark-enhanced-cdi.html
ferrite transformers are always smaller and much efficient than iron core counterparts. however their calculations could be entirely from the iron core types so first you will need to find out the exact dimensions, turns, thickness etc for getting the right trafo with the right specs.
Hello Michael I am so sorry I did not see your reply I though u had forgotten me. This is so help full now I know someone else has the same problem with the 1khz frequency at the output like I have and a cap accross has corrected it. I will try pin 2 and 3 but should we still connect pin 10 to pin 15. I really thank u foor telling me about the visual analyser. I will do the changes and post it here so everyone can know the progress. Happy too know of your sucess with yours so have u built the voltage correction section as yet to see how well it works because this is crusial in an inverter. we really thank Mr Swagatam for helping us. Looking forwart to hear from u.
yes the trafo will have a ferrite core, however now the dimension will become too small compared to the iron core trafo………wires will be always copper wires.
here's one example of a compact ferrite cored inverer, although here the application is intended as a CDI unit, the concept is of an inverter:
https://www.homemade-circuits.com/2013/10/universal-multi-spark-enhanced-cdi.html
I still await ur help to move on and make this project be a success
yes LC filters are always recommended for such applications….so it could be the right approach.
voltage drop is one big drawback in such arrangements, you may refer to the following example and see how an LC filter is employed at the outputs of this simple square wave inverter circuit:
4.bp.blogspot.com/-khKat0UA8Jw/UITpCnNd7yI/AAAAAAAAA_A/8x-KAD2aHLE/s1600/simplest60%20Hz%20Inverter%20circuit%20diagram.jpg
I don't think the number of blocks have anything to do with the quality of the sine wave, it's the RMS optimization and harmonic filtration that are connected with sine wave performance.
ferrite material can handle high frequencies with great efficiency without generating heat, whereas iron stamping are specified for lower frequencies only, that's why i doubt that higher PWMs could reduce the efficiency of the inverer if an iron core trafo is used.
Hello Michael, I have just tried to introduce the concept of optimizing a flat square wave into a modified sine wave. We say modified sine because we optimize and match it's RMS with an conventional sine wave RMS.
The IC 555 becomes the simplest and the cheapest option for implementing this and that's exactly what I have tried to explained in the above and in many of my previous articles.
The harmonics are the only issue here which can be taken care of by employing suitable L/C filters at the output of the trafo.
We should keep the chopping blocks to some lower number, may be to 3 or 4 this will prevent the trafo from getting hot.
Alternatively we could go for ferrite trafos and increase the number of PWM blocks to as many numbers as possible and check the results.
The PWM blocks can be tweaked by increasing or decreasing the input frequency.
thank u my friend if u look in the post n dec 3 I have written again thank u for ur help
3524 will never produce pure sine wave PWMs, unless treated with external circuits as done above.
The circuit discussed above is a full fledged pure sine wave equivalent inverter circuit,,,, the external capacitor is only helping to the carve out the harmonics and to shape up the modified pure sine waves into conventional pure sine wave that we are more familiar with.
ok Mr Swagatam and Michael I have seen your great discoverys and success so what do i do now to move from where I am stuck. Congratulations Michael it seems u are well on your way to the final product great I await ur reply
yes that's right
Thanks Michael,
Useful update, thanks very much…the fets will start becoming hot once you use the actual power trafo with optimum load at the output.
Anyway i think you have a wonderful job without involving the 555ICs and only with opamps.
thank you Michaei I am using pin 2 and 7 as output now so I await the result of the questiond between u and MR Swagatam to continue because that is my problem now with the voltage being low when I connect the pwm, Thank u
….hence the name pulse width modulation
Michael, the PWMs will not influence the count of the blocks rather the thickness of the blocks, meaning with 10k slider shifted toward ground will decrease the thickness of the blocks and vice versa keeping the number of blocks always the same.
The above will read in the form of proportionately varying voltage when measured with a voltmeter.
the PWM output should show a voltage between minimum 0 and max near to 2/3rd supply volts when the 10k preset is varied from ground to positive.
If this is not happening means your PWM circuit is not working or is faulty.
remove the pwm and then check the output freq, if it reads 50hz would mean your circuit is correct and the 1kHz after pwm connection is simply a misinterpretation or inability of your meter.
Actually a scope is strictly recommended for such projects.
Hello Mr Swagatam I am up again with the inverter and ready to test again. without pwm i am getting very high volts which is normal with the pwm diodes connected i get 104v but as I said before the gate voltage falls I adjust pot 10k to the positive as u said above in a post but this only brings it up to about .9v and the output frequency at the transformer is about 1khz and not 50hz as it was before without pwm. I am designing 120v system please help us here Sir
Thank u Mr Swagatam for ur reply I will try to do the adjustment and try again because we are determin to get it to work. We all appreciate the work that Mr Robin Maechaeil Majumdar and many others are doing to make it a success.As soon as I get more fets I will power up again Sir and let u know the results
250V or 280V trafos could be difficult to get in the market.
1) keep the 10k preset toward the ground and make sure the PWM output the IC shows near 0V in the voltmeter.
2) wider pwm blocks will force the mosfet to conduct more which in turn will allow more votlage/current into the trafo
I have updated the latests from Mr. Robin.
hello Alex,
it could have burnt due to excessive current….increasing voltage increases current too….you should have increased the voltage by keeping the PWM to lowest point.
hello Mr Swagatam I did not get to do more testing because i raise the voltage to 24v and imidiatly the output fet burst into flames so I have to go and try again. At 12v it was ok. Mr Robin is having quite similar heating so please help us here Sir. Thank u
inductor won't help the cause according to the latest reports from Mr. Robin.
yes that's right
yes pwm may give rise to heat in the trafo, so better to first filter out the high frequency content and carve the waveform into a decent looking sine equivalent, it could be done using a LC filter, not an RC.
yes, it can be tried. but RC will not do…you can try only with a high value Cap…may be 2200uF across center tap and ground.
1) step down trafo is not required because current is immaterial here.
2) a filter cap can be added at the base/ground of the transistor for better response
Hello Mr Swagatam thank u Sir I understand your explanation quite well about the pwm chopping up the wave form into smaller sections . The thing I am asking u is if it is normal for the gate voltage to drop from about 4v down to .08v when pwm is applied to the gates this is what i need u to answer Sir . Thank u. I think this is one of ur busy blogs because it is very informative and looks promising. I await ur reply
the gate voltage will depend on the space width of the PWM, if you have increased it to an extent which corresponds to zero voltage then the gate voltage would also drop to zero….adjust the 10k preset toward the positive for reducing the space width and for increasing the gate voltage.
Hello Alex, the 4017 output is responsible for triggering the mosfets with the intended 50 Hz frequency…one mosfet turned ON 50 times per second to produce the upper half cycle….the same for the other mosfet which creates the lower half cyces 50 times per second.
If your 4017 IC gets the required 100Hz pulse at its pin#14 hen this function will execute correctly and the output will show 50Hz.
When the diodes are introduced at the gates of the msfets, the PWMs cut the above 50Hz cycles at the mosfets gates into fine segments such that the average output RMS gets optimized at the rated voltage (220V here). this is controlled by Increasing or decreasing the space ratio of the PWMs.
I hope this clears your doubts…
the waveform shown by Mr Robin Peter above operations distinctly evident.
In systems that have no load correction, the maximum voltage is set for the optimal level (example 220V), means from here the voltage will only go down when its loaded, it can stay stable but surely cannot rise at any cost.
whereas in our system, the max voltage is set for 400V or more and is optimized at 220V according to the load conditions by the correction circuitry, in the above example it's done by automatically adjusting the voltage at pin#5 of the relevant 555 IC.
hello Mr Swagatam today i made a change on the circuit i put a 2.2uf cap accross the transformer out and I got back the 50hz when I check before it was actually giving me about 1089khz at the AC volts out but with the cap i am getting a difference. Dont know if this is a right approach.another thing I should youI notice when i connect the diodes is I see the gate voltage falling from about 4v to .08 is this normal. well reaching so far i dont know what kind of waveform i am getting now because I dont have a scope. Any other word from Mr Robin or Miacael about their progress. I await ur usual support Sir
thank u Mr Swagatam I read the blog and now i understand the function u made it so simple . So the 10k would be to adjust the pulse width at the gates of the fet. so I think this will adjust the output voltage at the secondary of the transformer Sir. please correct me if I am wrong.With regards to the 2khz what i am saying is at the output of the transformer when I connect the diodes the frequency changes to 2khz instead of 50hz so I wanted to know what was wrong here because u said I should still be getting 50hz only chopped at smaller pieces please help me here sir thank you
hello Alex, you can go through the following for understanding the role of the mentioned 555 IC and the 10K preset:
https://www.homemade-circuits.com/2012/12/how-to-use-ic-555-for-generating-pwm.html
The 2khz is the PWM for optimizing the RMS only, and will not change the 50Hz cycleit will only chop the individual pulses of the 50Hz….so the output frequency will remain = 50Hz.
hello Mr Swagatam thank u for your usual support to us . I know that the transformer should be about 6-0-6 for 12v supply but my transformer is just 10-0-10 the voltage is not a problem to me now because I know the transformer ratio. What I wanted u to do was to explain what is the purpose of the middle 555 and the use of the 10k at pin 5. The other problem with me getting 2khz at the output of the transformer is this a case that I need a filter now to get rid of the 2khz frequency now so as to see the 50hz usable frequency. This is where I need u to clarify for us and we appreciate ur support to us all. Thank u sir and I await ur answer
yes, he got over 500V with a 12-0-12V trafo using a 26V batt
it will display the average voltage for the negative and positive half cycles, irrespective of AC or DC, so it's fine to use it according to me.
Yes, forcing a higher voltage into the low voltage winding will force equivalent higher voltage across the output winding than the actual rating.
we are not interested to run the trafo at this forced voltage as it will heat up the trafo, it's here where the PWM comes into play for adjusting the output to the optimal 220V level.
a cap at pin5 is not critical
Hello Alex,that's great news…..please remember that without the PWM diodes connected to the mosfet gates the output should reach around 500V….are you getting this much voltage at the output?
And i have clarified this many times that the trafo input rating must be 50% less than that of the battery voltage….example 6-0-6 for 12V batt.
Hello Mr Swagatam and Micheal I am glad to tell u that the problem as just stoped the fets are not running hot again thank u for the encouragement. I also built the rest of the circuit when i connect the diodes to the gates the voltage drops by about half well that i think can be corrected. What happens now is I am getting the 2khz frequency at the output of the transformer I think we are getting somewhere now. Could u explain how the middle 555 ic works and how to adjust the 10k pot what results should we check for I am following the above circuit of Mr robins as u said I should do. Should there be a cap from pin 5 of this same ic to ground I await your reply . Thank u Sir
Thanks Michael, that's good bit of info, I hope this will help Mr. Alex to troubleshoot his circuit.
thank u Mr Swagatam for ur support . The fets I am using are ifrz44 which have diodes accross the drain to source junction. which components would I change to alter dead time on the 4017. I still want to try with this 4017 in that the other guys have built it and are working Sir. I await ur reply
Alex, the circuit discussed in the above article has employed dead time by skipping pin#3 and pin#4 across the 4017 outputs, so this is the way it needs to be done.
yes you are correct, the feature will automatically adjust the output voltage and try to keep it near the optimal level with varying loads, but only as long as the load is well within the limits of the inverter maximum deliverable power capacity.
I think an optocoupler would provide a better bidirectional optimization than a transistor as shown in the last diagram on this page:
https://www.homemade-circuits.com/2013/01/300-watts-pwm-controlled-pure-sine-wave.html
hello Mr Swagatam I am pleased with the good results u are having with this very important circuit. I am trying to build it but I am having some problems dont know if it is because I am building it in stages. I have just built the section with the 4017 fets and transformer and the 555 which is producing the 200hz. what is happening is that I am getting ac output but the fets are running very hot few seconds and I loose them. Dont know what is the problem i am getting about 3.8v on the output of pin 2 and 7 at 50hz. I think the circuit should work alone by itself please help me here sir. Thank u
Hello Alex,
Replace the 4017 section with 4047 IC circuit as shown below and then check the response, the issue might be due to lack of dead time from IC 4017 or absence of drain source diode across the fets.
https://www.homemade-circuits.com/2013/10/pure-sine-wave-inverter-circuit-using.html
Thanks very much Michael for this comprehensive update…I appreciate it.
I think it's always a better and technically correct to rig the active ICs itself for implementing the voltage regulation of the output, because every IC invariably has some kind of input which can be optimized for controlling and influencing the output, for example in the above circuit as pin#5 potential of the PWM IC is shifted toward zero, the output also proportionately comes down toward zero….and this does not heat up anything.
So I think as discussed in the above article we should use pin#5 of the IC for the enforcing the output regulation control instead of the mosfet gates.
thanks, keep updating your thoughts.
Thanks for the suggestion, it could be true but needs to be confirmed through practical verification.
Another rectification could be to use pin3 and pin2 of the IC 4017 as the outputs and connect pin4 with pin15, and feed a 100Hz to its pin14…. this will remove the gap between the wave cycles and produce continuously varying AC cycles.
multiplying the number of outputs with 50Hz we get 50×2 that's equal to 100, so now the input frequency will need to be 100Hz.
The extra ICs are not required, we just need to use pin3,2 with the mosfet gates and connect pin15 with pin4 of the IC 4017
it's a lengthy theory, cannot be explained in short here.
Hi Robin,
Making mistakes is a part of the game.
Ideally the trafo voltage should be less than the battery voltage, this will allow generating optimum voltage levels at the output, since a PWM optimizer is involved here.
Yes the load will tend to make the PWM oscillate a bit due to the feedback up/down effect, if a cap settles it, no issues we can go for it.
keep us updated, appreciate it.
Mr Alex, it will require a ferrite torroidal core. You can try with 5 turns of 1mm thick copper wire. The capacitor can be a 1uF/50V nonpolar.
Mr Swagatam I should ask u if that coil is air core or ferrite core and about what value just an estimate in what range should we start with thank u
Thank u Mr Swagatam for the connection of the filter and we are all so glad to hear from mr Robins just want him to show us the wave form to verify a sine wave output thank u for your support
Thanks for the valuable inputs Robin,
Those figures look reasonable and valid.
By the way could you please show us the waveform as received at the mains output of the transformer? This is something that every one wants to look at.
And also please tell us about the input rating of your trafo in terms of voltage and current.
Thanks.
Alex, it's very simple, connect one end of the coil to battery positive and the other end to transformer center tap, that means the battery voltage has to pass through the coil for entering the trafo center tap.
Next connect one end of the capacitor at the center tap of the trafo and the other end to the negative of the battery
hello Mr Swagatam could u show us a drawing of how to connect the filter u recommend at the output of the transformer thank u Sir and have u hear from Mr Robin yet about the final stage
At the gates of the mosfets, the pulses are all (+) or zero, there's nothing called (-) pulses.
+/- waveform is created by the transformer since its primary is subjected with a push-pull effect across the mosfets drains which generates the required (+)(-) waveform at the output mains.
Hir Sir
I built it with 4017 and I realize that every 1/4 of the 50Hz cycle I have both +,- at this time instead of only + pulses and in the other 1/4 of the 50Hz the – pulses of the modified sine wave. How do you cut the – pulses in the first 25% and the + in the next 25%?
Hi Theofanakis,
The mosfets are responding only for (+) signals from the 4017, and have no connection with (-) signals.
It's the transformer that is responsible for inverting the mosfet signals into (+)/(-), alternately.
Hi again
I want to sent you some changes that I made in order to solve the gap between positive part and negative part of the sine wave. I also have a picture of the final modified sine wave with resistor load. Would you might tell the way that I could publish it here?
Thank you
Hi Theofanakis,
Thank you very much, I'll update the info in the above article soon.
By the way could be please briefly explain why and how the use of 4066 ICs help the above circuit? I would love to update the info here for the benefit of the readers.
The IC3 produce 100Hz and the 4017 divide it at 50HZ. The pin2 controls which switch will be on so which mosfet will output the pwm signals produced by the IC1,2. That's the reason that I don't have gap between positive and negative signal at the transformer's output.
Yes, a gap between the mosfet gate triggering may be suitable for the above design as it will tend to make the output go down further.
…i meant a gap may NOT be suitable
If you are not comfortable with 6-0-6 tafo then you can increase the battery voltage to 24V and use a 12-0-12 trafo….will give you the same results.
as discussed in the previous comment, use pin3 and pin2 as the outputs from IC4017, and connect only pin4 with pin15 for resetting the IC back to pin3…this will give you 50% duty across cycle at the relevant pinouts.
Hello Sir,
Question regarding "How to Calculate and Match an Inverter Circuit with Battery and Transformer"
If I use 12v battery,
Max load I need is 25w,
Transformer output = 62.5w,
Transformer current = 62.5/12 = 5.2083A => Used 5A
Battery current = (5.2083/4)+5 = 1.302075+5 = 6.3A => Used 10A,
Now my question is,
What is the maximum backup time in hour(if maximum load connected is 25w)?
Thanks,
Chandrajith
Hello Chandrajith,
I have replied this question in your previous comment.
hello Mr Swagatam with regards to your filter and the link that u refer to on the 3rd Nov 2013 how would this filter be conected from center of transformer to ground because the drawing shows in and out. Dont know if its the right link I saw.. There is a coil in series and a cap accross. Please helpmus here Sir. Thank u
One end of coil to transformer center tap, other to battery positive, capacitor free bottom end to ground.
According to me the harmonics can be controlled by adding a simple L/C network across the center tap and ground of the transformer…however I am not sure what values would be appropriate, it could be found by a little trial and error.
An example image can be seen here:
" rel="nofollow ugc">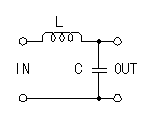
The calculations are rather simple:
Remember, there's a gap between pin2 and pin7, and also before pin in the 4017 output sequence, which is reducing the duty cycle to 25%.
we can make it to 50% by using pin3, pin2 as the outputs for driving the mosfets, and connect pin4 with pin15 for resetting.
The PWM will obviously reduce the duty cycle by 50%.
That's why I have always recommended using a transformer with input rating 50% less than the batytery voltage, meaning if the battery voltage is 12V, then the trafo must be rated with 6-0-6V input.
The above corrections will solve all the issues suggested by you and present the desired ideal design
thank u I will try it .so that wave form is the wave form before it drives the fet so how would we get a sine wave at the secondary of the transformer. Thank u
fets will drive the trafo exactly as per the input gate waveform, the waveforms as explained in the above article are optimized sine equivalents which can be verified across the trafo mains output
hello Mr Joel, you can try the above shown design, as you can see the waveforms are verified and they look exactly as assumed by me for the design.
hello mr swagatam could u refer me to any of ur pure sine wave inverter circuits that have been build and tested by any reader because I want to build a working one and try to understand this wave form theory Sir. Thank u and keep up the good work
The triangle waves are generated by the 555 itself at its pin6/7, so you dont have to feed it externally.
Configure the 555 in a monostable mode….feed a high frequency SQUARE WAVE at its pin2 and sine wave from the bubba at its pin5 ….and now check the result at pin3.
thank you Mr Swagatam for ur answer but I am not sure about that transitor u are talking about because i dont see no transistor in the circuit away fro the npn bc457 that is used for the voltage correction only the 4 ic please check I am looking at the circuit above which states ( the final desing might look like this) awaiting ur reply Sir
Hello Alex,
I just missed it, actually Mr.Robin did not use the transistor which existed in the original design at pin6/7 of the middle 555 IC. So as mentioned in the earlier comment here the triangle waves are taken and compared at pin6/7 of the middle 555 IC.
ok Mr Swagatam which circuit should I follow the original design or the last design that Mr Robin has drawn above because I am ready to build the circuit now and tell everyone the results
You can follow the above circuits, designed by Mr. Robin.
Hi Marcelin,
With 12V, trying to run a 3KVA inverter would call for hugely thick wires and a massive transformer….everything could get too bulky….and TIP35 is rated at just 25Amps, many of them would be required to cater for the massive 200amps requirement of the design.
Anyway it would be interesting to see how you manage them at your side
You can send me the images to my email ID hitman2008@live.in
Hello Mr swagatam have u heard from Mr Robin we need to know how this project work out. I can tell u Hundreds of hobbyist are waiting on ur result because the circuit has been rearranged so many times we really want u to give us a finish circuit with voltage correction circuit included . thank u sir
Hello Alex,
Yes, Mr. Robin has answered positively he would soon build the final design and inform us, let's wait for the results…from my side I can assure you that the above design would definitely work…
Mr Swagatam I see u have updatedthe final drawing and also the voltage correction circuit. we alll appreciate ur support What is the perpose of the 2k pot on the left 555 is it to set the frequency to 2khz. Is the second 555 running at 2khz also. Please tell us the purpose of the 10k pot on the bottom 555 ic. Could u give us a clearer drawing we cannot see the values of some of the components Sir. We are thankful to u sir. I am starting to collect the parts right now sir
Hello Mr Swagatam should we use a small transformer accross the output transformer of say about 12v or so to connect to the bridge rectifiers or connect it straight accross the 220ac volts. Thank u
Hello Mr Alex,
yes the left side 555 control is for adjusting the PWM pulse frequency (thin chopped pillars in the waveform).
The bottom 555 10k control is for adjusting the frequency of the trafo output (50 or 60Hz). The parts are not very critical, slight variation will not matter.
The load correction bridge should be directly connected to the mains output and not thru any additional trafo.
Thank u Mr Swagatam for explaining. So what frequency should we be getting at pin 3 of the left 555 and pin 3 of the middle 555 thank u Sir
2kHz from the left 555, not sure what would be at the output of the middle 555 output because it would be produced after comparing with the triangle waves at the collector of PNP transistor BC557
Actually we could also try connecting the BC547 collector with pin#5 of the PWM IC, as soon as BC547 begins conducting it would tend to bring pin#5 potential towards zero which in turn would result in wide spaces in the output PWMs making the mosfets slower with their conduction.
With mosfets conducting lesser would mean lowering the output voltage and vice versa.
BC547 is NPN, ……….PNP will not work
Go ahead with your feelings and get past your boredom:)… the above design has been proved beyond doubt by Mr. Robin and me, so I think there's hardy any chance that you would fail….moreover we are all eager to see a working prototype of this from somebody.
I'll try to update the required load correction feature here soon.
the central 555 which has a 10k preset at its pin5
..I meant mosfets and not transistors….
Hi Marcelin, welcome back.
For making a 3kv system, I am afraid you would have to take care of a few tings, first of all you will have to employ and not transistors, and most importantly a supply voltage more than 50V, actually the higher the better. Also an H-bridge is strictly recommended for such designs, I'll be soon posting a comprehensive design on this soon.
there's a way by using the reset pin#4 of the PWM IC555 as the shut down input.
A sample voltage is derived from the trafo output via a high value preset or voltage divider network and fed to th base of a NPN transistor.
The transistor collector is connected with pin4 of the PWM 555, while the pin4 in turn connected to positive via a 10k resistor.
he preset is adjusted such tat at around 250V, the transistor just begins to conduct. thereby pulling down the reset pin#4 to ground and shutting off the PWMs,
This goes on continuously making sure the output never exceeds the 250V mark.
yes Mr Swagatam I see where uused the optp coupler in the revised version of the inverter but I am not too clear on this because in a post dated August 23 I see where u said this wont help with varing loads please help us here . on this valid point in an inverter. Thank u
I probably said that it won't increase the voltage if load increased above the battery max limits, but otherwise the opto coupler method will certainly do the corrections as per expectation,
anyway i'll try to update the method discussed in the previous comment soon here.
Thank you we await your reply on this because I want to know what gets adjusted when output voltage falls to do the compensating if it is the sine wave pulse width or what. Thank u
I have updated the above article with the required info…pls check it out.
thanks! yes you are right, I'll do some research on it and try to put up a related post in this blog soon,
555/4017 = 10mA
4047 = 5mA
it doesn't really matter because mAs won't even scratch the battery anyway.
hello Mr Swagatam we all thank mr Robin for his great efforts we anxiously the rest of the project. Would we still use the rest of the circuit that deals with the voltage correction using the bridge rectifier and transistor config. Thank u
Hello Alex,
Voltage correction can be included, depends on the user! However it can be done through an opto coupler stage as discussed in one of my previous posts.
ok mr Swagatam so as soon as he completes his test we would appreciate u to redraw the schematic and give us the final circuit because now we would not know what are the different pot for and how to adjust what u would not know how much of us await ur support keep the good work going sir
surely Mr.Alex…thanks very much, will keep you updated!
pin2 and 7 both will ofcourse produce positive voltages, 50 times each.
the connected mosfets will also conduct accordingly 50 times each but alternately, meaning one after the other and never together, creating 100 alternate positive pulses across the transformer winding.
However the trafo winding polarity being opposite for the two mosfets, the conduction inside the two half winding create positive and negative push pull induction inside the core.
This neg/positive induction gets stepped-up to become positive and negative 50 Hz cycles across the output winding.
so it's the trafo which is responsible for switching the alternate positive pulses from the mosfets into alternate positive and negative AC.
to an extent it may be true, but the above design will also include harmonics(high frequency harmonics) which might cause some noise, although much reduced than an ordinary square wave inverter, it can be removed by additional inductor/capacitor network at the output of the trafo.
the voltage drop is because of load wattage exceeding the specified normal rating of the inverter (battery power), it's not because of the fets drawing more current, fets only act like switches, they have nothing to do with load current.
No inverter can compensate or increase the output voltage if the load exceeds the maximum allowable capacity, because battery is the ultimate power source beyond which the inverer cannot get anything.
hello alex,
yes that's right,
let's thank Mr. Robin for correcting and confirming the facts….
hello Mr Swagatam so this is the wave form u need to feed into the transformer output to produce the desired sine wave output u designed for. Thanks for ur support
My pleasure!
The PWM has no connection with 50Hz switching frequency.
50Hz cycless are created by the alternate switching of the 4017 IC.The PWM are used to break each pulse of the 50Hz cyce into thin calculated sections for setting up the RMS in accordance with a standard sine pulse.
Here the PWM does not depend or need the exact replication of a sine wave, therefore a sine wave input was not felt necessary
One 50Hz cycle consists of 50 alternate positive and negative peak voltages.
The above pulses are normally in the form of square waves.
The PWMs simply chop the above 50 square waves into thin sections, this results in removing or cutting off some magnitude of the total value of the voltage involved in the original 50 square wave pulses.
We do this to pull down and match the RMS of the pulses with a standard sine pulse.
THe mosfet gate receive the above voltage and switch the battery voltage exactly in the same pattern across the trafo winding through it drain/source leads.
gate trigger voltage has no link with drain voltage….5v gate voltage will allow full battery voltage to be pumped into the trafo.
Hola Sr. Swagatam muy amable y atento en sus respuestas. Agradecer por su gentil colaboración y por poner su empeño y conocimientos al servicio de la gente. En la actualidad me encuentro montando en protoboard uno de sus diseños, específicamente aquel basado en los tres circuitos integrados NE 555 y el cd4017. Soy un aprendiz que desea mejorar la forma de onda del inversor que en la actualidad utilizo en casa, cómo bien sabemos los ventiladores mal funcionan con la onda cuadrada de estos aparatos y esta es la razón que me motiva a montar uno de sus diseños. la pregunta es… de la salida #2 y #7 del CD4017 debo conectarla necesariamente a un mosfet driver basado en BJT tal como un TIP312C o puede ser un conformado por dos BJT tales como BC547 y BC557?
Gracias de antes manos por su gentil respuestas!!!
You are most welcome Mr. Juan, according to me there’s absolutely no need of adding any BJT stage at the MOSFET gates when a logic IC is used, and especially when a sufficiently high deadtime is incorporated as in the above explained 4017 base designs.
You can connect the MOSFET gates directly with the 4017 IC output pins via a 10 ohm resistor, but make sure to add external protection diodes across the drain/source pins of the MOSFETs, just for ensuring extra safety to the devices.
Swagatam i was referring to the 2nd circuit in #design1 in one of the 7 modified sine wave inverter. I asked if in case I want to use mosfet irf3502 instead of tip 35. Do I hv to replace the tip 122 also and which one do I use? Help
Morris, you can remove both the transistors, and connect the mosfet directly with 4017 output through 10 ohm resistors. Just make sure to connect individual 1K resistors across gate source pins of the mosfets, and diodes across drain source pins of the mosfets.
Yes Swagatam, can the 2nd circuit in design #1 in this article be modified with irf3205 and some relays to be inverter charger ? Advise!!!!
Morris, You can use IRF3205 for the 1st two circuits, and you will need a separate external charger for the battery.
Do I have to use some high voltage capacitors at the output of the transformer that provides AC for an improved wave form (sine wave)?
Yes you can use 2 or 3 1uF/400V capacitors across the transformer output….
sor pls ,should these 1uf 400v cap be in parallel or in series connection?
Parallel to the 220V output wires of the inverter transformer.
Hello my teacher, I appreciate your posts in all the articles and the information your are giving is very outstanding. My question is, I got anther lead acid battery labeled 72v 30ah, charging voltage-84v and whn I measure the voltage with my multimeter the reading is 79v at 91% in its display. Now I want to use the second circuit in this post of 7 modified sine wave inverter. For the 4017 I will use regulate but how about the transformer’s specification,pli guide. Thanks
Thank you Morris, you can use the second schematic with a 36-0-36V transformer to match the 72V battery. You can replace the BJTs with MOSFETs appropriately rated at over 100V and 20 amp. Just make sure to step down the 72V to 12V through a 1K, 5 watt resistor for the IC circuit, and also connect a 1K across the gate/source of each of the mosfets.