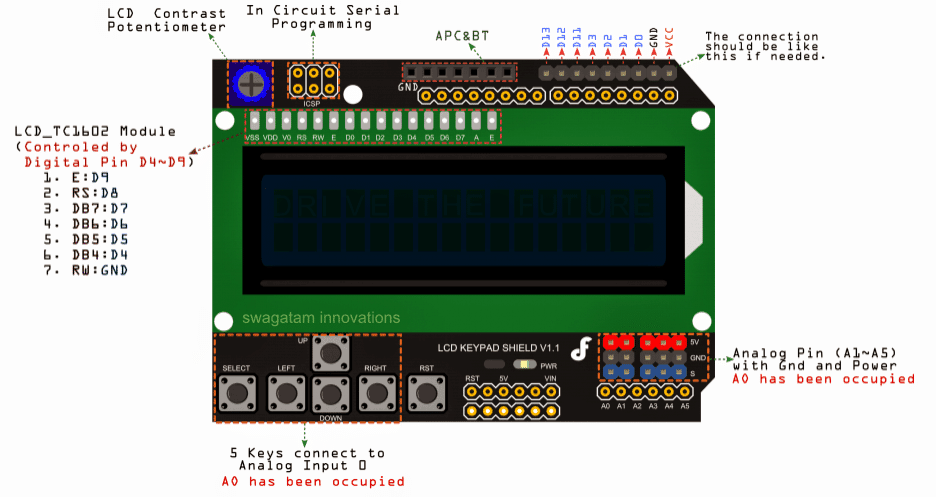
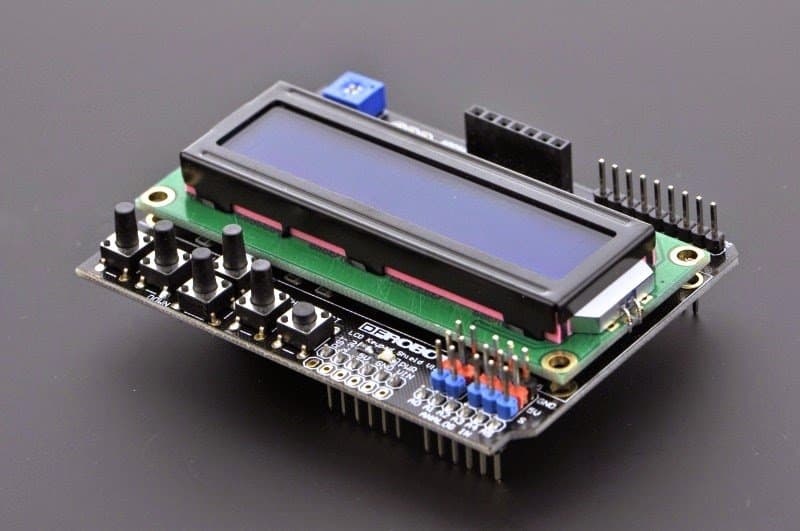
The write up explains the pinout and working details of the LCD module "Arduino LCD KeyPad Shield (SKU: DFR0009)" which is specifically manufactured for offering a quick plug-in compatibility for all Arduino based applications which may require displaying a particular parameter in digits, such as temperature, speed, time, weight etc.

Arduino LCD KeyPad Shield (SKU: DFR0009)
The LCD Keypad Shield is specifically created for working uniquely with Arduino boards, with a mission to allow a hassle-free and user-friendly interfacing operations for the users.
With this module users can now get well versed with the menu, and choose the variants as per their specific application conditions and desirability.
The Arduino LCD KeyPad Shield (SKU: DFR0009) module is designed with 1602 white digital characters, over a bright blue backlight Liquid crystal display panel.
It features a keypad with 5 keys, configured to deliver exclusive functions such as select, up, right, down, and left.
The module includes a digital IO (input/output) saving ability through a single analogue to digital converter or ADC channel.
The key pressing command is identified internally via a 5-stage potential divider network.
The explained Arduino LCD KeyPad Shield (SKU: DFR0009) LCD module has become pretty popular due to its easy compatibility with Arduino boards.
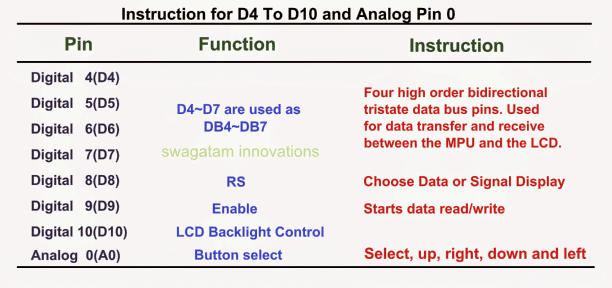
The display is made up of 2 by 16 LCD slots, assisted with 6 push to ON switches. Pin#4,5,6,7,8,9 and 10 work together for interfacing with an Arduino board.
The analogue pin#0 is assigned to scan the push button commands.
The module features an attached contrast adjustment control, and a back light ON/OFF option button.
The system also offers an expandable analogue pinouts for an hassle-free analogue sensor readability and presentation.
More details are enclosed HERE

Image courtesy: https://www.dfrobot.com/wiki/index.php?title=File:DSC0410.jpg

The Main Features Included in a Arduino LCD KeyPad Shield (SKU: DFR0009) are:
- Operating Voltage: 5V
- 5 Push-to-ON buttons for toggling a custom menu panel for the intended selections.
- RST button offers resetting of the concerned arduino program
- Integrate a potentiometer for adjusting the back light
- Available I/O pins are expandable
- Analog Pinout expandable using standard DFRobot configuration for an enhanced sensor extension
- Ideally suited Dimension: 80 x 58 mm
Library Explanation
Function Explanation
LiquidCrystal(rs, enable, d4, d5, d6, d7)
Generates a variable alternative of Liquid Crystal. The display screen can be commanded by means of the 4 or 8 data lines. If the first, pin numbers for d0 to d3 may be eliminated and maintain the relevant lines unused.
The RW pinout may be recommended to be connected with the ground rather than connecting to a pin over the Arduino board; in such a case, you may want to eliminate it from this function's parameters.
You may consider the following example for the same:
LiquidCrystal lcd(8, 9, 4, 5, 6, 7);lcd.begin(cols, rows)
Triggers the interfacing of the LCD screen display, and assigns the
dimensions (width and height) to the display reading. begin() demands to be called prior to any different LCD library prompt, as an example:
lcd.begin(16, 2);lcd.setCursor(col,row)
Fixes the location wherein the following inputs written to the LCD may become visible, for instance:
lcd.setCursor(0,0);lcd.print(data)
Prints text for the LCD display, for example:
lcd.print("hello, world!");lcd.write(data)
Writes a character for the LCD screen.
Example
The following example examines the LCD panel and the featured buttons. As soon as the user presses
the button over the shield,the screen instantly illuminates the relevant prompts.
Connection details: Simply Plug-in the LCD Keypad to the Arduino board such as an UNO (or any similar controllers)
/*****************************************************************************

  Mark Bramwell, July 2010
 https://www.dfrobot.com/wiki/index.php?title=File:DSC0410.jpg
  This program will test the LCD panel and the
buttons.When you push the button on the shield,
  the screen will show the corresponding one.

  Connection: Plug the LCD Keypad to the UNO(or
other controllers)

*****************************************************************************/

 #include <LiquidCrystal.h>

 LiquidCrystal lcd(8, 9, 4, 5, 6,
7);           // select the
pins used on the LCD panel

 // define some values used by the panel and buttons
int lcd_key     = 0;
int adc_key_in  = 0;

#define btnRIGHT  0
#define btnUP     1
#define btnDOWN   2
#define btnLEFT   3
#define btnSELECT 4
#define btnNONE   5

int read_LCD_buttons(){
// read the buttons
    adc_key_in =
analogRead(0);       // read the value from the
sensor

    // my buttons when read are
centered at these valies: 0, 144, 329, 504, 741
    // we add approx 50 to those
values and check to see if we are close
    // We make this the 1st option for
speed reasons since it will be the most likely result

    if (adc_key_in > 1000) return btnNONE;

    // For V1.1 us this threshold
    if (adc_key_in <
50)   return btnRIGHT;
    if (adc_key_in < 250)
return btnUP;
    if (adc_key_in < 450)
return btnDOWN;
    if (adc_key_in < 650)
return btnLEFT;
    if (adc_key_in < 850)
return btnSELECT;

   // For V1.0 comment the other threshold
and use the one below:
   /*
     if (adc_key_in <
50)   return btnRIGHT;
     if (adc_key_in <
195)  return btnUP;
     if (adc_key_in <
380)  return btnDOWN;
     if (adc_key_in <
555)  return btnLEFT;
     if (adc_key_in <
790)  return btnSELECT;
   */

    return btnNONE;
// when all others fail, return this.
}

void setup(){
   lcd.begin(16,
2);
// start the library
   lcd.setCursor(0,0);
// set the LCD cursor   position
   lcd.print("Push the
buttons");  // print a simple message on the LCD
}

void loop(){
   lcd.setCursor(9,1);
// move cursor to second line "1" and 9 spaces over
   lcd.print(millis()/1000);
// display seconds elapsed since power-up

   lcd.setCursor(0,1);
// move to the begining of the second line
   lcd_key =
read_LCD_buttons();   // read the buttons

   switch (lcd_key){
// depending on which button was pushed, we perform an action

       case btnRIGHT:{
//  push button "RIGHT" and show the word on the screen
            lcd.print("RIGHT
");
            break;
       }
       case btnLEFT:{
             lcd.print("LEFT
"); //  push button "LEFT" and show the word on the
screen
             break;
       }
       case btnUP:{
             lcd.print("UP
");  //  push button "UP" and show the word on the
screen
             break;
       }
       case btnDOWN:{
             lcd.print("DOWN
");  //  push button "DOWN" and show the word on the
screen
             break;
       }
       case btnSELECT:{
             lcd.print("SELECT");
//  push button "SELECT" and show the word on the screen
             break;
       }
       case btnNONE:{
             lcd.print("NONE
");  //  No action  will show "None" on the
screen
             break;
       }
   }
}
Need Help? Please Leave a Comment! We value your input—Kindly keep it relevant to the above topic!