In this post I have explained the making of a simple 3 phase induction motor speed controller circuit, which can be also applied for a single phase induction motor or literally for any type of AC motor.
When it comes to controlling the speed of induction motors, normally matrix converters are employed, involving many complex stages such as LC filters, bi-directional arrays of switches (using IGBTs) etc.
All these are employed for ultimately achieving a chopped AC signal whose duty cycle could be adjusted using a complex microcontroller circuit, finally providing the required motor speed control.
However we can experiment and try to accomplish a 3-phase induction motor speed control through a much simpler concept using the advanced zero crossing detector opto coupler ICs, a power triac and a PWM circuit.
Using Zero Crossing Detector Opto Coupler
Thanks to the MOC series of optocouplers which has made triac control circuits extremely safe and easy to configure, and allow a hassle free PWM integration for the intended controls.
In one of my earlier posts I discussed a simple PWM soft start motor controller circuit which implemented the MOC3063 IC for providing an effective soft start on the connected motor.
Here too we use an identical method for enforcing the proposed 3 phase induction motor speed controller circuit, the following image shows how this can be done:
In the figure we can see three identical MOC opto coupler stages configured in their standard triac regulator mode, and the input side integrated with a simple IC 555 PWM circuit.
The 3 MOC circuits are configured for handling the 3 phase AC input and delivering the same to the attached induction motor.
The PWM input at the isolated LED control side of the opto determines the chopping ratio of the 3 phase AC input which is being processed by the MOC ICS.
Using IC 555 PWM Controller (Zero Voltage Switching)
That implies, by adjusting the PWM pot associated with the 555 IC one can effectively control the speed of the induction motor.
Output at its pin#3 comes with a varying duty cycle which in turn switches the output triacs accordingly, resulting in either increasing the AC RMS value or decreasing the same.
Increasing the RMS through wider PWMs enables acquiring a higher speed on the motor, while decreasing the AC RMS through narrower PWMs produces an opposite effect, that is it causes the motor to proportionately slow down.
The above features are implemented with a lot of precision and safety since the ICs are assigned with many internal sophisticated features, specifically intended for driving triacs and heavy inductive loads such as inductions motors, solenoids, valves, contactors, solid state relays etc.
The IC also ensures a perfectly isolated operation for the DC stage which allows the user to make the adjustments without the fear of an electric shock.
The principle can be also efficiently used for controlling single phase motor speed, by employing a single MOC IC instead of 3.
The design is actually based on time proportional triac drive theory. The upper IC555 PWM circuit may be adjusted to produce a 50% duty cycle at much higher frequency, while the lower PWM circuit may be used for implementing the speed control operation of the induction motor through the adjustments of the associated pot.
This 555 IC is recommended to have relatively lower frequency than the upper IC 555 circuit. This may be done by increasing the pin#6/2 capacitor to around 100nF.


Assumed Waveform and Phase Control using the above Concept:
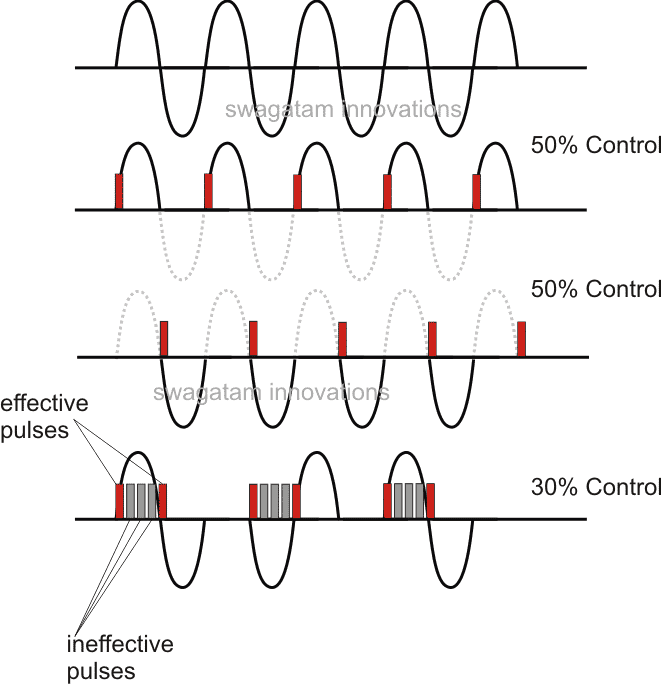
The above explained method of controlling a 3-phase induction motor is actually quite crude since it has no V/Hz control.
It simply employs switching the mains ON/OFF at different rates to produce an average power to the motor and control the speed by altering this average AC to the motor.
Imagine if you switch the motor ON/OFF manually 40 times or 50 times per minute. That would result in your motor slowing down to some relative average value, yet moving continuously. The above principle works in the same way.
A more technical approach is to design a circuit which ensures a proper control of the V/Hz ratio and automatically adjusts the same depending on the speed of the slip or any voltage fluctuations.
For this we basically employ the following stages:
- H-Bridge or Full Bridge IGBT driver Circuit
- 3-Phase Generator Stage for Feeding the Full Bridge Circuit
- V/Hz PWM Processor
Using a Full Bridge IGBT control Circuit
If the setting up procedures of the above triac based design look daunting to you, the following full-bridge PWM based induction motor speed control could be tried:
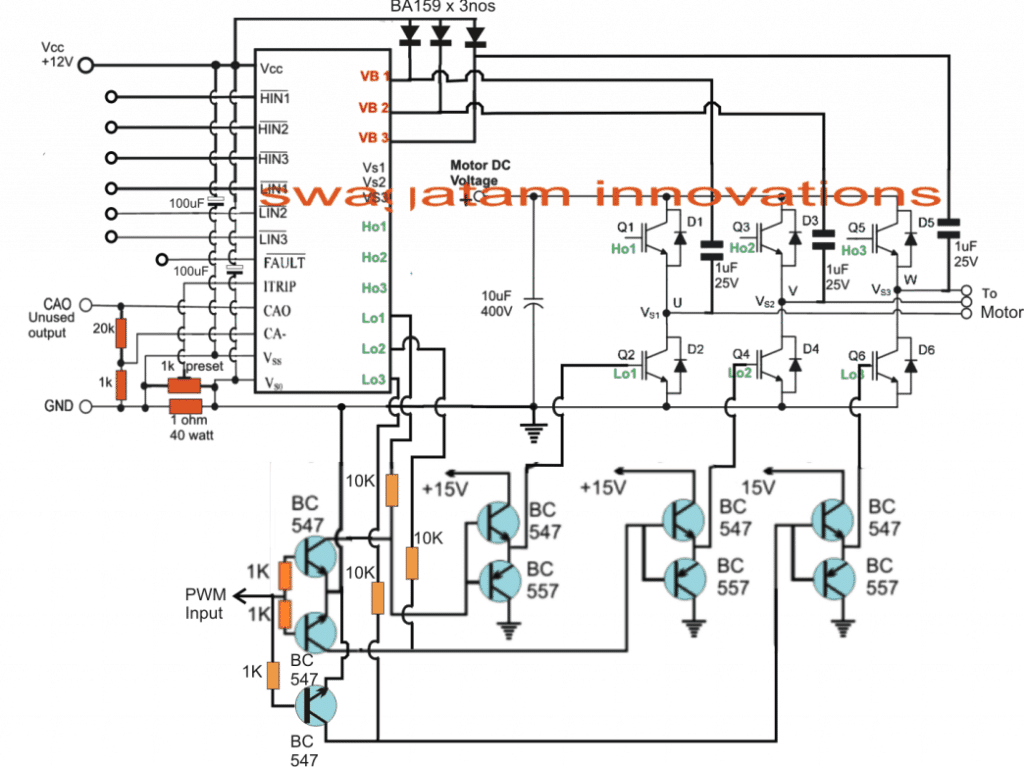
The circuit shown in the above figure utilizes a single chip full-bridge driver IC IRS2330 (latest version is 6EDL04I06NT) which has all the features in-built in order to satisfy a safe and a perfect 3 phase motor operation.
The IC only needs a synchronized 3 phase logic input across its HIN/LIN pinouts for generating the required 3 phase oscillating output, which finally is used for operating the full bridge IGBT network and the connected 3 phase motor.
The speed control PWM injection is implemented through 3 separate half bridge NPN/PNP drivers stages, controlled with a SPWM feed from an IC 555 PWM generator as seen in our previous designs. This PWM level may be ultimately used for controlling the speed of the induction motor.
Before I have explained the actual speed control method for the induction motor, let's first understand how the automatic V/Hz control can be achieved using a few IC 555 circuits, as discussed below
The Automatic V/Hz PWM Processor Circuit (Closed Loop)
In the above sections I have explained the designs which will help the induction motor to move at the rate which is specified by the manufacturer, but it won't adjust according to a constant V/Hz ratio unless the following PWM processor is integrated with the H-Bridge PWM input feed.
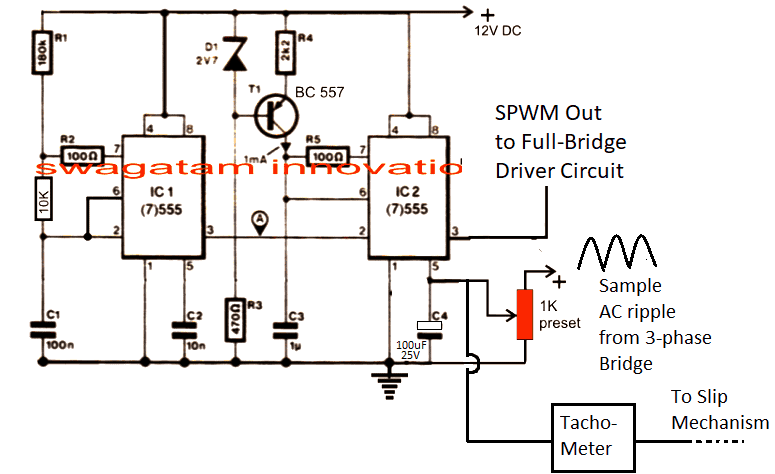
The above circuit is a simple PWM generator using a couple of IC 555. The IC1 generates the PWM frequency which is converted into triangle waves at pin#6 of IC2 with the help of R4/C3.
These triangle waves are compared with the sinewave ripple at pin#5 of IC2. These sample ripples are acquired by rectifying the 3 phase AC mains into a 12V AC ripple and is fed to pin#5 of the IC2 for the required processing.
By comparing the two waveform, an appropriately dimensioned SPWM is generated at pin#3 of IC2, which becomes the driving PWM for the H-bridge network.
How the V/Hz Circuit Works
When power is switched ON the capacitor at pin#5 begins by rendering a zero voltage at pin#5 which causes the lowest SPWM value to the H-bridge circuit, which in turn enables the induction motor to start with a slow gradual soft start.
As this capacitor charges, the potential at pin#5 rises which proportionately raises the SPWM and enables the motor to gain speed gradually.
We can also see a tachometer feedback circuit which is also integrated with pin#5 of the IC2.
This tachometer monitors the rotor speed or the slip speed and generates additional voltage at pin#5 of IC2.
Now as the motor speed increases the slip speed tries to synchronize with the stator frequency and in the process it begins gaining speed.
This increase in the induction slip increases the tachometer voltage proportionately which in turn causes IC2 to increase the SPWM output and this in turn further increases the motor speed.
The above adjustment tries to maintain the V/Hz ratio to a fairly constant level until finally when the SPWM from IC2 is unable to increase any further.
At this point the slip speed and the stator speed acquire a steady-state and this is maintained until the input voltage or the slip speed (due to load) are not altered. In case these are altered the V/Hz processor circuit again comes into action and begins adjusting the ratio for maintaining the optimal response of the induction motor speed.
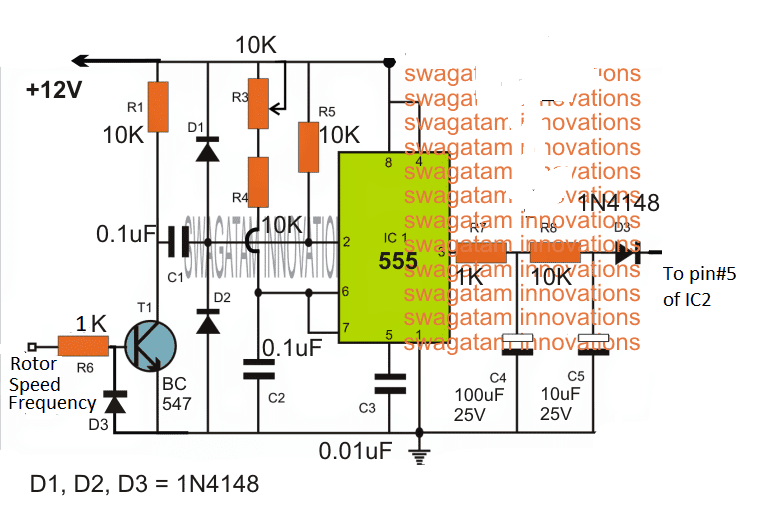
The tachometer
The Tachometer circuit can be also cheaply built using the following simple circuit and integrated with the above explained circuit stages:
How to Implement the Speed Control
In the above paragraphs we understood the automatic regulation process that can eb achieved by integrating a tachometer feedback to a auto regulating SPWM controller circuit.
Now I have explained how the speed of an induction motor can be controlled by varying the frequency, which will ultimately force the SPWM to drop and maintain the correct V/Hz ratio.
The following diagram explains the speed control stage:
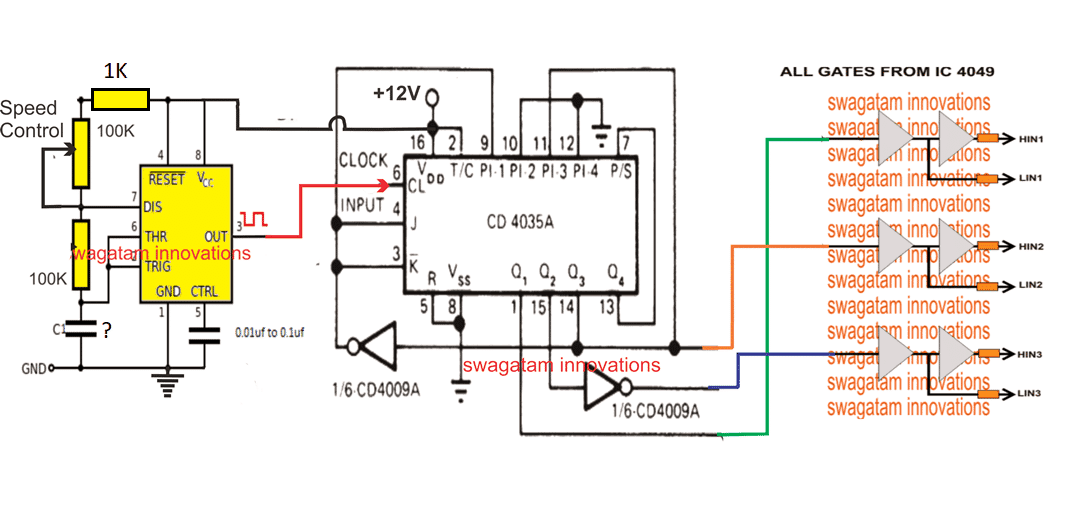
Here we can see a 3-phase generator circuit using IC 4035 whose phase shift frequency can be varied by varying the clock input at its pin#6.
The 3 phase signals are applied across the 4049 IC gates for producing the required HIN, LIN feeds for the full -bridge driver network.
This implies that by suitably varying the clock frequency of IC 4035, we can effectively change the operating 3-phase frequency of the induction motor.
This is implemented through a simple IC 555 astable circuit which feeds an adjustable frequency at pin#6 of IC 4035, and allows the frequency to be adjusted through the attached 100K pot.
The capacitor C needs to be calculated such that the adjustable frequency range comes within the correct specification of the connected induction motor.
When the frequency pot is varied, the effective frequency of the induction motor also changes, which correspondingly changes the speed of the motor.
For example when the frequency is reduced, causes the motor speed to reduce, which in turn causes the tachometer output to reduce the voltage proportionately.
This proportionate reduction in the tachometer output forces the SPWM to narrow down and thereby pulls down the voltage output to the motor proportionately.
This action in turn ensures that the V/Hz ratio is maintained while controlling the induction motor speed through frequency control.
Warning: The above concept is designed on theoretical assumptions only, please proceed with caution.
If you have any further doubts regarding this 3-phase induction motor speed controller design, you are most welcome to post the same through your comments.
Sir I have many problem in phase control circuit please help me sir actually mne ek phase control krna mne ujt se v 1:1pulse transformer lga kr try kiya sir but sir nai work kr raha ਫਿਰ 555 se pulse transformer joint kiya ta k vo pulse transformer isolation krke triac ko trigger kre but impossible sir please help me sir
Hello Sukhwant, I will surely help you…please try the following circuit, it should work if you connect the parts correctly: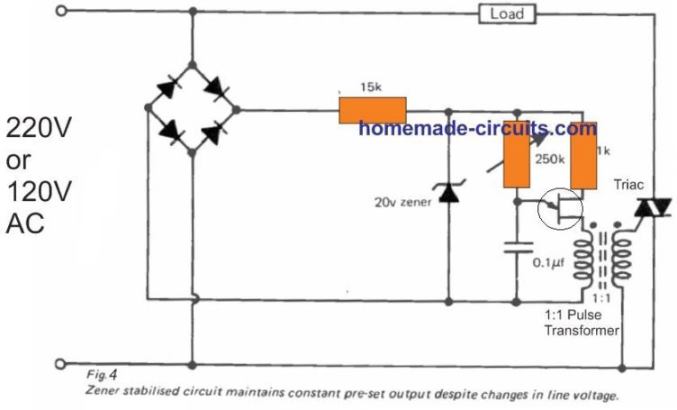
" rel="ugc">
Please let me know if you have any issues with the circuit.
1. devre de 555 bloğunda oluşan sinyal frekansı kaç hertz? bu bölümü yapamadım.
The 555 frequency will depend on the value of the capacitor at pin#6/2 of the IC, which can be modified as desired…
Hız ayar potansiyometre yerine dokunma yüzeyi nasıl konur?
Adding a touch speed control can make the circuit very complex, I do not have an easy design for it…
Güzel ve basit bir devre. 555 den optokupler e giden direnç değeri nedir? Öğrencilerimle yapmayı düşünüyoruz.
Glad you liked the concept!
For a 5V supply, a 470 ohm resistor should be enough for each opto LED.
Hi
Very helpfull and simple explanation
I hope you to be glad
Thank you so much!
I am currently working on implementing SVPWM (Space Vector Pulse Width Modulation) for speed control in 3 phase induction motor using Arduino. I’m looking for a detailed circuit diagram to help me with the design and would appreciate any guidance or resources on this topic. Any assistance would be greatly appreciated!”
Hello Tathagat, I wish I could help you, however since my Arduino knowledge is not good, so it might be difficult for me currently to help you with this project. I hope you will understand and kindly bear with me…
Buna ziua domnule.Am o întrebare care nu e despre subiectul de mai sus.Exista posibilitatea de a face din 220v -380v?Daca da,as dori o schemă simpla pentru un proiect de casa,pentru a alimenta un motor de 1,5kw.Multumesc.
Hello Lacusta, the first schematic is the simplest one and should work if done correctly. There’s no other concept simpler than the first schematic using optocouplers.
Mulțumesc domnule pentru amabilitate.
You are most welcome!
Hello swagatam,
I made single phase to three phase motor controller using spwm from arduino feed to full bridge mosfet driver. So, if I want to make auto v/freq adjustment I need the circuit with 2 555, tachometer circuit, and tachometer with hall sensor and magnet attached on the motor shaft. The output from arduino will go to the 2 555 circuit and feed to the mosfet driver. So if I change the freq then the v/freq will adjust accordingly. Is this correct?
Hello Wira,
I will have to see the schematic to understand your concept, without the schematic it may be difficult for me to understand the working concept.
I will draw the schematic, but it is a basic circuit. I learn from your schematics and find the component available. I cannot get most of the component you use.
First i have arduino with 3 set of hi/lo pwm output with 120 degree phase shift. Then it goes to 3 pcs ir2110 to drive 2 igbt each. The output then goes to low pass filter to 3 phase motor.
The igbt power supplied from 220v ac main to full bridge recrtifier then to 450v capacitor.
I am thinking to “alter” the 3 pwm output from arduino to ir2110 using 3 of your v/freq circuit and parallel the tachometer output. I also think as alternative I also could use just 1 pwm output, and phase shifted them using opamp(also from your circuit) to produce 3 set of pwm phase shifted by 120 degree.
Then the output go to the 3pcs ir2110. The v/hz and tachometer circuit could “alter’ the pwm input to the opamp from arduino.
Yes, what you are suggesting looks good to me. It should be OK. But implementing it practically can be quite hard.
I still unsure about the concept, this is my concern:
– by tapping only the hi pwm input on i have no control on the lo input, ir2110 might turn on both mosfet and create short circuit.
– if i somehow generate the lo signal from the pwm processor, i am not sure if ir2100 will add dead time between mosfet on and off. As there is difference in the time between mosfet turning on and off, this will also lead to shorting both mosfet.
I think it is easier to use single pwm instead hi and lo. I could use fan73892 which take single ended pwm input. It also do add dead time between mosfet on and off sequence. I also will only need one pwm processor to apply the concept.
I was reluctant because i could only find fan73892 in smd package, but i already put an order on it. I think I will test the circuit without the mosfets to be sure and use lm317 output with resistor divider to simulate the tachometer circuit. I will look how pwm signal got altered by the pwm processor using a scope. This will take times as i need to build another circuit from scratch, and I could only do it when i have free time.
Anyway, thanks for your reply.
You will have to create opposite PWM signals on the Hi, Lo inputs of the IC by using NOT gates, as shown in the following figure: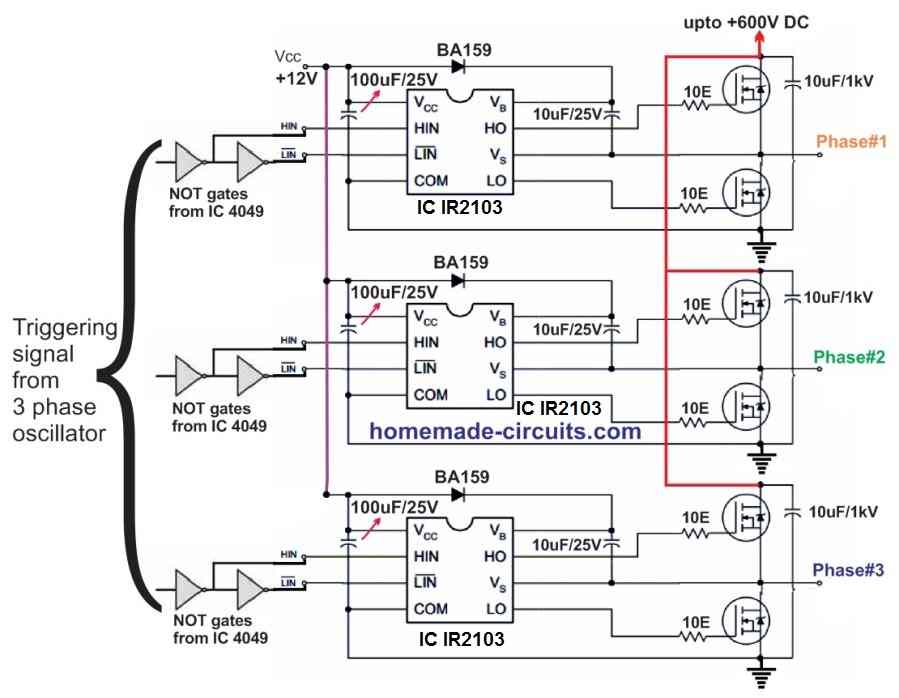
" rel="ugc">
All full bridge ICs have in-built dead time adjusted, so no issues about that.
However, yes, if you have access to a single PWM input IC, then it is much better and easier.
The pwm source i use is digital with hi and lo, the not gate convert analog to digital. My idea is to add another pin outputing analog pwm, but my uno already struggling with current code.
Now, i try to use nodemcu esp32s, which is cheaper(i got nodemcu v1.1 just for $5) and much faster(12mhz vs up to 240mhz dual core) plus it got two 12bit adc(vs a 10bit adc on arduino uno). But the code won’t work with nodemcu, as node mcu did not have on board timer. Currently i am still learning the basic of using esp32.
I am trying to generate a pair of digital and analog signal from esp32. Also the analog voltage is only 3.3v which wouldn’t work with mosfet driver, but i think this could be adjusted using transistor, isolator or opamp.
With node mcu, i think i also could use it as comparator taking speedometer input as feedback.
Update: the 3phase smd mosfet driver has arrive, i have try using lan cable to convert it to dip. The wire was to big and to stiff, i will try using 24awg wire today.
can this circuit diagram, drive up to 300kw electric motor,3phase
Hello sir,
Myself Saikat I tried to build the circuit of speed control of 3phase induction motor using zero crossing detector. But I am unable to understand why the MOC3061 is connected with the phase using a 360ohm resistor. Please clarify it.
Hello Saikat,
The MOC3061 configuration is as per the datasheet of the IC. Please check out the following datasheet and refer to the diagram under “Basic applications”
https://www.mouser.in/datasheet/2/308/1/fairchild_semiconductor_moc3061m-1191638.pdf
Thank you sir
Can I use it to drive a 310v 160w 3-wire DC motor (U, V and W wires)
Basically, I want to drive this DC motor from 220v AC at three different speeds
You can use the mentioned motor, but the input supply will need to be 3 phase, as indicated in the diagrams. Make sure the triacs are appropriately rated.
Hi Swagatam,
I am looking for an inexpensive, straightforward way to control the speed of a 3-phase hoist motor. This motor operates a 500 kg SWL chain block with a hook on the end, and we use it to swap out heavy parts of a CNC machine.
It is a single speed hoist (6.7 m/min) and its speed is too fast for us. It can drop parts onto the concrete floor quickly. We would like to be able to halve its speed but I don’t want to go to the expense of buying a commercial VFD or similar for this simple application.
Motor specs are: 415 volt, 0.8kW, 4 pole, 50%ED, 50Hz, 2.5A, 1380 RPM
I am hoping that one of your simple circuits will do the job for us. Which would you suggest, please?
Hi Jim, I am not sure if this would work perfectly or not, but it can be tried. According to me the 3 phases can be connected with 3 identical light dimmer switches in series, and the dimmer controls could be synchronized such that they produce identical amount of control on the 3 phase lines. In this way the load could be perhaps controlled by moving the synchronized controls or the pots of the light dimmer switches.
You can initially try this with a smaller load to check the response.
Dear swagatam, I made the changes you suggested, I think.. things have improved, however, the igbts and the driver no longer burn but…. every time the dc voltage on the igbt drain exceeds 90VDC the driver goes to the “FAULT” mode and the outputs are disabled.
If I lower the voltage everything seems to work fine. Do you have any idea what could be happening?
Any other suggestions??
thanks again.
Dear Marcio, It is good to know that now the IGBTs now are not burning. I checked the datasheet of the IC IR2130, and learned that the IC will go into a FAULT mode in case it detects an over-current or undervoltage shutdown. I think in your case it could be an over current shutdown happening.
I am sure you might have wired the current detection network across the ITRIP pin of the IC. You might have to adjust the current sensing resistor values so that the IC does not go into a fault mode due to an over current sensing across this network.
Dear Swagatam, I’m Marcio from Brazil, congratulations for all your projects and for your patience in answering all your followers’ doubts, by the way, I have a doubt too and I hope you can help me.
I set up the speed control project for the 3 phase AC motor, however, I used the IR2130 with a PWM program coming from a PIC 16F628.
But, when I do the test with the AC motor (220VAC 2HP)with a lower voltage, around 45VDC everything works great, but when I apply the correct voltage on the DC bus around 320VC… Bang!!! everything explodes, the igbt, the driver etc… when I reapply a lower voltage, everything works, do you have any idea to solve this that can help me….
Thank you very much and greetings from Brazil.
Dear Marcio, Increasing the DC buss also increases the voltage spikes across the IGBTs, which is why the IGBTs mght be blowing off. Did to put reverse diodes across the collector/emitter of the IGBTs? If not please make sure to put these diodes. Also, make sure to add a 100uF/400V capacitor right across the IGBT bridge supply lines, that is the DC BUS lines. Furthermore add a 1K resistor across the gate/emitter of each IGBT.
For the driver circuit, try adding a 100 ohm resistor between the 12V Dc input and the Vcc pin of the driver IC, and add a 100uF/25V capacitor across the Vcc and ground line of the IC. Also add a 12V zener diode between the Vcc and ground line of the IC.
Thanks for your prompt reply.
I will make the changes you suggested.
Do you think pwm can generate this kind of problem??
I had difficulties to create the 120° spaced signal and I think they are not working properly… could this also be the problem? …another thing !!… does the IR 2130 automatically regulate the voltage at the igbt gate ?
I’m using IGBT silan 40n60
(VGE =~ 20V).. how do I limit this voltage??
thank you again..
I can’t say about the PWMs, if you think they are not working properly then you must correct it appropriately.
The output from the IR 2130 will be same as the voltage applied at its Vcc pin. If its is 12V then the output will be also 12V.
Dear swag
I have a car ac blower motor the driving circuit is defected. Is it posible to operate the motor direct on 12v adapter
Hello Hmoud, what is the rating of the motor, and at what speed it is supposed to rotate?
Nice post, i think i want to implement what you’ve been written here. But, i think something is missing in this part:
Here too we use an identical method for enforcing the proposed 3 phase induction motor speed controller circuit, the following image shows how this can be done:
after this paragraph i didn’t see an image.
Thank you, and glad you liked the post….actually it refers to the same diagram which is shown in the next paragraph:
" rel="ugc">
Hello I am looking for a PCB board design that can run a 1-3 HP motor it’s parameter are –
Input is 220v 50-60hz
And output is 220v three phase 200hz mr swagatam if you can help please let me know
Also I made a Proteus design but when put in load the output freq drops need help
Sorry Rajat, I do not have a PCB design for this project at this moment!
Hello,
I’m wondering if this schematic can be upsized to become a speed control for a Siemens S55D 3 phase electric motor to be used in Light what we call Light Sport Aircraft here in the US.
The motor currently used a 75kW battery pack and I have a proprietary 400 VDC 400 Amp DC power source to replace the battery pack.
The cruise RPM for the motor is 2500 RPM with a maximum RPM for takeoff is 3000.
I would really appreciate your input on this
Hi, yes according to me you can use the first concept universally with any 3 phase motor regardless of its size and power, however one has to make sure that the triacs are appropriately upgraded as per the motor power rating.
What other triac can I use other than the FKPF12N60? And could you tell me how to do the control but for 3 speeds?
You can use BTA41/600….by 3 speeds do you mean 3 level speed control?
Hello, can you please tell me if any of the circuits would work for my use case.
I have a 12V PWM PC water pump that has died. I don’t want to just throw it away so I want to try to fix it but I can’t change the existing components on the circuit because I have no idea what they are (they aren’t marked). I’m looking for a replacement circuit that can be used on a pc sys/fan header so from 0 to 12V and at most 1A (the pump is probably rated at 6-19W). The pump motor has 6 coils with 3 phases if that matters.
Kind regards, Grapher
Hello again
Looks like I was successful this time. The water wheel puts out 480 3 phase to a cabin 600′ away. Its converted to 28VDC (via Sola power supplies) to charge a battery bank. Then use standard inverters to provide power. When the wheel has no or little load, it overspeeds and blows things up! What I want to do is shunt some of the power to load resistors to control the speed and output of the wheel. I already have the loads in the system, but are manually controlled. I need a way to control automatically. I bought a used soft start controller to see if I could horrify it for this purpose. It is all TTL 7400 series and SCR’s If nothing else I can use the box. I will start with this and see what you have to say.
Dennis
Hello,
you can probably try the PWM control version from this article:
https://www.homemade-circuits.com/simple-electronic-load-controller-elc/
I want to talk with you about something very similar to this 3 phase control for use with a water wheel. Instead of a motor control, would be using load resistors to regulate the speed of the wheel. Having trouble making contact, so will be short untill I make contact.
Dennis
Dear sir,
Can I use the PWM Output from Arduino instead of 555? Also please tell me if I have to change the TRIAC as I’m going to implement the circuit for a 5HP motor.
Dear Manesh, yes that’s possible if you can replicate the PWM actions exactly as suggested in the article. You can use BTA41/600 for your application
Dear sir,
Thanks a lot for your reply.
Can you please tell me the wattage of resistors used in case of using BTA41?
Manesh, the resistor wattage will not change, you can use the same resistors which are shown in the diagram.
Sir, Can You please prepare a three phase VVVF circuit for controlling three phase Induction motor 0.5 KW with 12V DC supply. Frequency can be varied using POT meter.
Sir these are my specifications,,, which one will b best from the above mention circuits that will be best for speed control,,
Parameters Specifications
Delta connection Star connection
Voltages 227 393
Speed 3022 2992
Power rate on execution 0.25Hp 0.25Hp
Current 0.54 0.47
Ak, I think the first universal design can be tried. It can be optimized to produce the ideal speed control range for the motor, with some trial and error.
you mean using the zero crossing detector opto coupler ICs, a power triac and a PWM circuit,, but what about using full bridge IGBT,,,? is thi will work too .,,?
If you can build the complex full bridge design then you can try it also.
I convert sine code and simplex inverter to 300 V to 750 V DC to 220 V AC with frequency 50 HZ which is voltage dependent frequency
With overload protection – short circuit etc ..
How much does it cost?
How much does it cost if the same system works with solar and hybrids?
Hello Swagatham,
I am looking to make the above circuit to use it with 6 pole synchronous motor for my turntable. As I could know from internet the speed of the synchronous motor depends on its pulse frequency. Reason the use this circuit, the driver IC AN630U is obsolete and not available. Can you advise.
Thanks in advance
Hello Prasad, if the motor has 3 wires then probably you can try the above given concepts, it should work if correctly optimized.
Hey, i’m doing final year project on Inverse Parallel IGBT Based Speed Controller for three phase Induction Motor, can you help me with a comprehensive circuit diagram for this project? Thanks.
Hey, you can try the second concept in the above article, and add more IGBTs in parallel…
İn first picture, what does ıt mean second 555 timer. What is the mission. Why we used and what if we didn’t use
The lower IC 555 is for interrupting the pulses generated by the upper IC 555 at calculated intervals…if it is not used, the speed control will not be smooth.
hey..im a student looking to submit my final year project..
i have a three phase soft starter circuit working with scr’s..7812 regulator..LM324 & LM339 microcontrollers..MOC3021 optocoupler..
can i make this circuit more efficient by replacing the scr with IGBT using PWM..
and how can this be successfully implemented..
Hi, sorry an SCR cannot be replaced with an IGBT, the two are entirely different things.
Could you make some recommendations on how to modify this circuit to make it more efficient..because I understand scr produce some harmonics..how can I reduce this..
The first circuit uses triacs with zero crossing triggering, so it won’t produce any harmonics.
Hi,
can this circuit be modified to control 3-phase arc welding machines using SCRs?
Hi, that looks perfectly possible.
Sir, may I know what is the magnitude of Rin in the speed control of three phase induction motor using opto coupler and IC555?
You can use 1K if the supply is below 12V
Sir may I know what are the ratings of the machine for which you have designed speed control of three phase induction motor using 555timer and MOC6063?
Bhava, it will on the selected triac amp rating, normally this could be a 6 amp triac, so the motor could be upto 1000 watts
Can the full bridge igbt speed controller can handle an input of 660volts DC?
yes if the IGBTs are rated at that much voltage
Thank you Sir. I would also like to ask about the connection of LO and HO outputs. Why do the Ho outputs are directly connected to Q1, Q3, Q5 while LO were not?
Thanks.
Julius, in a normal inverter without the pwm control the all LO points would be joined across each other just like HO, but here since we want to use PWM, we are injecting it through the lower mosfets and hence their gates connections are routed through the pwm chopping stage
I have a question regarding the speed control circuit. May I request for the detailed connection of Lin and Hin from IC 4049? Is it the CD 4049 hex inverter?
Thank you.
yes it is a HEX inverter/buffer, you can use any 4049 IC and configure its 6 NOT gates as shown in the diagram. Since all the gates are exactly similar with their functions, there are no restrictions, you can configure the relevant pinouts as per your preference
Ok sir thank you for your fast response, this would be a great help for my project.
Regarding my project, I will use three phase 480 V line to line as my input. Do I need a rectifier to step down the voltage to 12V ac ripple for the PWM processor circuit since I obtained 660V ripple as per my simulation using simple bridge circuit?
Also, I would like to ask where will I get the motor frequency input on the tachometer circuit?
Thanks a lot sir.
Thanks Julius, yes a separate 12V or 15V Dc would be required for the circuit stage, which can be derived through a switching SMPS circuit or simply through a small transformer based power supply.
Motor frequency can be achieved through a hall effect sensor and magnet mechanism, or though an IR LED transmitter/receiver network. These could be attached with the motor wheel, and the sensor may be triggered by the rotations of the wheel. This RPM frequency could be then fed to the tachometer input for the processing.
Another tachometer example can be read here:
https://www.homemade-circuits.com/simple-accurate-speedometer-circuit/
Hello can you tell us how to compute the capacitor on the spped control stage
I do not have the calculation details, but it can be implemented with some practical experimentation, and some trial and error.
You will definitely want to operate the following engine. And I have a voltage source of 36volt. I can drive him with your design thank you
N5065 1820W 320KV Outrunner Brushless Motor For Electric Skate Board DIY Kit New
yes 36V DC brushless is possible…. but not inuction motor
well, I want to use your design with tension 36 volt dc 10 s lilon 3.7 v will work
sorry I have never heard of an induction motor running with 36V DC, could you elaborate?
And i also want to make rectifiers through which we get 310 dc voltage. So which diode i used that i get desired output and is it necessary that the resister is on prallel to the capicator
you can use 1N4007 or 1N5408 depending on the current rating of the load…
Sir plz tell me is it possible that we can control scr till 310v meanz we get 310v dc control output…
My techer says that this technique is useless but i think he is wrong.. Plz sugest me about this scr circuits
Fahad, SCRs and triacs cannot be used for DC loads, because they would get latched with a DC supply across their cathode/anode.
My load is not dc i give scr output to three phase inverter after that the three phase motor is connected
If it is AC then you may need a triac instead of an SCR, in that case an ordinary dimmer switch circuit can be a good option…as detailed in the following article
https://www.homemade-circuits.com/how-to-make-simplest-triac-flasher/
I have simulite firing angle on Proteus but its mot properly worked
Sir hope you are right
I work on three phase PMSM in my fyp. My terget is to control the speed of that motor by using SVPWM. But i face to much difficulty kindly help me .i made scr rectifiers to get control dc but my firing angle circuit are not properly worked so plz help me suggest me the easiest way
Hi Fahad, I have not yet thoroughly studied a space vector based motor control, so I am sorry I won’t be able to suggest you much on this….
Dear Swagatham,
Brilliant idea yet again!
Question: Are the Sample Ripples at PIN5 of IC2 are 3 Phase (120deg apart) or 1 Phase ?
Thanks Uday,
since the ripples will be rectified, they won’t be 120 degrees apart rather will look as shown below:
" rel="nofollow ugc">
see the bottom most waveform
How can I make sample AC ripple from 3 phase bridge which it produce DC
the bridge output will be in the form of ripple, and not a pure DC unless capacitor is added
Where is the input phase 1,2,3 and the output HIN1,2,3 LIN1,2,3 in ic4049
There is any resistant or capacitors for ic4049
please see the last diagram for the details.
no resistance is required for the 4049 stage, the shown output resistances can be eliminated or removed
Hi swag
Thank you
How can I make signal of rotor speed frequency in the tachometer
Hi Husain, speed control can be achieved by adjusting the 1K pot at pin#5 of IC2
hello sir…!!!
This is very huge step taken by you to enhance our understanding regarding electronics and electrical. Thereby, it’s grateful and keep on.
I want to make three phase inverter using IGBT. I have went across your both methods i think second is unto my requirement i.e VFD. Now, the problem is to find out the gate driver IC’s for IGBT module. I also noticed that you have mentioned IR2330(6EDL04I06NT). Could you please tell me how and where from i can get ?
Thank you Navi, I am glad you liked my website.
However I am really sorry, I do not have the exact information regarding where this IC can be available.
I think you should try the various online stores such as digikey, mouser, element14, onsemi etc and inquire about the IC.
Or you can also practically visit Lamington road in mumbai for getting them quickly….
Hi, I am trying to figure out how to modify the newer 3phase washing machine motor controllers on say a Maytag Neptune along with the existing motor of course. Basically I would like to use the existing VFD on the machine by taping into the signals for speed and direction. These motors are perfect for many jobs and are now available in the junk yard for cheap $. The motors tend to be 120v 3phase and 120v RFDs are very hard to find. All seem to be 220v out. Any thoughts or should I just start reading the computer outputs during the various speeds and direction. It seems to me we have a very capable and cheap motor system being thrown out daily that we could all be using with a little smart sleuthing. My first use would be a chimney top fan unit to improve the output of my home build gasification wood boiler. I have a Neptune at the ready for parts. These are induction and not permanent magnet like the direct drive machines we read about.
Hi, I think reading the computer outputs would give you a better and a quick idea regarding the speeds, so it is according to me the right way to proceed….
Good day sir, we have a project of making a control module for the squirrel cage induction motor of LabVolt. We are trying to use your first design but MOC3041 is the only available optocoupler in our country. Which triac should we use that works well with the MOC3041? And is there any modification needed for the design to work?
The motor ratings are:
Stator Voltage = 220V
Motor Mech. Power = 200 W
Nominal current = 2 A
Hi Justin, you can use a BT139 triac, without any modification in the design.
However I hope that you have correctly understood the “time prop concept” which is employed through the IC 555 switching?
Would a BT137 be applicable?
We’re not sure about the time prop concept but required of our project is to output 3 different speeds with an increment of 100rpm with respect to the rated speed. Will the time prop concept help us in achieving the desired speed regulations?
BT137 will also work.
Time prop is the recommended PWM speed control technique, you can read more about it here:
https://www.homemade-circuits.com/triac-phase-control-using-pwm-time/
It will work but the PWM from the two IC 555 will need to be carefully adjusted for getting the required phase control
Thank you very much sir!
We have to change the 1nF to 100nF in the 2nd IC 555? And what value of Rin should we use?
Again, thank you so much sir! This will be a really great help for us. Thank you!
You are welcome Justin! just make sure that the output from the IC 555 is in the form of bursts of pulses, having 4 to 5 PWM blocks on each burst, and total number of such burst should be adjustable within the 50Hz or the 20 millisecond range, higher number of bursts withing the 50Hz range will allow higher speed on the motor and vice versa
Rin can be any value between 1K and 4k7 if the supply is 12V
Dear Sir
I have a 3 phase induction motor 1 ps /o,75kW , that it works by 380v/50 Hz power. What of those diagrams is the right for this application and what type of triacs are safe to use for it..?
Thank you.
Dear eneos,
the last concept is the best one, and will provide you with the best possible results
Hello sir,
I have an AC Induction motor with rated voltage 415 V and output power 2.2kW and frequency of 50 Hz. I am willing to make an real electric car. The place where I am getting stuck is it’s inverter part i.e variable frequency drive and PWM part. So please help.
I saw your articles but I guess they are for low rated voltage and output power.
Looking forward for a positive response.
Hello Jai,
you can probably try the following universal concept designed by me, and use it for your application:
https://www.homemade-circuits.com/2017/07/universal-esc-circuit-for-bldc-motors.html
please do it under an expert’s supervision.
Thank you sir
But in your answer can I replace PWM circuit by soft start motor PWM circuit?
in the existing IC 555 diagram, for initiating a soft start you can replace the pin#5 100nF with a 100uF/25V cap
Will this circuit work for 3phase Squirrel cage IM of 25hp, 400V, 15A
the last one will work
Hai Sir,
I am very happy with your support. It is extra-ordinary job what you have doing.
I have a question for you,
Is the Speed controller works under “Variable Frequency Variable Current concept ” OR ” Variable Frequency Variable Voltage concept”?
Please Conform Sir
Thank you Richards, however please ignore my recent modifications for the first circuit, it might not work correctly, because the PWM is supposed to be released in bursts, therefore two IC 555s will be required, sometimes too much analysis results in mistaken assumptions.
The idea is simple, we break or interrupt the 50Hz mains supply to the motor and prevent the motor from getting a continuous mains supply, in this way the motor is able to get a reduced average power from the mains, causing a proportionate drop in its avearge speed level accordingly.
Hi Sir
Please tell me the value of Rin Resistance.
Please tell me what is N1,N2,N3…..? I unable to understand.
Please help me
Regards
Richards Samson
Hi Richards,
Rin can be anywhere between 2k2 to 10K
N1—N3 are gates from the IC 4049…check the datasheet of the IC 4049, you will understand.
Hi sir
Thanks for the information
Iam using the first circuit for speed control of motor is there any necessity of ic 4049
Hi Richards, for the first design 4049 will not be required.
there’s one modification I just now realized which can be tried in the first design.
connect the Rin common side with the 5V supply, and remove the upper IC 555 stage entirely.
now use only the lower IC 555 circuit and configure its output pin#3 to the pin#1 of the MOC ICs through separate 1N4148 diodes…the anodes of the individual diodeswill go to pin#1 of the MOC.
please try this this looks to be a much better idea for achieving the speed control
ok sir
I will follow the procedure.
Thanks you very much.
connect the Rin common side with the 5V supply, and remove the upper IC 555 stage entirely.
That means Rin is connected to the pin#3 of IC 555 and connect the diode 4148 to Pin#1 of IC MOC
555 Pin#3—-Rin—-Cathode–4148–Anode–Pin#1 MOC
Is the above mentioned sentence is right? Please conform.
Rin resistor ends will go to 5V supply, not to pin#3
3 diodes 1N4148 should be connected with pin#3 of PWM IC 555, and the anode ends of these diodes should be separately connected with pin#1 of the MOC opto
Hai sir
Please help me
Can i use the first circuit for 10HP motor and 50 Hp motors?
Hi Richards, you may have to use a BTI41C 25amp triac to accomplish your requirement…but I am not sure whether the MOC IC would be able to produce 50mA current required for triggering these 25 amp triacs.
hi good morning swagatam sir,
i need to speed control of 3phase 5hp, 430 v , 50hz ac induction motor. can i use this circuit.
Hi Venkatesh, you can try the last circuit, and upgrade the mofets accordingly for operating your 5 HP motor…it will work.
Dear sir
I want to speed control of 3 phase induction motor, capacity 1 hp without using market drives. I want to making self drive. Please send me full circuit diagram. My mail id is [email protected]
Thanking you
Bhupinder, you can try the last concept which is explained in the above circuit.
Dear Swagatam Ji,
Namskar!
I have to run a hoist.
Hoist motor details-
220 volt ac single phase
60 hz
900 watt
Motor winding resistance – 8.7 ohm
Load capacity -500 kg / 250 kg lifting speed – 10 m / 5 m per minute
My requirements –
Lifting load – 150 kg
Speed – 8 m to 4 m per minute .
Here in India power supply is 220- 240 volt at 50 hz.
Please suggest me .
Can I use above mentioned hoist at 50 hz power supply. My load and speed is well within limit.
Does hoist need any additional attachment like small fan for extra cooling, hz converter etc.
What changes will occur in initial current (surge current) and running current when 220 v 60 hz motor used at 240 v 50 hz.
After successful testing I will run hoist on a inverter . I want to use 6 no. Fan dimmer in parallel to handle above mentioned hoist initially surge current . to avoid higher capacity inverter requirement. Will this work.
Thank you very much.
Dear Devendar, yes, according to me your motor will be able to work with the domestic 220V supply.
for avoiding initial surge issue, you can use a dimmer switch for controlling the speed of the mtor, initially keep the speed to zero, after switch ON you can gradually increase the speed through the dimmer to the maximum limit, this will prevent any possibility of a switch ON surge
Swagatam Ji,
Thank you very much for your quick reply.
I was worried because at some web site it was suggested to lower the volt to get V/hz unchanged. otherwise motor will draw more current resulting in overheating (at 50 hz motor will run at 20% slower if designed at 60hz. means less cooling) and will burn.
Now I can go further without any hesitation.
Thank you very much .
Hello Devendar, A dimmer switch will not alter anything in the mains AC, neither frequency nor the volts, it will control the speed by chopping the AC waveform which is the safest way to control an AC single phase motor…so you can go ahead with this suggestion….just make sure the dimmer controller is rated to handle 1500 watt.
Swagatam Ji ,
Thank you very much for reply.
I was little worried about V/hz ratio.
I hope you are suggesting after looking effect of 220/60 vs 240/50 volt/hz effrct
I hope hoist motor not required to reduce input voltage to get correct ratio of V/hz. (220/60 vs 240/ 50)
as working load is within limit.
No need to replace hoist , thanks for your help.
Devendar
Sorry, I did not see that your motor was rated at 60Hz, in that case yes it will affect your motor performance….you must change it to a 220V 50Hz motor and then use it with a dimmer controller for initiating the slow start.
Swagatam Ji,
instead of replacing motor can we change frequency from 50 hz to 60 hz .
please suggest me suitable circuit for this.
I will manage to build .
Thanks
Hello Devendar, that can be a very complex procedure, you will have to build a full fledged VFD for implementing that, or buy the same readymade….that’s why I did not suggest changing the frequency.
here’s one design
https://www.homemade-circuits.com/2013/09/single-phase-variable-frequency-drive.html
it’s strictly for the experts, not recommended for newcomers.
Hi.
Thanks for your quick response.
if i understand you wel the potentiometer R1 can be used to reduce the speed ????.
at the (hotline switching application circuit) there is a resistor (R in) that hese no value ,can you tel me in simple words how to calculate this resistor.
as i say before i am not at home in high voltages and have no idea how to do this.
i also looked in the data sheet of the MOC3063 but cant find any explanation for this resistor.
Thanks in advance.
Johan.
yes you are right, the relevant potentiometers can be used for speed control.
the resistor Rin is not critical, it could be anywhere from 1K to 10K, it limits excess current to the opto LED. Alternatively you can use Oh’s law to calculate the resistor value.
Hi. Swagatam
is it possible to add a speed controller to this circuit ?????
i am building this softstart module for my circular saw because that thing starts at full speed.
sometimes i have to saw pieces of aluminium for project cases and that needs to be done at a lower speed.
i hope that you can help me out because i am not so at home with high voltages.
hope to hear from you soon .
Johan.
Hi Johan, speed control is already included in all the designs.
In the last design you can do it by varying the PWM input
Hi. Swagatam
I have finaly the components received from aliexpress and completed the build of this circuit.
With the last info about the 100NF capacitor the speed control works but not as i expected.
it works with some hick-ups and not at a continuous speed.
the soft start works also but my question is the following, is it possible to increase the delay time for the soft start so it takes some more time to go to full speed.
i hope you can help me out there because it is still a little to fast for me.
Johan.
Hi Johan, which circuit did you assemble, is it the last one using IC IRS2330 ?
using IC IRS2330 should work without any hiccups, just make sure the IC 555 PWM pot is a good quality pot, if possible use a multi-turn type of pot.
can you please tell me which soft start circuit dd you try?
sorry, I just forgot the last conservation and therefore could not track the details…anyway for the first design the PWMs will need to be precisely calculated with some trial and error, and the correct match will need to be found for the fast PWM duty cycle, otherwise the motor will show some stuttering
you can try adding a capacitors across the motor winding to smoothen it out a little bit, just a suggestion though.
hi.
no it is the one with the 2 555 ic’s.
the one you mentioned is new for me and i did not see it yet.
i will look for it and see if it is not to difficult to build for me.
i think that the potmeters i use are not that good quality because i have them from aliexpress and they ware cheap.
i will try a multiturn potmeter but that will take some time before they are delivered to me.
thanks.
Johan.
OK great, let me know if you have any problems…..
Sorry i forgot to mention that i use the BT 139 because the one you mention in the schematic was not available on ali or in the stores over here.
Johan.
no problem… the triac will need to be selected as per the motor current specs, if BT139 suits your specs then it’s fine!
Hi Swagatham,
Can you tell me how we can provide deadtime and shoot-through protection for the MOSFETS?
Is there a logic circuit which will address these issues, so that the output from this circuit will go to the ITRIP of the driver.
I am using IR2136 as the gate driver since IRS2330 is not available at my location. And IR2136 provides Under Voltage protection and as you mentioned the 1 ohm 40 watt with 1k preset protects the system against overload and overcurrent situations.
However, I experienced the damage of 6 MOSFET pack twice, (the gate and sources of the MOSFETs are getting shorted). After investigating I am suspecting that this was due to dead times and shoot through. Can you share your thoughts on this?
Thanks
Uday
Hi Uday, the dead time is internally fixed for this IC, here's what its datasheet says:
"This family of HVICs features integrated deadtime protection circuitry. The deadtime for these ICs is fixed; other ICs within
IR’s HVIC portfolio feature programmable deadtime for greater design flexibility. The deadtime feature inserts a time period (a
minimum deadtime) in which both the high- and low-side power switches are held off; this is done to ensure that the power
switch being turned off has fully turned off before the second power switch is turned on. This minimum deadtime is
automatically inserted whenever the external deadtime is shorter than DT; external deadtimes larger than DT are not modified
by the gate driver. Figure 5 illustrates the deadtime period and the relationship between the output gate signals.
The deadtime circuitry of the IRS233(0,2)(D) is matched with respect to the high- and low-side outputs of a given channel;
additionally, the deadtimes of each of the three channels are matched…"
still you can try adding 12V zener diodes in series with all the outputs of the NOT gates and see if it helps to increase the same externally…
Hi Swagatham,
Actually, I am confused about what I asked!
I am experiencing Gate to Source shorts, not Gate to Drain shorts.
So I believe that Gate to Source shorts are independent of deadtimes.
Still unable to figure out the reasons for Gate to Source shorts in the MOSFETS.
Thanks
Uday
Hi Uday, you cannot check a mosfet with a meter, it can be a somewhat complex process to test a mosfet with a meter. the easiest method is to connect the mosfet as a switch and check its response as shown here
https://www.homemade-circuits.com/2013/04/simple-mosfet-switch-circuit-with-delay.html
deadtime is an IC is introduced to make sure that the mosfets across the two channels can never be ON during the brief transition periods, that is during the instantaneous periods when the IC may be switching from one of its output to the other. deadtime creates a dead zone during these transition periods and this allows the meosfets to switch OFF completely during these periods, which in turn keeps the mosfets safe from burning.
Thank You Swagatham, that works.
How do I monitor torque speed characteristics of an Induction motor?
Any suggestions?
Thanks
Uday
Hi Uday,
I guess the characteristic can be diagnosed using a tachometer, but I am not entirely sure about it, I have a few tachometer circuits in this website you can perhaps check them out
Oh Okay!
How do we extract the speed signal from the shaft?
The motor I am working with is having a speed resolver not a speed encoder.
I am not sure how to work with a resolver!
Any suggestions?
Thanks
Uday
sorry, I don’t have much info regarding speed resolver…if you know about its basic working principle you can share it with us
Hi
We alredy discussed about this matter which is overload protection circuit for three phase induction motor controller.can you post a simple overload protection circuit without use current transformer ?
Hi, It is already present in the above explained full bridge circuit.
The 1 ohm 40 watt, and the associated 1k preset is specifically introduced to protect the system against overload and overcurrent situations
Hi Swagatham,
Got a question about the "Decoupling Capacitor". Can you throw some light on the factors that I need to consider for selecting the value for the decoupling capacitor across the DC link terminals.
I tried the 10uF as suggested in the above circuit (using full IGBT circuit), but it blew after few seconds.
I am running an induction motor on a 24VDC link.
Thanks
Uday
Hi Uday,
a capacitor will blow only when the voltage across it exceeds its maximum rating.
You can try putting two 400V capacitors in series and see the response
By the way it's not exactly a decoupling capacitor, it's a filter capacitor.
…for a 24V bus, 400V cap will not be required…simply a 50V should be enough.
Okay Sir. Will implement the idea and get back to you with questions.
Thanks a lot
Uday
sure…You are welcome!!
Okay Sir.
Let me ask you one more request. I have built the circuit suggested by you and successfully drove an induction motor. However I need to operate it at its maximum torque value. If you could remember torque speed characteristics I need to stay at top of the curve. Can you suggest me how to get there.
In general I can do with VFD circuit which you mentioned in other thread. But the complication here is I need to automate the maximum torque operation, which means the motor torque should adjust itself and stay at max torque with the load changes.
Thanks in advance
Uday
Hi Uday, which circuit did you build? please specify, I will to try to figure out the idea for the automatic torque control…if possible
Hi Sir,
I built my circuit based on the one which is mentioned in this post.
https://www.homemade-circuits.com/2016/07/3-phase-induction-motor-speed.html
Thanks
Uday
OK but which one the one which has used two 555 ICs or the full bridge circuit….?
The full bridge one Sir
-Uday
You can make a 741 based "voltage follower circuit" and integrate it with a 3 diode bridge rectifier circuit.
The input to this 3 diode bridge is derived from a small step down trafo whose primary may be connected to any of the two phases.
the output of the 741 is connected with pin#5 of the PWM IC 555.
now whenever the motor voltage tend to drop, the 741 proportionately increases the voltage at pin#5 causing wider PWMs which in turn allows the motor to get higher torque ad vice versa.
Hi Sir,
I am in need of a slope calculator circuit, which should calculate the slope of a voltage curve. So that I can maintain the value of the voltage at a constant point on the curve. Please suggest me an idea.
Thanks
Uday
Hi Uday, sorry I do not have the circuit with me at this time…will try to find it and let you know, if it's possible.
Okay Sir,
If you cannot find it, at least please suggest any idea, so that I can follow/think in that direction. Thanks for your efforts.
Uday
I have not yet investigated the concept, so presently I cannot suggest much about it….
Hi, sir. I had done the simulation of the 3 phase motor controller with 555. But the design was not as good as predicted. And, It stated that the output of 555 is 1.1 Volt.
Hi Setiawan, simulators are useless when it comes to simulating complex circuits, that's I never use simulator, instead I do a brain simulation and then make the design practically and tweak it to perfection.
secondly the user must know exactly how to use and how to troubleshoot a simulation results if required, otherwise again it can be useless..
Really.
Thanks for reply .I would like to ask one thing ..If we add three resistor in series of three phase input supply, does it reduce the voltage as per our requirement ? if what is the calculation of the resistance ?
regards
Ajitkumar
Adding resistors will reduce the speed but that would be a very crude and a bad method of implementing speed reduction.
the resistor will emit a lot of heat and waste power
sir
The old post triac based motor speed control, if we avoid the pwm control section and power circuit use for just on and off for a low voltage three phase induction motor (100 volt to 150 volt) frequently with help of a on off sensor,in 100 or more voltage,motor too hot after some time running.if apply 50v three phase it will be working fine.but in 50 volt it does not work with full speed.can you give any suggestion. and can you post a relay tripping circuit if the motor over heated or mechanically jam.
thanks
Ajitkumar
Ajithkumar, if your motor runs slow at 50V, and gets hot at 100V, then you could probably try running it with 75V and see how it performs.
yes the mentioned protection features can be included in the design easily.
I'll try to post it soon if possible….
WE ARE WAITING FOR NEW UPDATION OF TREE PHASE MOTOR CONTROLLER
I will update it tomorrow, in the meantime you can refer to the following article, I am going to apply and modify this concept…
https://www.homemade-circuits.com/2014/12/simple-3-phase-brushless-bldc-motor.html
I have updated the full bridge design….you may check it out
But,how will on the high side mosfets?
is it connect to direct on Ho1-Ho3 of IRS chip ?
yes, The gates are marked Ho1, Ho2, Ho3, meaning these will connect with the IC pinouts which are also identically marked
Sir,
I tried the 3Ph_Ind mot circuit,Its working with AC motor.
And I connected a 100w Bulb on out put as single phase its doesn't dimming but,
fluctuating in the slow speed. help me to solve the problem
thanks
Ajit
Ajit, sorry I could not get it…which circuit are you referring to??
SIR,
I Told about 3 phase induction motor speed controller .
the one which is explained in the above article?…the last one?
The Last updated additional 555 pwm circuit which I have tried
but output fluctuating when decrease the speed. On full speed its working well.
is it happening for the bulb or for the motor?
anyway you can try adjusting the frequency of the lower iC555 by increasing its capacitor and see how it works.
I tried motor and bulb.I will check the capacitors then after reply to you
great swagatam sir.
OK thanks
Sir,
I increased the capacitor value up to 1uf. but could not get a good result.
here speed reducing no doubt but only blinking (bulb) or jerking (motor) in slow speed.if possible please post a microcontroller based circuit instead of 555.
thanks once again
Ajitkumar
Ajitkumar, the above presented concept in the last diagram is perfect, but the circuit will need to be adjusted with proper understanding and with with some experimentation, by using an oscilloscope.
the 1uF was just a suggestion, it's not the exact value.
I think Triac does not support to pwm speed controller for induction motor. only possible to on and off the output ?
using the last time proportional theory, the AC 50Hz cycles is broken into pieces using PWM and the gap between these breaks decides the speed on the motor. higher gaps causes the motor to slow and lower gaps increases the speed.
I think the problem could be in the use a common signal for all the 3 phases, the PWMs needs to be synchronized with the 3 phase cycles separately so that the splitting of the AC is done uniformly across the 3 phases.
In short the PWMs should be also released in accordance with the 120 degree phase shifts
A much easier and better idea would be to use a mosfet or IGBT based full bridge driver which I will upadte soon here.
Dear sir I tried this circuit as single phase also and referred MOC3061 series is a zero crossing opto-triac it gets ON only at the zero cross of the mains even if the excitation pulse comes sooner so it cannot control the firing angle that is needed to speed control. any other random firing optotriac may be possible.any way waiting to a openloop 3@ motor controller.
Ajitkumar, the zero crossing will not have much impact if the frequency of the upper 555 IC is set to a reasonably high level. Because if the frequency is high one of the pulse will be able to somehow catch hold of the zero crossing start point and trigger the triac,
The zero crossing basically helps to reduce RF interference to the minimum.
having said this it would also interesting to see how a non-zero-crossing opto coupler responds with this circuit
I'll try to update the mosfet version soon next week…if i forget please do remind me.
Thank you very much indeed. Will be Looking forward your design.
Kind regards
Imsa Naga
thank you for your patience!!
Dear Sir, Could you spare some time for the above mentioned "ELECTRONIC ENGINE SPEED GOVERNOR" design?
thanks again.
Imsa Naga
Dar Imsa, I have posted it here:
https://www.homemade-circuits.com/2017/01/electronic-engine-speed-governor-circuit.html
Yes, Precisely an Engine Speed Controller. Thank you for the prompt reply !
OK then may be you can try the following concept
https://www.homemade-circuits.com/2016/12/diesel-generator-rpm-controller-circuit.html
Dear Sir
Your blog is really great! I am beginning to learn electronics now!
I have a Desiel car engine and would like to couple the same with a 5-7KvA 3 phase Alternator for my home use. Would you be kind enough to kindly provide a Governor Circuit design for the same ? (either electronic or electromechanical)? I assure you that I would try out the same and update your blog, hopefully in the interest of all you interested fans!
Thank you very much in anticipation.
Kind regards
Imsa Naga
thanks imsa, please elaborate on the specifications of the "governor" design so that I can understand what exactly you are looking for?? do you mean a speed controller??
Sir
In PWM circuit, can you post a Microcontroller circuit(AT89c2051) instead of NE555 circuit
If possible I'll try to update it soon…
THANKS N WAITING
Sir update version use 4 doide 1n4007 and what's transistor no……..
bta12 use for fkpf12n60
please ignore the last diagram, the first diagram can be used with some modification, will try to update the design soon…
Sir pwm put its ok but not working in put voltage 90-90-90
Raj, I have clarified at the bottom of the article that the design has problems
possibly I will try to update a corrected version of the same soon…
Sir,
Thanks for your reply and i am waiting eagerly for your post.
I have published it here
https://www.homemade-circuits.com/2016/11/submersible-pumpset-timer-circuit.html
Hi Swagat,
Is there any IC with 3 PWM pins which can directly generate a sine wave using PWM to drive, say, a MOSFET or something? I was searching for something simple for a project. Please could you point me in the right direction?
Thanks in advance
Hi George, there's no such IC in my knowledge which can do such thing.
you can manufacture SPWM by feeding a fast triangle wave and a slow triangle wave across the two inputs of any opamp…the output from the opamp could be applied to the mosfets for the required sinewave AC generation.
Dear Sir,
Let me know pwm static voltage regulator with buck boost transformer. If have simple schematic without PIC, share some idea. I appreciate much for soon reply.
Your Sincerely,
KL
Dear KYI,
you can refer to the following article
https://www.homemade-circuits.com/2013/06/universal-ic-555-buck-boost-circuit.html
Dear is it working with soft start?
Hi Swag.
Greats works. Your site is a real reference for many persons.
I failed realising 10A / 220 v dc for a motor a found but I am still trying reading more and more articles on your site to increase my chances.
When I have something working I'll feed back
Thanks
Thanks Michel, but I cannot see any 220V 10 amp DC figure in the above article?
Dear brother what will be transister we want to use? Also can i use 1n4007 for the doide bridge?
Dear Siva, the diode should be rated much above the motor current specs.
the transistor is supposed to be a suitably rated IGBT
you can use 1K for it, calculation is not necessary
Will this circuit replace vfd
VFD purpose is different than the above, VFD is for matching motor frequency specs correctly with the input mains frequency…whereas the above is for specifically adjusting speed.
What is the actual voltage ending up on the motor terminals in this circuit? I am curious as to the relation of the DC supply voltage to the circuit compared to what ends up at the motor terminals and what it ought to be in comparison with the design voltage of the motor.
Please clarify.
The output to the motor will be in the form of intermittently switched ON and switched OFF AC cycles, so the average of these intermittently switching voltage will be the final voltage reaching the motor