
In this article I have explained how to make a simple 2-step Arduino programmable timer circuit, which can be used to switch an electrical load ON/OFF with independently adjustable ON and OFF timings.
For example if you want a light to remain ON for 24 hours and OFF for 2 hours, you can simply do this through a quick modification in the program code. In the same way you can customize the output timings to any other desired set of time intervals by changing the code appropriately.
You just have to compile and upload the following code to your Arduino board and start the timer function as per your specific application needs.
Program Code
void setup(){
pinMode(13, OUTPUT);
}
void loop(){

digitalWrite(13, HIGH);
delay(86400000);
digitalWrite(13, LOW);
delay(3600000);
}
In the above example code the lines delay(86400000); and delay(3600000); determine the output ON and OFF delay time intervals respectively, in milliseconds. Here, the figure 86400000 milliseconds corresponds to 24 hours, while 3600000 exhibits 1 hour delay.
You can customize these two values as per your personal preference to get the required output delays.
Once setup and powered, the Arduino will continue switching between the two step ON/OFF timing sequence. as long as power remains applied to the system.
Circuit Diagram
The complete circuit diagram along with the Arduino connections can be witnessed in the following diagram:
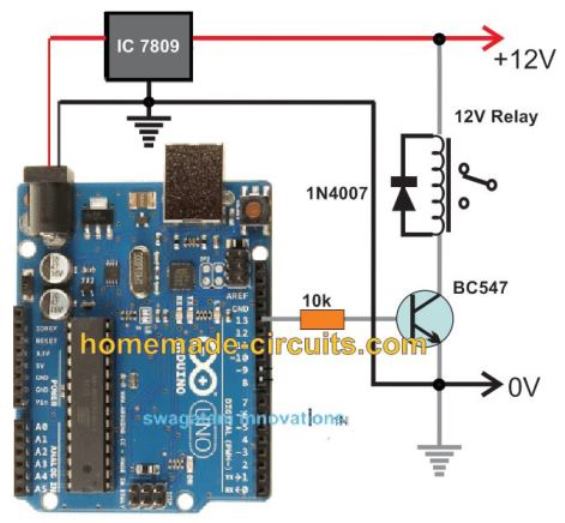
Arduino One-Shot Timer Circuit
If you don't want the timer to loop through the two step timer, instead want the timer to be a one-shot type, which will switch OFF permanently after the set delay, you can apply the following code:
int led = 13; // Pin 13 has an LED connected on most Arduino boards.

unsigned long DELAY_TIME = 10000; // 10 sec
unsigned long delayStart = 0; // the time the delay started
bool delayRunning = false; // true if still waiting for delay to finish

void setup() {
  pinMode(led, OUTPUT);   // initialize the digital pin as an output.
  digitalWrite(led, HIGH); // turn led on

  // start delay
  delayStart = millis();
  delayRunning = true;
}

void loop() {
  // check if delay has timed out
  if (delayRunning && ((millis() - delayStart) >= DELAY_TIME)) {
    delayRunning = false; // finished delay -- single shot, once only
    digitalWrite(led, LOW); // turn led off
  }
}
If you want a discretely designed version of an identical programmable timer circuit, you can opt for this circuit
Parts Required for the Arduino Programmable Timer Circuit
- Arduino UNO Board = 1
- IC 7809 = 1
- BC547 = 1
- 1N4007 Diode = 1
- 10k 1/4 w resistor = 1
- Relay 12V/400 ohm/SPDT/5 amp = 1
- 12V AC to DC Adapter = 1