A crystal radio receiver, often known as a crystal set, is a simplest form of radio receiver that was widely used in the initial periods of radio. A crystal radio set does not require any external power supply to operate. Instead, it simply makes sound using the energy of the radio signals that is received. It gets its name from its main component, the crystal detector, which was initially manufactured from a crystalline material like galena. Nowadays, this part is referred to as a diode.
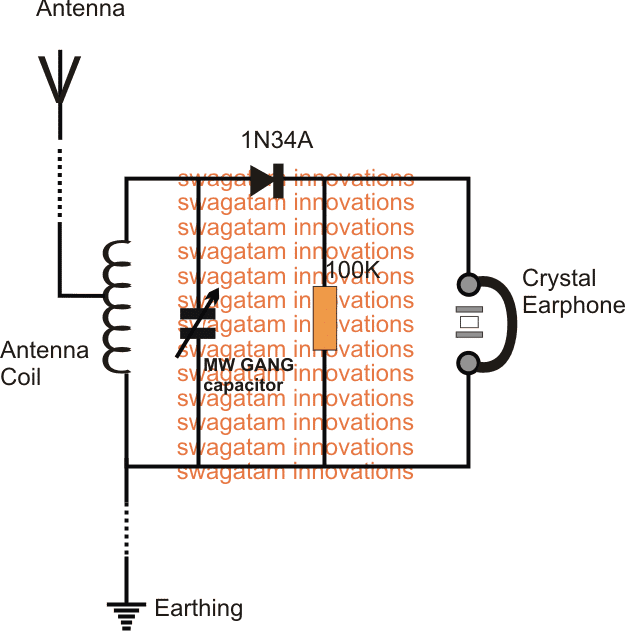
An antenna, a wire coil, a capacitor, a crystal detector, and earphones are all that may be required to build a very simple crystal radio receiver. Because a crystal set lacks the power to drive a loudspeaker, earphones become mandatory.
A standard crystal radio receiver circuit can be witnessed in the following diagram:
However, in this article I will elucidate the options of adding an amplifier stage to crystal radios, so that it becomes possible to use a loudspeaker instead of earphones.
Simplest Amplifier for a Crystal Set
The amplifier circuit displayed below will boost a weak or far-off station's loudness to a level that is suitable for powerful headphone listening. A DC source with a voltage range of 5 to 9 volts can be used to power the circuit.
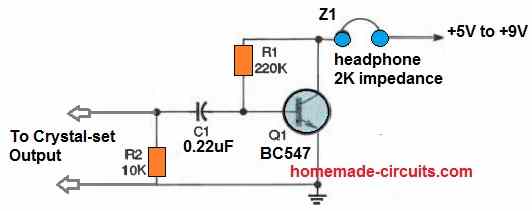
Q1 is a BC547 NPN transistor that amplifies the signal. Use headphones with a resistance of 2000 ohms for the Z1.
Crystal Set with Loudspeaker
The circuit diagram below depicts our second amplifier. It will boost a crystal set's audio signal to a level strong enough to operate an 8 ohm speaker.
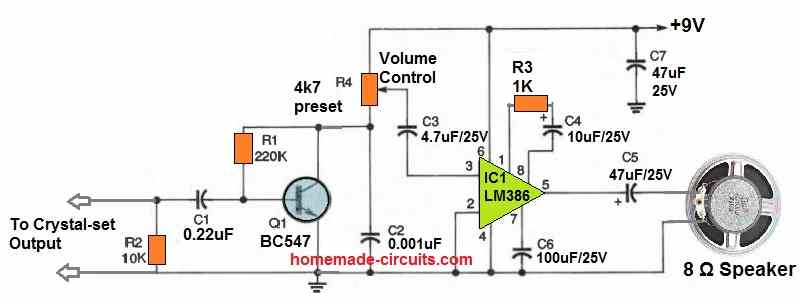
The gain of an LM386 amplifier (IC1) is adjusted to 50 when it is configured as indicated in the diagram. By eliminating R3 and connecting the positive pole of C4 straight to pin 1 of the IC, the gain may be enhanced to 200.
If a gain of 50 or 200 appears too high, the gain could be decreased to a minimal level of 20 by eliminating C4, C6, and R3.
Q1 and IC1 have a total gain of many thousand, therefore keep all of your connections short and clean. The volume can be adjusted through potentiometer R4.
Using an Antenna Coil
The antenna coil's winding diagram, which will be utilized in the remaining crystal-set receiving circuits, is shown in the following image below.
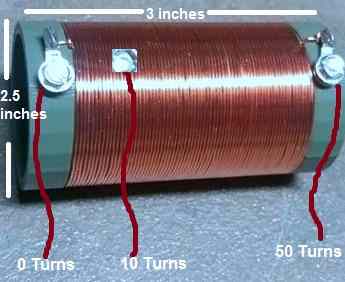
A piece of PVC pipe with a 2 and a half inch diameter may be used as the coil former. It should be around 3 inches long.
If this stuff is not easily accessible, any plastic tube with a comparable diameter and length will suffice.
Medicine containers, disposable plastic cups, and abandoned toys can also be used to make the above coils.
On the plastic former, wrap 50 tightly spaced turns using 19 or 20 gauge super enamel copper wire. At the tenth and twentieth turns, pull out a tap to finish making the antenna coil.
Crystal set with RF Amplifier
A crystal radio's output could be amplified using one of two simple techniques. One approach is to incorporate an audio amplifier at the detector's output, similar to that used in the first two concepts.
Another option is to place a radio-frequency (RF) amplifier ahead of the detector circuit, as seen in the figure below.
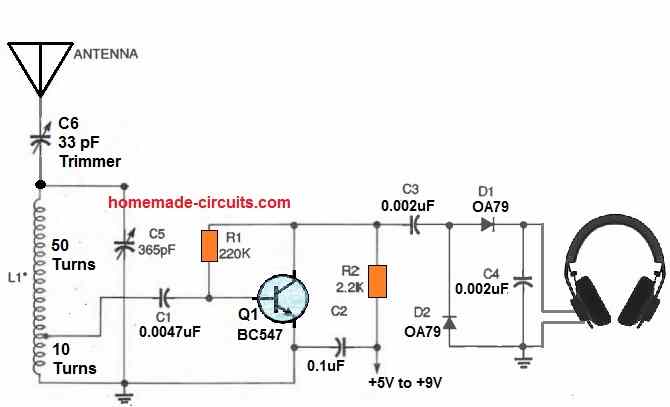
Any tunable capacitor with a value of 365 pF or more can be used as C5. This is also called the GANG capacitor, used to tune the intended radio transmission. These capacitors may often be salvaged from older AM broadcast receivers.
Additionally, you might want to look into your nearby ham radio set, where you can frequently find a decent variety of tunable capacitors and other helpful parts that are just waiting to be put to good use.
The 5 to 50 pF capacitor C6 facilitates in tuning the circuit and matching the antenna to enhance the circuit's sensitivity and selectivity.
The circuit's sensitivity can be maximized by setting C6 to its peak capacitance. Likewise, the selectivity will be at its highest when C6 is tuned to a practical minimum value.
There is always a trade-off between sensitivity and selectivity in receivers, just like in any other device.
The antenna coil L1 extracts the RF signal at the 10th turn up from the ground and feeds it to the base of Q1.
Next, the Q1 transistor boosts the RF signal to power the twin diode detector stage. Finally, the headphones Z1 enables the amplified signal audible to the ears.
Antenna and Earthing
I stretched roughly 20 feet of 24-gauge copper wire over the ceiling to serve as the antenna for this single transistor receiver. This looks quite long, but since I'm almost 100 miles away from any strong AM station, I did not have any other choice.
I had a single ground rod inserted in hard, rocky terrain for my earthing system.
This also isn't the best ground system, no doubt about it. But despite these two significant flaws, the little, straightforward receiver operated admirably. The expense of the circuit is low, and the joy it generates is irresistible.
An Improved Crystal Set RF Amplifier
Next up is an improved RF crystal set receiver circuit that is seen below. This employs an audio amplifier behind a diode detector stage, and an RF amplifier ahead of it.
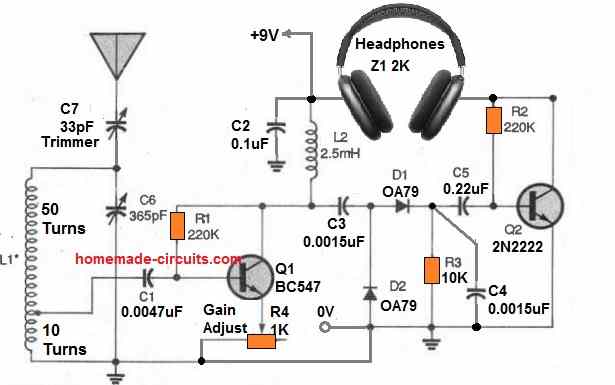
With two differences, this RF amplifier design is quite identical to the one used in the earlier receiver. Firstly, the load resistor in Q1 is upgraded to a 2.5-mH RF choke (L2).
Secondly, R4 is replaced with an RF gain control potentiometer.
At AM broadcast frequencies, the RF choke enhances the amplifier's efficiency and gain. R4 controls the receiver's level as well as the additional RF and AF amplification provided by the circuit.
How to Setup
After you've finished building the receiver, connect an antenna and ground. Apply power after setting R1 to its maximum resistance and C7 to roughly half of its highest capacitance.
Turn C6 until a station is audible, then turn R4 to a volume that is comfortable to listen to. Reduce C7's capacitance if many stations are being received at once; this should improve the circuit's selectivity.
Antenna Filter
If a powerful local station overwhelms the crystal set, an antenna filter network may be recommended.
All of the circuits above include a couple of RF-filter circuits that can help reduce interference from close or aggressive AM stations.
Despite modest differences, they function quite similarly. The antenna and reception circuits are coupled in parallel with the parallel-tuned filter circuit. This consists of a 365 pF variable capacitor parallel to the antenna coil. You can minimize or turn off the conflicting stations by tuning this variable capacitor.
You can also see the antenna connected in series with the series-tuned filter circuit. Here, a 33 pF trimmer can be seen connected in series with the antenna.
For this setup also you can adjust the trimmer to minimize or eliminate the overlapping radio stations.