In this post I have explained how a shunt regulator IC works typically in SMPS circuits. We take the example of the popular TL431 device and try to understand its use in electronic circuits through a few of its application notes.
Electrical Specifications
Technically the device TL431 is called a programmable shunt regulator, in simple terms it may be understood as an adjustable zener diode.
I have explained more about its specifications and application notes.
The TL431 is attributed with the following main features:
- Output voltage settable or programmable from 2.5V (minimum reference) up to 36 volts.
- Output Impedance low dynamic, around 0.2 Ohm.
- Sink current handling capacity up to maximum 100mA
- Unlike normal zeners, noise generation is negligible.
- Switching response lightning fast.
How the IC TL431 works?
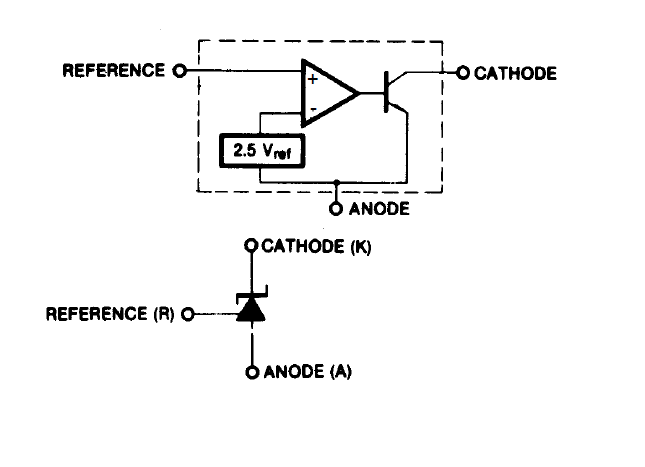
The TL431 is a three pin transistor like (such as BC547) adjustable or programmable voltage regulator.
The output voltage can be dimensioned using just two resistors across the specified pin outs of the device.
The diagram below shows the internal block diagram of the device and also the pin out designations.

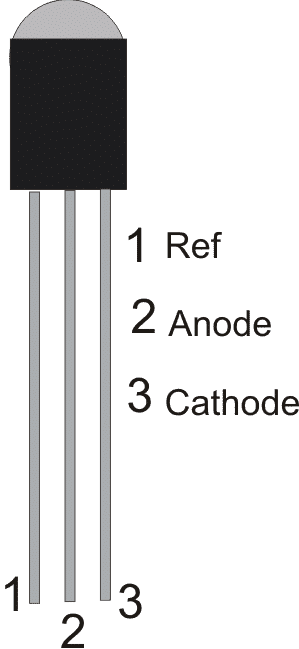
The following diagram indicates the pin outs of the actual device. Let's see how this device can be configured into practical circuits.
Circuit Examples using TL431
The circuit below shows how the above device TL431 can be used as a typical shunt regulator.
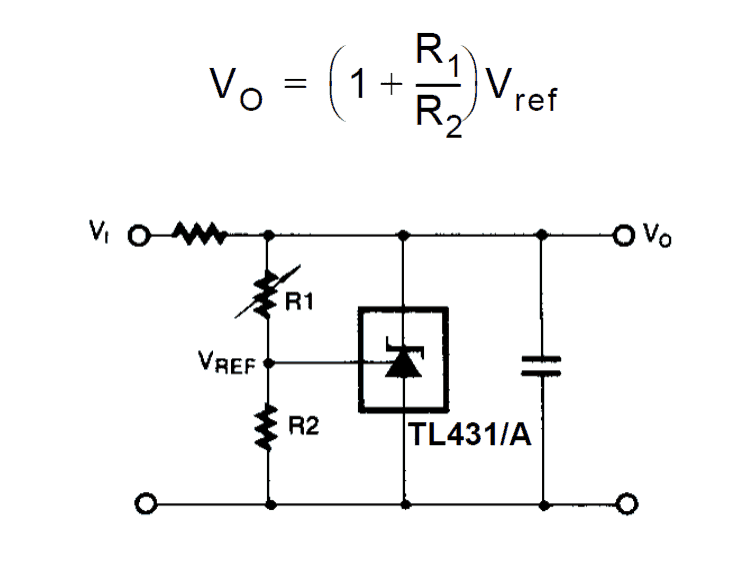
The above figure shows how with the help of just a couple of resistors the TL431 can be wired up as a shunt regulator for generating outputs between 2.5v to 36v. R1 is a variable resistor which is used for adjusting the output voltage.
The series resistor at the supply positive input can be calculated using Ohm's law:
R = Vi / I = Vi / 0.1
Here Vi is the supply input which must be below 35 V. The 0.1 or 100 mA is the maximum shunting current specification of the IC, and R is the resistor in Ohms.
Calculating Shunt Regulator Resistors
The following formula holds good for acquiring the values of the various components used for fixing the shunt voltage.
Vo = (1 + R1/R2)Vref
Here Vref is always equal to 2.5 V, which is internally set for the TL431 IC.
So the formula finally can be expressed as:
Vo = (1 + R1/R2) x 2.5
Practical Example
Let's try to understand the calculations through a practical example, as shown below:
In this example we will try to use the TL431 to regulate the output supply voltage to 12 V.
Let's assume we have all the parameters given, except R1.
- Given:
- Vo = 12V
- R2 = 1K
- R1 = ?
- Vref = 2.5
Vo = (1 + R1/R2) x 2.5
12 = (1 + R1/1000) x 2.5
12 = [(R1 + 1000) / 1000] x 2.5
12/2.5 = (R1 + 1000) / 1000
4.8 = (R1 + 1000) / 1000
4800 = R1 + 1000
R1 = 3800 = 3.8 K
Thus, by using a 3.8 K resistor for R1 we can regulate the output voltage of the TL431 to an exact 12 V level. Likewise, you can alter the values of R1 and R2 to get other regulated values at the output as required.
Modifying 78XX IC Output Voltage using TL431
In case a 78XX needs to be used in conjunction with the device, the following circuit can be used. In this example we can see how the output voltage of the a 7805 IC is modified to increase above its normal 5 V level. For example here the 7805 IC output could be increased to 9V by suitably adjusting the TL431 parameters.
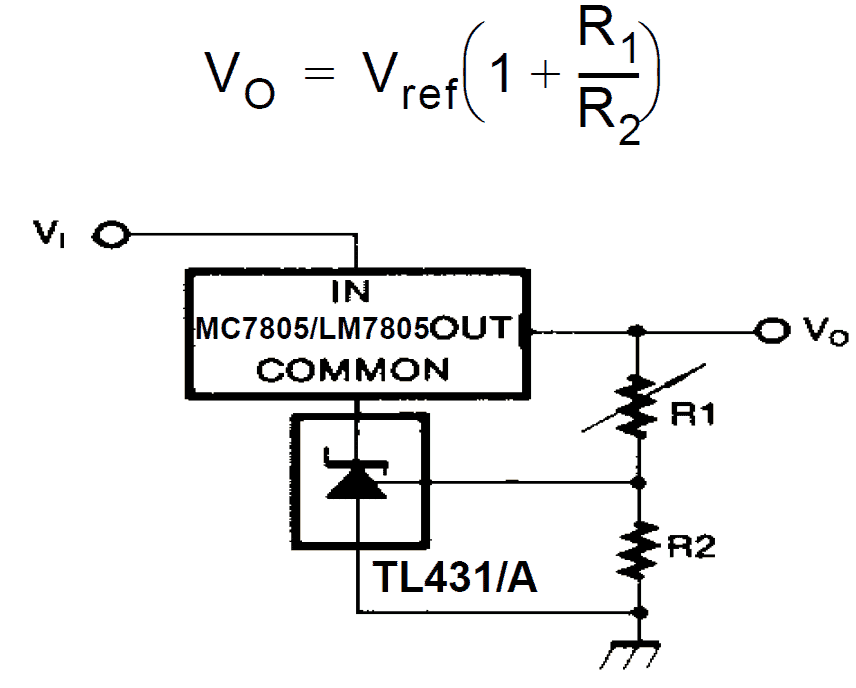
The ground of the TL431 cathode is connected with the ground pin of the 78XX. The output from the 78XX IC is connected with the potential divider network which determines the output voltage.
The parts can be identified through the formula shown in the diagram.
The above configurations are restricted to a max 100 mA current at the output.
Making a High Current Shunt Regulator using TL431
Normally, the TL431 adjustable zener diode cannot used with currents over 100 mA. However this device can be configured to shunt higher amount of currents by adding an external shunting transistor with the output of the TL431.
For working with higher current a transistor buffer may be used, as shown in the following circuit.
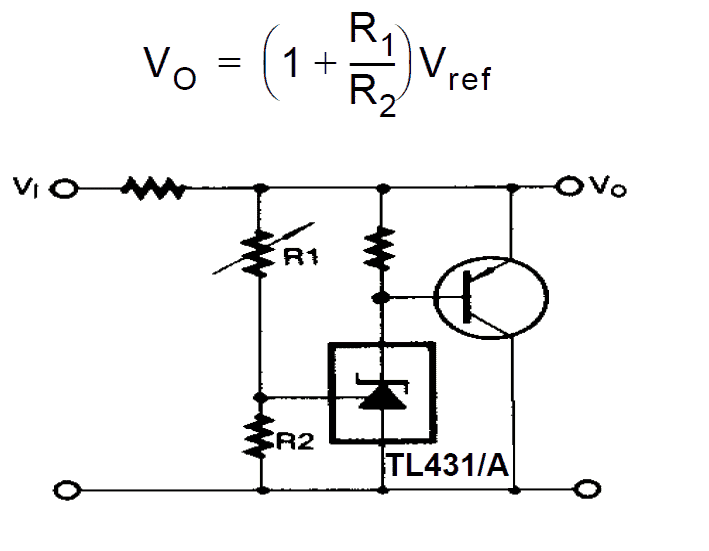
In the above diagram most of the parts placement is similar to the first shunt regulator design, except that here the cathode is provided with a resistor to positive and the point also becomes the base trigger of the connected buffer transistor.
The output current will depend on the magnitude of current the transistor is able to sink.
In the above diagram we can see two resistors whose values are not mentioned, one in series with the input supply line, another at the base of the PNP transistor.
The resistor at the input side limits the maximum tolerable current that can be sinked or shunted by the PNP transistor. This can be calculated in the same way as discussed previously for the first TL431 regulator diagram. This resistor protects the transistor from burning due to short circuit at the output.
The resistor at the base of the transistor is not critical and may arbitrarily selected anything between 1k and 4k7.
Making a Precision Shunt Regulator using TL431 for Windmill Applications
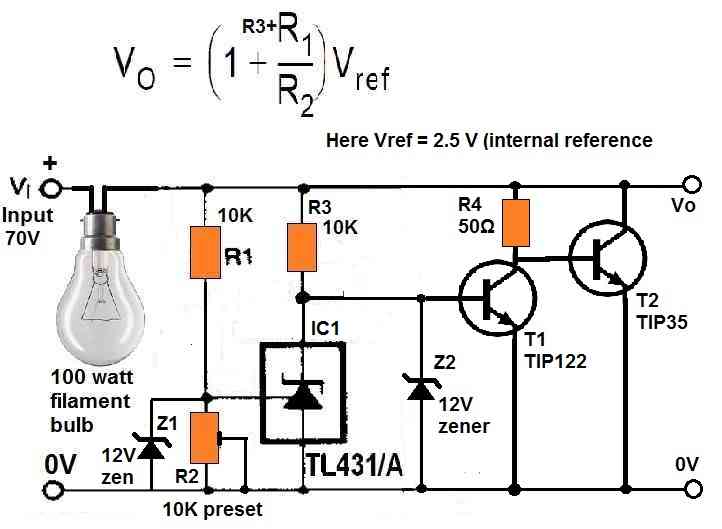
The following image shows how the TL431 device can be used for controlling windmill generators for charging upto 48 V batteries.
In this design, the TL431 IC is well protected with 12 V zener diodes to ensure the internal circuitry of the device is not subjected to extreme breakdown voltages.
The 1K preset is adjusted such that the TL431 just conducts at around 56 V which is optimal level for charging a 48 V battery.
As soon as the TL431 conducts, the T1 shuts off, causing T2 to turn ON.
When T2 turns ON, it shunts the supply voltage to ground thus regulating the supply voltage at the desired level.
Application Areas of the IC TL431
Although the above configurations can be used in any place where precision voltage setting and references may be required, it's extensively used in SMPS circuits nowadays for generating precise reference voltage for the connected opto coupler, which in turn prompts the input mosfet of the SMPS to regulate the output voltage precisely to the desired levels.
For more info please go to TL431 Datasheet
