If you are looking for a power transistor able to support high current upto 25 amps and yet not incorporate the traditional cumbersome TO-3 package, then the TIP36 would certainly impress you.
High Current from Smaller Package
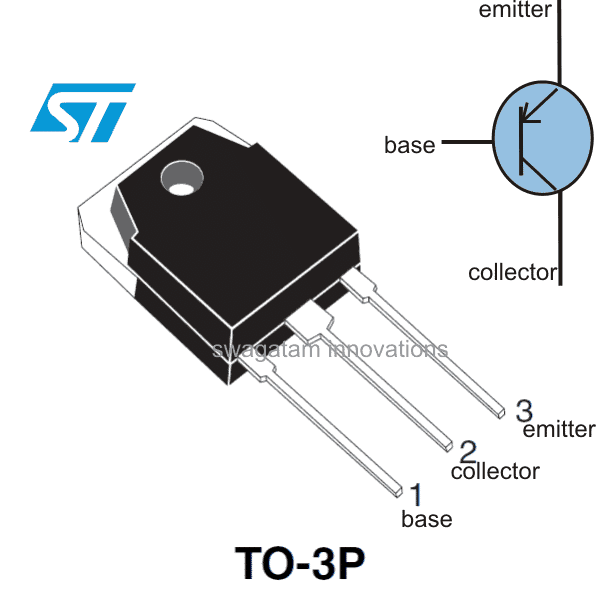
The package of TIP36 is TO-3P which means the accompanied heatsink would require just a single hole to be drilled and the device could be easily soldered over a PCB along with the heatsink, quite unlike the devices which are in TO-3 packages.
You would be surprised to know that this device is a lot advanced and powerful than the more popular MJ2955 (complementary pair of 2N3055) in terms of voltage and current ratings. Comparatively a TIP36 exhibits excellent high gain performance even at low or compressed saturation base voltages.

Let's proceed and learn the datasheet and the specifications of this outstanding high current transistor - the TIP36:
Typical Applications:
- Audio Amplifier
- Inverters
- Motor Control
- Solar Chargers.
Absolute Maximum Ratings:
The device will not tolerate anything above the following parameter magnitudes:
- Collector-base Voltage (Vcbo) = 100 volts
- Collector Emitter Voltage (Vceo) = 100 volts
- Emitter Base Voltage (Vebo) = 5 volts
- Collector Current (Ic) = 25 Amp continuous, peak 50 Amp for 5 ms only.
- Base Current (Ib) = 5 Amps
- Max Operating Junction Temperature = 150 degrees Celsius
Complementary Pair
TIP36 can be paired with TIP35, they both are ideally suited as complementary pairs.
Application Note:
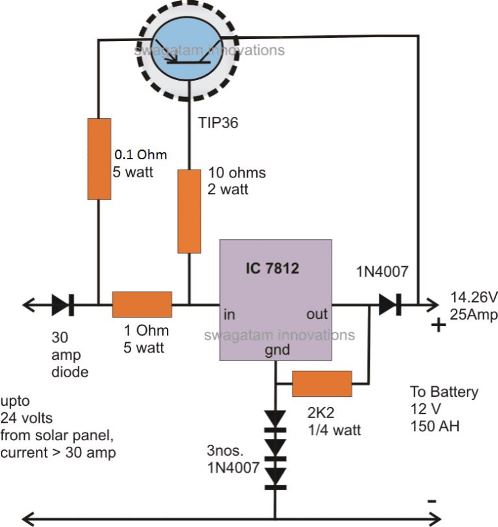
One interesting and very useful application circuit using a couple of TIP36 transistor can be made for charging high current batteries in the order of 150 AH, directly from solar panels.

Derate linearly to 150°C free air temperature at the rate of 28 mW/°
The circuit shown above may be used for charging 12 V batteries having in excess of 100 AH capacities.
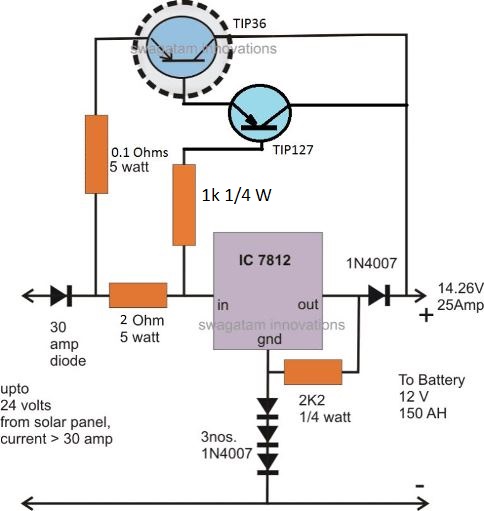
To enhance the current gain of the circuit, you can add a TIP127 with the TIP36, as shown below. Remember both the transistors will require a large heatsink, possibly with a fan cooling.

The circuit may be understood as follows:
How TIP36 Works to Produce High Current
The voltage from the solar panel enters the IC7812 first, the three diodes connected at the GND of the IC elevates the output voltage to about 14.26V which is the ideal voltage for charging 12V batteries.
However at this point the TIP36 stays inactive, because of the absence of any voltage across its base/emitter 1 Ohm resistor.
Once the output of the IC 7812 is loaded, sufficient voltage develops across the 1 Ohm resistor for saturating the TIP36 transistor.
The transistor conducts and shifts the required amount of current at the output.
However, in the course the transistor also tries to transfer the entire solar panel voltage to the output. As this tends to happen and the instant voltage at the output tends to go beyond the 14.26 mark, the IC7812 becomes reverse biased and stops conducting.
With 7812 not conducting, voltage across 1 Ohm resistor becomes zero and the transistor inhibits the flow of the voltage.
Due to the above action, the voltage tends to fall back below the 14.26 mark, which instantly prompts te IC to conduct and the cycle switches rapidly producing a voltage that's exactly 14.26 at the output.
Thus the IC is only responsible for holding the voltage to the set limit while the transistor TIP36 becomes responsible for delivering the required high currents.
Note: Use a common heatsink for the IC7812 and the transistor, this will ensure complete safety to the transistor from thermal runaway situation. Be sure to use mica isolation kit for fixing the devices over the common heatsink.