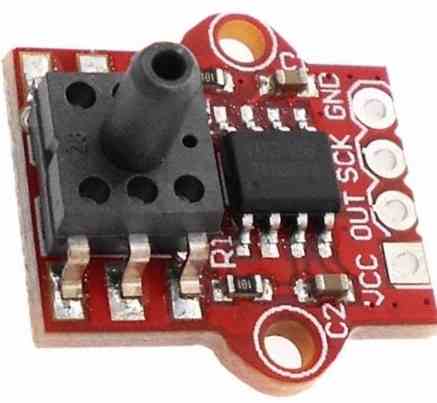
The HX710B Air Pressure Sensor Module monitors the air's pressure in the range of 0 to 40 kilopascals (kPa) and turns it into an electrical impulse which microcontrollers or other electrical gadgets can interpret and read.

It is a common and frequently utilized sensor in a wide range of applications that demand precise pressure sensing, including weather monitoring, industrial control systems, and medical equipment.
The HX710B device is a piezoresistive pressure sensor which determines pressure by detecting variations in electrical resistance produced by pressure-induced displacement of a sensing element.
The module is made up of a pressure sensing element, a signal conditioning circuit, and an output amplifier. The sensor chip is a tiny, thin-film device having a diaphragm and piezoresistive components.
The signal conditioning circuit boosts and purifies the electrical signal from the sensing element, and the output amplifier generates a voltage or current proportionate to the pressure detected by the sensor.

Technical Specifications
Here are some key specifications of the HX710B air pressure sensor:
- Operating pressure range: 30kPa to 110kPa
- Supply voltage: 1.8V to 5.5V
- Operating temperature range: -40°C to +125°C
- Sensitivity: 80mV/kPa
- Total error: ±2% FS
- Long-term stability: ±1% FS/year
- Response time: ≤ 1ms
Features of the HX710B Air Pressure Sensor Module
The HX710B sensor module offers several advantages that enable it to be a good option for a wide range of applications. These are some examples:
Broad pressure range: The module can detect pressure from 0 to 40kPa, making it appropriate for a broad range of low-pressure sensing applications.
High precision: The HX710B module offers a precision of 1% of full-scale pressure, ensuring dependable and accurate pressure readings.
Compact size: The module is modest in size and may simply be incorporated into different size and shape, which makes it ideal for projects that require little space.
Reduced energy consumption: The HX710B module consumes less power, which makes it perfect for battery-powered applications.
Simple to use: The module is simple to operate and can communicate with microcontrollers and other electronic equipment through conventional protocols, for example I2C or SPI.
Applications of the HX710B Air Pressure Sensor Module
The HX710B Air Pressure Sensor Module is utilised in a variety of applications where accurate and dependable pressure detection is required. The module is commonly used for the following purposes:
Environment monitoring: The module may be used to record air pressure and provide feedback on weather conditions including such variations in atmospheric pressure, that can contribute in weather pattern prediction.
The module can be utilized to measure pressure in diverse manufacturing systems, including such pneumatic and hydraulic ones, in order to verify that they are working under safe and appropriate pressure limits.
Healthcare devices: The device may be utilized to monitor the pressure of air or oxygen provided to patients who use medical instrumentation including respiratory machines.
Gas pressure measuring system: The module can be employed to monitor gas flow and diagnose leaks by measuring the pressure of gas in pipelines and other gas distribution networks.
Automotive: The module can be integrated into automobile applications including such tyre pressure monitoring equipment to detect air pressure in tyres and inform drivers if the pressure is not high enough.
How to Use the HX710B Air Pressure Sensor Module
The HX710B Air Pressure Sensor Module is simple to use. The steps below could serve as a reference:
Use conventional protocols such as I2C or SPI to attach the module to a microcontroller or other electric devices.
Connect the module to power and wait for it to stabilise.
To use a microcontroller or other electronic gadget, obtain the pressure value from the module's output.
To guarantee precise pressure measurement, calibrate the module if necessary.
How to use it in an Electronic Circuit
The HX710B Air Pressure Sensor Module is a pressure sensor which could be utilised in many different electrical applications. To interface it to an electronic circuit, you must first do the following steps:
Identify the power needs: The HX710B Air Pressure Sensor Module demands a 5V DC power source, therefore ensure your circuit can offer it.
Attach the power: Hookup the HX710B's VCC pin to the 5V power source, and the GND pin to ground.
Attach the signal output: Because the HX710B Air Pressure Sensor Module emits a digital voltage signal, you must connect it to a digital input pin on your microcontroller or other circuit.
Add a decoupling capacitor: To stabilise the power supply and decrease noise, connect a decoupling capacitor between the HX710B's VCC and GND pins. A 0.1uF capacitor is usually adequate.
How to connect it with Arduino
You can adhere to these procedures to connect an Arduino and the HX710B Air Pressure Sensor Module:
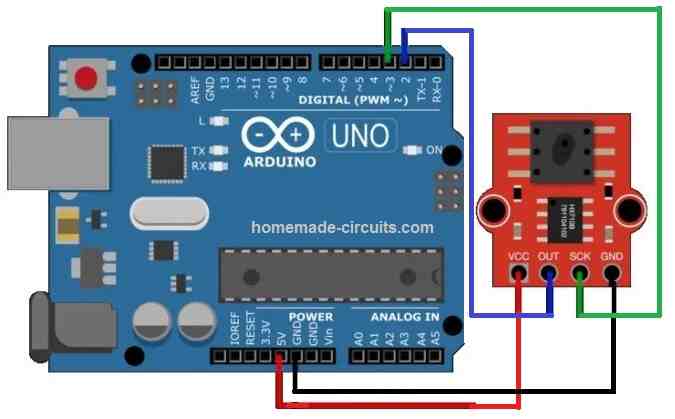
Attach the power supply by connecting the GND and VCC pins of the HX710B module to the Arduino board's GND and 5V pins, respectively.
Connect the signal output: Join an Arduino board's digital input pin to the HX710B module's OUT pin. Any of the board's digital input pins, as illustrated in the image below, can be used.
The HX710B module's VCC and GND pins should be connected to a 0.1uF decoupling capacitor, as was previously described, to stabilise the power supply.

Checking the Output
Once you have configured the above setup, you can check the output by checking the LED lamp of the Arduino board.
Each time an pressure is detected on the sensor, the LED can be seen illuminating at some threshold point of the air pressure.
Using Analogue Pins
The HX710B Air Pressure Sensor Module can be also connected with the analog pin of the Arduino board by programming the following code.
Here is an example code to read the analog output from the HX710B module and print it to the serial monitor:
// Assign the analog input pin
int pressurePin = A0;

void setup() {
  // Start the serial communication
  Serial.begin(9600);
}

void loop() {
  // Read the analog input value
  int pressureValue = analogRead(pressurePin);

  // Print the pressure value to the serial monitor
  Serial.print("Pressure: ");
  Serial.print(pressureValue);
  Serial.println(" Pa");

  // Add a delay to prevent rapid reading of the same value
  delay(500);
}
This code reads the analog input from the HX710B module and prints the pressure value in Pascal (Pa) to the serial monitor every 500 milliseconds.
Note that you may need to adjust the scale factor to convert the analog input value to a pressure value in your specific application, depending on the calibration of the HX710B module.
Conclusion
The HX710B Air Pressure Sensor Module is a flexible and dependable sensor with excellent accuracy, low power consumption, and simple integration into electronic systems.
It is appropriate for a number of applications because because of its extended pressure range and compact size, namely gas flow measurement in automobiles, industrial control systems, medical equipment, and industrial processes.
It's crucial to calibrate the HX710B module before use to guarantee precise pressure reading. Yet with the necessary calibration and configuration, the module can deliver accurate and repeatable pressure measurement for a range of applications.

Hello Sir. I would like to incorporate an I2C LCD or an OLED with this sensor. How do I go about it please?
Hello Jedidiah,
I am not good with Arduino projects, so I am not sure how that can be done.
You can go through the following article, you might find some relevant information here:
https://www.homemade-circuits.com/introduction-i2c-lcd-adapter-module/
Hello Sir. thank you very much. I am currently working on a project whereby I need a gas pressure sensor that will indicate the pressure level using LEDs and when the gas pressure is low a buzzer will sound. please help me.
Hello Jedidiah,
It may be possible to indicate the pressure through LEDs only if we have an analog output from an air pressure sensor module.
The HX710B does not have an analog output so getting an indication through LED array might not be possible.
If you know about any air pressure sensor that provides an analog output, let me know, then we can configure the LED driver circuit with it.
Hello Sir. So far I have come across CPT6030, an analogue pressure sensor.
Thank you Jedidiah, I checked the datasheet of the CPT6030, but could not find any clear information regarding its analog output voltage, so I am not sure how this can be used to interface with an LED driver.
However, we can convert the HX710B Arduino output into an analogue voltage and then use it to drive an LED driver such as LM3915.
So, please first build the HX710B Arduino configuration and confirm the PWM results, then I will guide you how to proceed with the LED integration.
Hello Sir.
How about MPS20N0040D-D air pressure sensor?
Hi Jedidiah, yes, I think this IC generates a linear analogue output and can be integrated directly with an LM3915 IC for getting the response over LED bar graph.
Please purchase it and first confirm its analogue output response, it should around 100 mV max, please check this and then we an provceed with the final integration with the LM3915 IC…
Can it’s output be fed into an LM3915 for graphical display?
This module requires a microcontroller interfacing, so i don’t think it can be directly integrated with an LM3915 IC, which requires an analogue input.
How do you use this with seeed Xiao rp2040? 3.3v input pins
What is the mV range HX710B gives out as like pH sensor generate? I want to know the range of out put from the sensor. Thanks
Range can be between 80 mV to 5 V.
How do I calibrate the sensor? is there any documentation?, if so where do I get it from?
Here’s a general process to calibrate the HX710B air pressure sensor:
Gather the necessary equipment: You’ll need a known reference pressure source, such as a barometer or a calibrated pressure gauge, as well as a microcontroller or development board to interface with the sensor.
Establish a baseline reading: Connect the HX710B sensor to your microcontroller or development board according to the manufacturer’s instructions. Write a simple program to read the sensor values and display them. Place the sensor in an environment with a stable and known pressure, such as at sea level.
Record the sensor output: Allow the sensor to stabilize and take multiple readings over a period of time. Calculate the average value of these readings and record it as the baseline output for the known pressure.
Compare with reference pressure: Using your known reference pressure source, measure the actual pressure value. Take note of the difference between the known pressure and the sensor’s baseline output. This difference represents the calibration offset.
Adjust the calibration offset: To adjust the calibration, you’ll need to modify the code in your microcontroller or development board. Add or subtract the calibration offset to the sensor readings to compensate for any deviation from the actual pressure.
Validate the calibration: After making the calibration adjustments, repeat steps 2 and 3 using the known reference pressure source. Compare the average output of the sensor with the actual pressure value. If you still find a major difference, you may need to fine-tune the calibration offset and repeat the process until more accurate readings are acquired.
is there a way to tare the sensor from arduino?
Sorry, no ideas about it.
Can we program the arduino uno to get 8 bit binary output by using the hx710p ( low Pressure senser)? or
a arduino program to read differential milivolt in 8 bit binary output.
thanks
Sorry, my Arduino coding knowledge is not good, so cannot solve it for you. The above article was contributed by an external author.