In this post I have explained the main electrical features, pinout specifications, datasheet, and application circuit of the IC 723.
The IC 723 is a general purpose, extremely versatile voltage regulator IC, which can be used for making various types of regulated power supplies such as:
- Positive Voltage Regulator
- Negative Voltage Regulator
- Switching Regulator
- Foldback Current Limiter
Main Features
- The minimum voltage that can be achieved from IC 723 Regulator Circuit is 2 V, and the maximum is around 37 V.
- The peak voltage that can handled by the IC is 50 V in pulsed form, and 40 V is the maximum continuous voltage limit.
- The maximum output current from this IC is 150 mA which can be upgraded to as high as10 amps through an external series pass transistor integration.
- The maximum tolerable dissipation of this IC 500 mW, therefore it should be mounted on a suitable heatsink in order to allow optimal performance from the device.
- Being a linear regulator, the IC 723 needs an input supply that should be at least 3 V higher than the desired output voltage, and the maximum difference between the input and the output voltage should never be allowed to exceed 37 V.
ABSOLUTE MAXIMUM RATINGS
- Pulse Voltage from V+ to V- (50 ms) = 50V
- Continuous Voltage from V+ to V- = 40V
- Input-Output Voltage Differential = 40V
- Maximum Amplifier Input Voltage (Either Input) = 8.5V
- Maximum Amplifier Input Voltage (Differential) = 5V
- Current from Vz 25 mA Current from VREF = 15 mA
- Internal Power Dissipation Metal Can = 800 mW
- CDIP = 900 mW
- PDIP = 660 mW
- Operating Temperature Range LM723 = -55°C to +150°C
- Storage Temperature Range Metal Can = -65°C to +150°C P DI P -55°C to +150°C
- Lead Temperature (Soldering, 4 sec. max.) Hermetic Package = 300°C Plastic
- Package 260°C ESD Tolerance = 1200V (Human body model, 1.5 k0 in series with 100 pF)
Pinout Functions
Pin 1 (CL - Current Limit)
- Function: Current limiting sense input.
- Connect this pin to a low-value resistor (current sense resistor) placed between the load and ground. It is used to set the maximum load current.
- If the voltage across the sense resistor exceeds the threshold (approximately 0.65V), the IC reduces the output voltage to limit the current.
Pin 2 (VOUT - Output Voltage)
- Function: The regulated output voltage.
- The voltage at this pin is determined by the feedback resistors connected between the output and the non-inverting input (Pin 5, NI).
- This is the main regulated voltage output of the circuit.
Pin 3 (CS - Current Sense)
- Function: Alternate current limiting input.
- Provides another method for current sensing by connecting a resistor between this pin and the regulated output.
- This pin works in conjunction with the CL pin (Pin 1) for current limiting.
Pin 4 (INV - Inverting Input of Error Amplifier)
- Function: Reference voltage input for error comparison.
- This pin is connected to the feedback network (voltage divider) from the output voltage.
- The error amplifier compares the voltage at this pin with the reference voltage at Pin 5 to maintain a constant output voltage.
Pin 5 (NI - Non-Inverting Input of Error Amplifier)
- Function: Reference voltage input.
- Usually connected to the internal reference voltage (generated at Pin 6).
- The error amplifier compares this voltage with the feedback voltage at Pin 4.
Pin 6 (VREF - Reference Voltage)
- Function: Internal reference voltage output (around 7.15V).
- This pin gives a stable reference voltage used for feedback and control.
- It can be also used externally in the circuit for other purpose.
Pin 7 (V- - Ground)
- Function: Ground pin supply.
- Works like the reference point for all voltage level within the IC.
- It must be connected to the circuit ground.
Pin 8 (Comp - Frequency Compensation)
- Function: Voltage Stabilization and frequency compensation.
- A capacitor is connected from this pin to ground to stabilize the operation of the internal error amplifier.
Pin 9 (Vz - Zener Voltage Output)
- Function: Internal zener diode pin.
- This pin is connected to an internal 6.2V zener diode used to generate the reference voltage.
- It can also be used externally for regulation in combination with the external feedback.
Pin 10 (NC - No Connection)
- Function: Not connected internally.
- Reserved for manufacturing purposes; it should be left unconnected in your design.
Pin 11 (V+ - Supply Voltage)
- Function: Positive input supply voltage.
- The input supply voltage is connected here. The maximum allowable voltage is 40V with respect to ground (Pin 7).
- This pin powers the IC internally and provides input power for regulation.
Pin 12 (VOUT Sense - Regulated Voltage Output Sense)
- Function: Sense point for regulated voltage.
- Internally connected to the output regulation circuitry.
- This pin is typically used to sense the regulated voltage and is connected to the regulated supply rail (often the same node as Pin 2).
- Works like a voltage sense point for the regulated output. Ensures an accurate feedback for the regulation process.
- Compensates for any voltage drops across external components like pass transistors.
- Helps to maintain precise voltage regulation in both low- and high-power applications.
- If you are using external pass transistors, please make sure that Pin 12 is connected to the true output voltage point where the load is connected for proper regulation!
Pinouts in Table form
| Pin | Name | Function |
|---|---|---|
| 1 | CL | Current Limit Input |
| 2 | VOUT | Regulated Output Voltage |
| 3 | CS | Current Sense Input |
| 4 | INV | Inverting Input of Error Amplifier |
| 5 | NI | Non-Inverting Input of Error Amplifier |
| 6 | VREF | Reference Voltage Output (7.15V) |
| 7 | V- | Ground |
| 8 | Comp | Frequency Compensation Input |
| 9 | Vz | Zener Voltage Output |
| 10 | NC | No Connection |
| 11 | V+ | Supply Voltage Input (Max 40V) |
| 12 | VOUT Sense | Regulated Voltage Sense |
Question Regarding Pin#12: Why Pin 12 Is Sometimes Connected to Vin:
Needs for Internal Circuits:
Pin 12 is used by the internal circuit of the LM723 to sense and stabilize voltage.
To make sure the IC "knows" the input voltage it's regulating from when utilizing external pass transistors, Pin 12 should be connected to Vin.
By comparing the input (Vin at Pin 12) and the feedback voltage at Pin 4 (INV), the integrated circuit (IC) internally modifies the output.
Applications with High Voltage:
The external pass transistor has to deal with a substantial voltage drop between Vin and Vout while the output voltage is high. The LM723 can properly drive the external pass transistor if Pin 12 is connected to Vin.
For example, Pin 12 connected to Vin guarantees that the internal management of the LM723 can appropriately handle a 10V drop across the pass transistor if the supply voltage is 60V and the intended output is 50V.
Headroom in Voltage for Appropriate Control:
The IC needs enough headroom between the regulated output (Pin 2) and its input supply (Pin 11). The IC is guaranteed to detect the increased unregulated voltage and continue to function properly by connecting Pin 12 to Vin.
Design simplification:
Due to VCE, the external pass transistor can deliver a little voltage drop in circuits with a high load current.
In order to simplify the circuit, engineers frequently link Pin 12 to Vin rather than the actual Vout. Considering that the voltage loss is minimal or tolerable, this eliminates the need for further correction hardware.
Reasons for Connecting Pin 12 to Vout (the Load Side):
Precise Voltage Control:
Pin 12 keeps an eye on the voltage output. The IC cannot directly determine the voltage at the load if it is connected to Vin rather than Vout.
The LM723 wont adjust for a voltage drop across the pass transistor (VCE) or connected wires, which might result in inaccurate regulation.
Compensation for Pass Transistor Loss:
Regardless of the voltage drop across the external pass transistor the LM723 makes sure that the output voltage supplied to the load is accurately controlled by connecting Pin 12 to Vout.
Improved Control of Feedback:
Even with fluctuating load circumstances the LM723 is capable of keeping strict control over the output voltage thanks for precise feedback (from Vout at Pin 12).
When Can Pin 12 Be Connected to Vin?
When There Are Minimal Voltage Drops:
Wiring the Pin 12 to Vin won't have a noticeable impact on performance if the external pass transistor's VCE drop is extremely tiny or negligible for the application.
When It's Better to Keep Things Simple:
Because it eliminates the need for extra wiring or complexities, connecting Pin 12 to Vin is accepted in circuits in which minimalism is more important than accuracy.
Applications with Low Current:
The voltage loss across the external pass transistor is going to be negligible where the load current is modest. Connecting Pin 12 to Vin is a reasonable compromise for simplicity in these situations.
Block Diagram
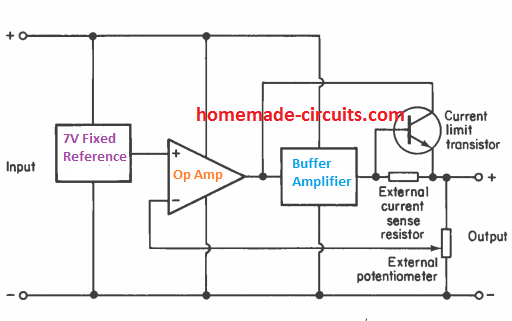
Referring to the above block diagram of the internal circuitry of the IC 723, we can see that the device is internally configured with a highly stable reference voltage at 7 V, created through advanced circuitry using op amp, buffer amplifier, and transistor current limiting stages.
We can also visualize that instead of creating a feedback stabilization by directly connecting the inverting input pin of the op amp with the output pinout of the IC, the inverting pin is rather terminated with a separate individual pinout of the IC.
This inverting pin facilitates integration with the center pin of an external potentiometer, while the other outer pins of the pot is linked with output pinout of the device and ground respectively.
How Potentiometer Adjusts the Output Voltage
The potentiometer can then be used for accurately setting or adjusting the internal reference level of the IC 723, and therefore a stabilized output from the IC in the following manner:
- Gradually lowering the slider center arm of the pot towards ground interacts with the inverting pin of the opamp to raise the output voltage
- If the slider of the potentiometer is lowered down its track, instead of causing a stabilization of the output at a potential identical to the reference voltage, the feedback regulates the inverting input of the op amp at the potential developed by the potentiometer.
- Due to a decreased potential across the potentiometer pins, the output is prompted to increase to a greater potential so that it allows the inverting input to adjust at the correct suitable voltage level.
- If the pot center wiper arm is moved further down, causes a proportionately higher voltage drop, which prompts the output to climb even higher, causing the output voltage from the IC to become higher.
- To understand the working better, let's imagine, the center wiper of the pot is moved 2/3rd section in the lower direction. This may cause a feedback voltage to the inverting pin of the internal op amp to be just 1/3rd of the output voltage.
- This enables the output to become stabilized and constant at a potential that's 3 times higher than the reference voltage and allows an appropriate voltage level to be established on the inverting input of the internal op amp.
- Therefore this feedback control through a potentiometer facilitates the user to get the intended adjustable output voltage, along with a very high and efficient level of output stabilization.
Calculating the Output Voltage using Formula
In case the output needs to be a fixed constant stabilized voltage, the pot could be replaced with a potential divider network using R1 and R2 resistors as shown below:
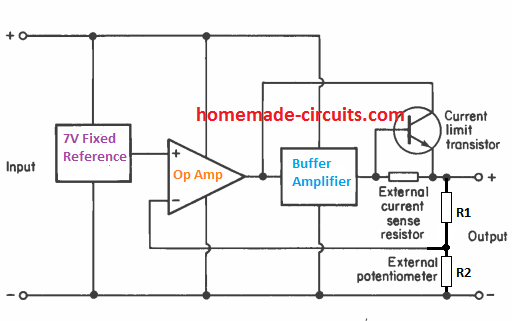
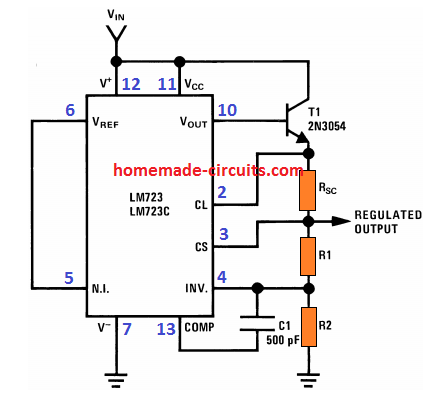
The formula 7 (R1 + R2)/R2 volts determines the desired constant output voltages, where the resistor R1 is connected between the output and the inverting input of the operational amplifier, while the resistor R2 is wired between the inverting input and the negative supply line of the device.
This implies that the reference voltage is directly associated with the non-inverting input of the IC 723 internal op amp.
The number 7 in the formula indicates the reference value, and also minimum output voltage the IC can deliver. For getting fixed output voltages lower than 7 V, this number in the formula could be replaced by the desired minimum voltage value.
However, this minimum output voltage value for IC 723 cannot be less than 2 V, therefore the formula for fixing 2 V at the output will be: 2 (R1 + R2)/R2
Understanding Current Limit Feature in IC 723
The IC 723 enables the user to get a precisely adjustable current control at the output depending on the load requirement.
An array of discretely calculated resistors are employed for sensing and limiting current to the desired levels.
The formula for calculating the current limiting resistor is simple, and as given below:
Rsc = 0.66 / Maximum Current
IC 723 Application Circuit
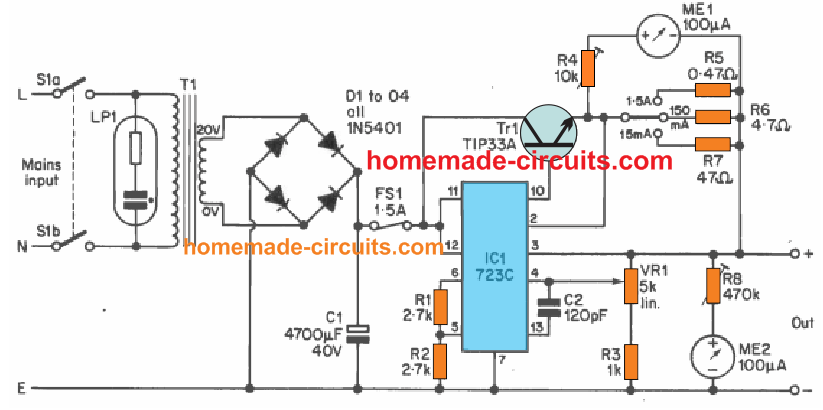
The above application circuit using IC 723 demonstrates a practical example of a useful bench power supply which can deliver an output voltage range from 3.5 V to 20 volts, and a optimum output current of 1.5 amps. 3 step switchable ranges of current limiting, accessible through 15 mA., 150 mA., and 1.5A current ranges (approximately).
How it Works
The mains AC input supply is stepped down by the transformer T1 to 20 volts with a maximum current of 2 amps. A full wave rectifier built using by D1 to D4, and a filter capacitor C1 converts the 20 V RMS AC to 28 V DC .
As discussed earlier, to be able to achieve the minimum 3.5 volts range at the output it is necessary to associate the reference source of the IC at pin 6 with the non-inverting pin 5 of the IC through a calculated potential divider stage.
This is implemented through the network created by R1 and R2 which are selected with identical values. Due to the identical values of the R1/R2 divider, the 7 V reference at pin 6 gets divided by 2 to produce a minimum effective output range of 3.5 volts.
The positive supply line from the bridge rectifier is attached to the pin 12, Vcc of the IC, and also with the pin12 buffer amplifier input of the ICI through fuse FS1.
Since the power handling specification of the IC alone is quite low, it is not suitable for making a bench power supply directly. Due to this reason output terminal pin10 of the IC 723 is upgraded with an external emitter follower transistor Tr1.
This allows the IC output to get upgraded to much higher current depending on the rating of the transistor. However, to ensure this high current is now controlled as per the needs of the output load specs, it is passed through a selectable current limiter stage having 3 switchable current sensing resistors.
ME1 is actually a mV meter which is used like an ammeter. It measures the voltage drop across the current sensing resistors and translates it to the amount of current drawn by the load. R4 can be used for calibrating the full scale range in the order of 20 mA., 200 mA., and 2A, as determined by the limiting R5, R6, R7 resistors .
This allows a more accurate and efficient reading of the current compared to having a single full scale range of 0 to 2A.
VR1 and R3 is used for achieving the desired output voltage, which could be continuously varied from aapproximately 3.5 volts to 23 volts.
It is advised to use 1% resistors for R1, R2 and R3 to ensure higher accuracy of the output regulation with minimum errors and deviations.
C2 works like a compensation capacitor for the in-built compensation op amp stage of the IC, for complementing enhanced stability to the output.
ME2 is configured like a voltmeter for reading the output volts. The associated resistor R8 is used for fine tuning and setting the full scale voltage range of the meter to about 25 volts. A 100 micro amp meter works great for this through a calibration of one division per volt.
Parts List
Resistors
R1 = 2.7k 1/4 watt 2% or better
R2 = 2.7k 1/4 watt 2% or better
R3 lk 1/4 watt 2% or better
R4 = 10k 0.25 watt preset
R5 = 0.47 ohms 2 watt 5%
R6 = 4.7 ohms 1/4 watt 5%
R7 = 47 ohms 1/4 watt 5%
R8 = 470k 0.25 watt preset
VR1 = 4.7k or 5k lin. carbon
Capacitors
C1 = 4700 AF 50V
C2 = 120 pF ceramic Disc
Semiconductors
IC1 = 723C (14 pin DIL)
Tr1 = TIP33A
D1 to D4 = 1N5402 (4 off)
Transformer
T1 Standard mains primary, 20 volt 2 amp secondary
Switches
S1 = D.P.S.T. rotary mains or toggle type
S2 = 3 way single pole rotary type capable of switching
FS1 = 1.5A 20mm quick blow type
Lamp
Neon Lamp indicator neon having integral series resistor
for use on 240V mains
Meters
MEI, ME2 100 µA. moving coil panel meters (2 off)
Miscellaneous
Cabinet, output sockets, veroboard, mains cord, wire, 20mm
chassis mounting fuseholder, solder etc.
Automatic Ambient Light Illumination Adjust
This circuit will automatically adjust the illumination of an incandescent lamp with respect to the available ambient or reference light conditions. This can be ideal for instrument panel lights, bedroom clock lighting and related purposes.
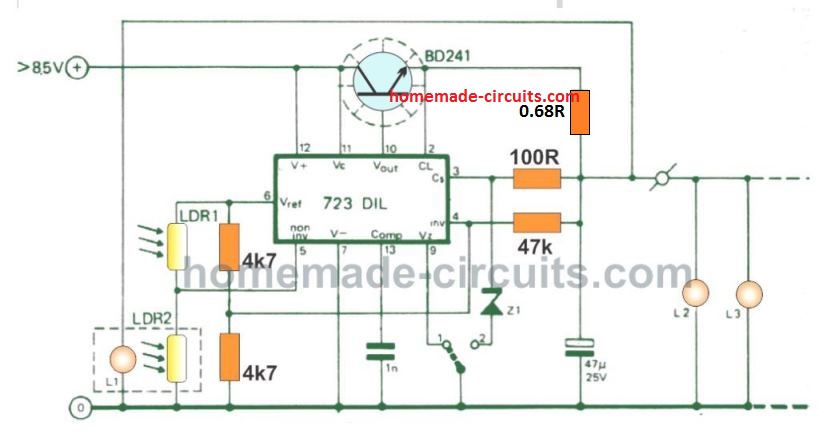
The circuit was created for 6-24 V lamps; the overall current should never go beyond 1 amp. The ambient light adjuster works as explained in the following points.
LDR 1 scans and detects the ambient light. LDR 2 is connected optically to an incandescent lamp. The circuit tries to balance as soon as the two LDR 1 and LDR 2 detect the identical level of illumination.
The circuit should, nevertheless, induce the external lamp(s) to be higher in brightness than the intensity of the ambient light. Due to this specific reason L1 needs to have rated with lower current than L2, L3 etc; or, if this is not followed, a small screen (small page of paper) could be positioned between the lamp (L1) and the LDR inside the opto-coupler.
The 0.68 ohm resistor restricts the lamp current; the 1 nF capacitor inhibits the circuit from going into oscillating mode. The circuit should be powered by a minimum of 8.5 volts; lower voltages that this might affect the operation of the IC LM723.
We advise to employ a supply that is higher than the lamp voltage specs by at least 3 volts. The zener (Z1) is selected to complement the lamp voltage; for 6 V lamps the in-built zener of the IC can be exploited by connecting terminal 9 of the IC to ground.
Reducing Dissipation in IC 723 Power Supply Circuit
The IC 723 is a quite commonly used IC regulator. For this reason the below circuit, that is designed to minimize power dissipation while the chip is applied through an external transistor, should be really popular.
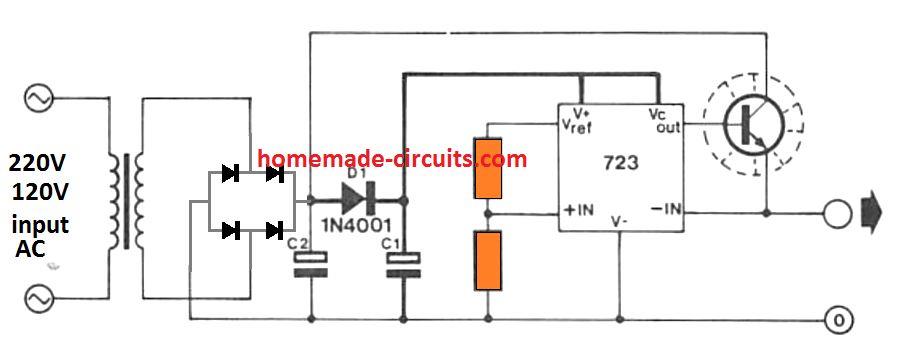
Based on the company datasheets the supply voltage to the IC 723 must strictly be a minimum of 8.5 V to guarantee proper functioning of the chip's in-built 7.5 V reference and also the IC's internal differential amplifier.
While using chip 723 in a low-voltage high-current mode, through an outer series transistor working through the existing power supply lines used by the IC 723, usually leads to abnormal heat dissipation on the series external transistor.
As an illustration, in a 5 V, 2 A supply for TTL approximately 3.5 V could well be dropped over the external transistor and a staggering 7 watt power would be wasted through heat at full load current conditions.
Additionally, the filter capacitor has to be bigger than required to stop the 723 voltage supply from dropping under 8.5 V within the ripple troughs. Actually the supply voltage to the external transistor is required to be hardly 0.5 V higher than regulated output voltage, to enable its saturation.
The answer is to make use of another 8.5 V supply for your device 723 and a lower voltage supply to the external transistor. Instead of working with individual transformer windings for the a pair of supplies, the supply source to the IC 723 is basically extracted through a peak rectifier network comprising of D1/C1.
Due to the fact the 723 requires just a tiny current C1 can quickly charge to essentially the peak voltage through the bridge rectifier, 1.414X the transformer RMS voltage minus the drop in voltage across the bridge rectifier.
The transformer voltage specification as a result has to be a minimum of 7 V to allow an 8.5 V source to the IC 723. On the other hand, through appropriate selection of the filter capacitor C2 the ripple around the mains unregulated supply could be implemented in a way that the voltage drops to around 0.5 V higher than the regulated output voltage within the ripple troughs.
The average voltage given to the external pass transistor may consequently be lower than 8.5 V and the heat dissipation shall be tremendously minimized.
The C1 value is dependent upon the highest base current that this 723 has to source to the series output transistor. As a general guideline allow around 10 uF per mA. The base current could be determined by dividing the highest output current by the transistor gain or the hFE. An appropriate number for the mains filter capacitor C2 may be between 1500 uF and 2200 uF per amp of output current.
Another Cool 723 Power Supply Design
The following great IC 723 based power design was submitted by Mr. Roya, who is one of the avid readers of this blog. The details are furnished below, as compiled by Mr. Roya
For the past 30 years, I've been using a very nice professional adjustable 0 to 35V, 4A power supply. Three potentiometers and an LM723 IC are included in the circuit.
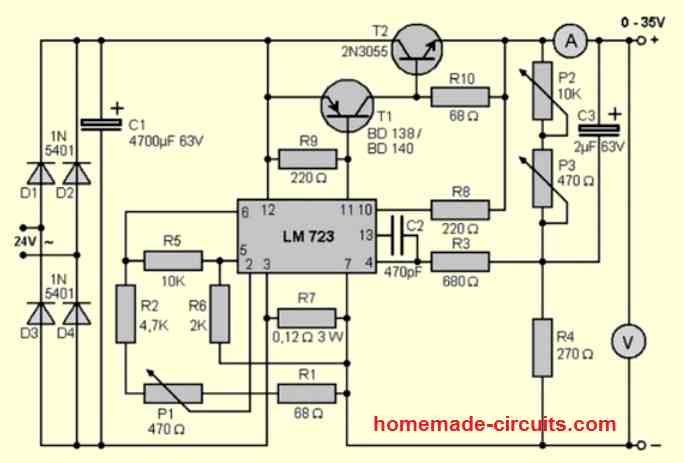
The IC and two of the potentiometers burned out a few days ago. I wanted to design its circuit while fixing it. Now I'd want to send you an email with the circuit I created, so you may post it on your website and share it with your visitors.
As you are probably aware, if the output voltage is adjusted to a significant proportion, such as 30 volts, we may draw nearly 4 amps of current from the power supply without any problems.
Unfortunately, when we wish to draw 3 or 4 amps from the device when the output voltage is adjusted to low voltages like 2 or 4 volts, a serious scenario emerges. Transistors are required to convert more than 100 watts of electrical power "within them" into heat in this condition, a power that would be deadly to power-transistors and end up causing them to smoke out.