In this post I have explained how to increase or extend the range of an ordinary infra red or IR remote control through a 433MHz RF remote control system.
IR Range Extender Concept
The idea of this circuit is to feed the IR data from an IR transmitter into the transmitter input of an RF module through an IR sensor, and transmit the data in air so that the distant RF receiver module is able to receive the data.
After receiving the data the RX would decode it and convert it back to IR based data, which could be used for triggering the relevant IR operated distant device.
Block Diagram

Parts You will Need to Build this Circuit
Transmitter Stage
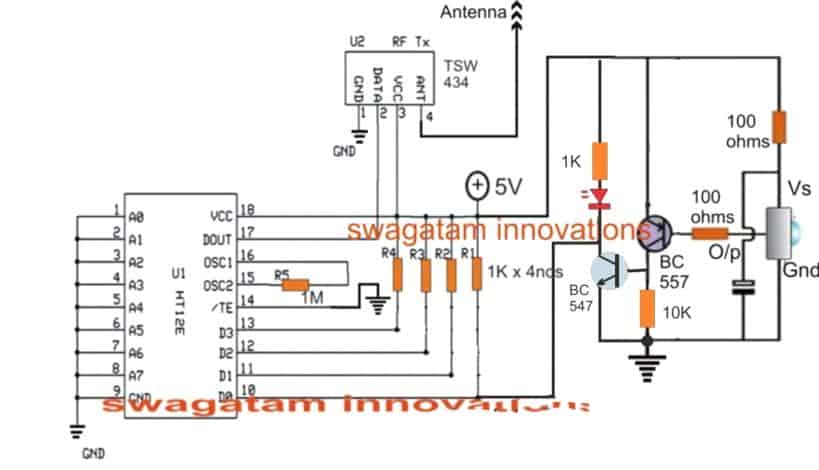
433MHz or 315 MHz RF Encoder Modules, as shown in the following article, and assemble them as show:
How to wire RF Module circuits
All below shown Resistors are 1/4 wat t 5% CFR, unless otherwise specified
1M - 1no, 1 K - 4nos, 100ohms = 2nos,
Transistor BC557 = 1no
Capacitor 10uF/25V = 1no
Receiver Stage
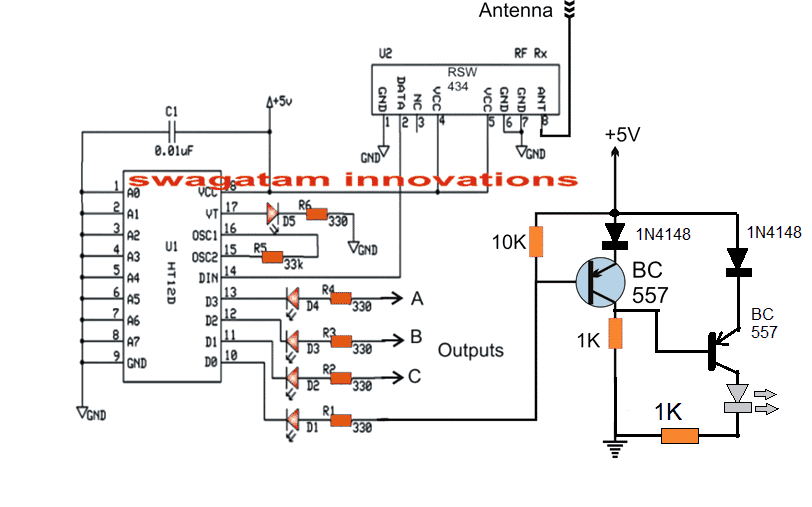
433MHz or 315 MHz RF Decoder Modules, as shown in the above linked article, and to be assembled as show:
1K = 1no, 10K = 1no, 330ohms = 2nos, 33K = 1no
IR photodiode (any type) = 1no
Transistor = BC557
RED LED = 2nos
Capacitor -= 0.01uF
The IR to RF Range Extender Transmitter Circuit

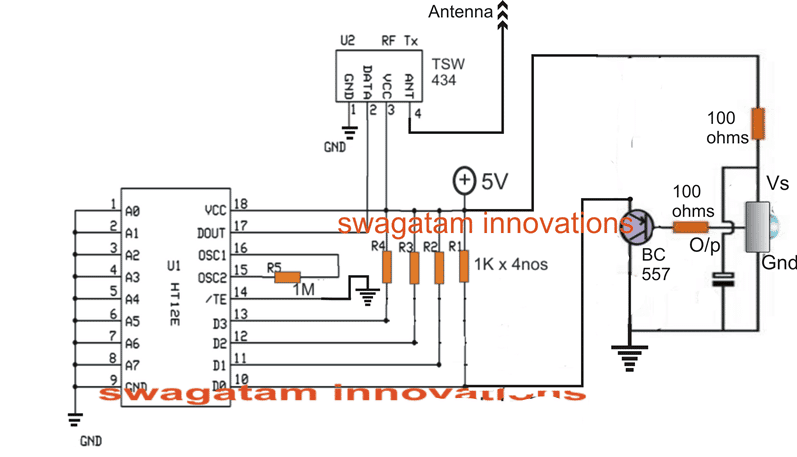
The figure above shows the basic layout for the infrared remote control range extender transmitter circuit, wherein a 433MHz or a 315MHz RF encoder circuit can be seen built around the chips HT12E and TSW434, and we can also see an attached simple IR sensor circuit stage using TSOP730.
The IR sensor can be visualized at the extreme right side of the diagram with pinouts: Vs, Gnd, and O/p. The output pin is connected with the base of an PNP transistor, whose collector is integrated with one of the 4 input pinouts of the RF encoder IC HT12E.
Now, to enable transmitting of the IR data to a distant location to extend its range, the user has to point the IR rays on the sensor from a IR handset and press the relevant button of the IR handset remote.
As soon as the IR rays hit the TSOP sensor, it converts the data into its respective PWM format and feeds the same to the selected input pinouts of the HT12E encoder.
The encoder IC picks up the converter IR signals, encodes the data and forwards it to the adjoining TSW434 transmitter chip for allowing the transmission of the data into the air.
The signals travels through air until it finds the antenna of the corresponding RF decoder module using 433MHz or 315MHz as the operating frequency.
The Range Extender RF Decoder Receiver Circuit

The circuit diagram shown above represents the IR data receiver circuit which receives the transmitted signal from the transmitter end and reverts the signals back to the IR mode for operating the IR device extended at this remote end.
Here the RF decoder module is built using HT12D IC and the receiver using RSW434 chip. The receiver chip picks up the transmitted IR to RF converted data, and sends it to the decoder IC, which completes the process by decoding the RF signals back to IR frequency.
This IR frequency is appropriately fed to an IR photo-diode driver circuit built using a PNP transistor and an IR photo-diode device, as shown at the extreme right side of the circuit.
The decoded RF to IR frequency is oscillated and transmitted by the photo-diode and applied on the device which is to be operated at the remote end.
The device hopefully responds to these RF decoded IR signals and functions as per the expected specification.
This concludes the IR range extender circuit using RF 433MHz modules, if you think I have missed something in the design or in the explanation please feel free to point them out through the comment box below.
Another IR Remote Control Extender Circuit using Rx, Tx Modules
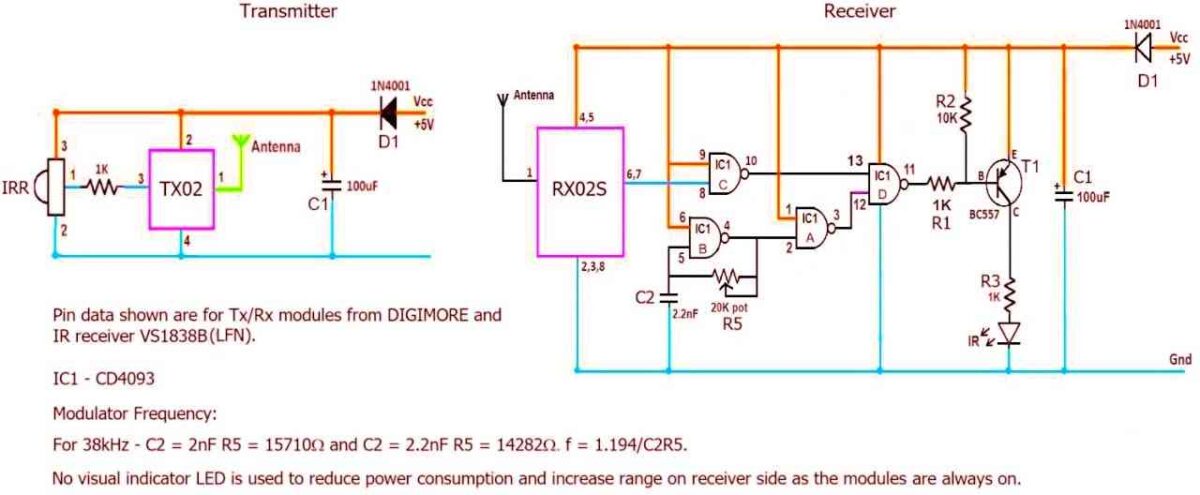
This schematic was graciously contributed by Mr. K. Ayyappan to benefit all the interested readers. We sincerely appreciate his valuable contribution.

Circuit Description
In this always on circuit the demodulated signal out of IR receiver is fed directly to the transmitter module TX02. At the receiver RX02S side, the on-air received signal is modulated with CD4093 marked IC1. IR LED driver can be an NPN(Emitter Follower configuration) or a PNP as shown. The resistor in series with IR LED controls the IR range.
This may be one of the simplest IR extenders with minimal component footprint. The Tx and Rx home made boards as per given schematic using a Veroboard KS 110, cut as required, have been tested for over a year. No performance reduction, components failure or spurious operations have been observed despite some issues as described below:
The IR LED remains on with lesser intensity when no signal is received. This is observed to be due to
1. The ASK Receiver is prone to noise pick-up from various sources like a passing motorbike's engine, fan or any other motor, TL, etc.
2. The free running modulator IC1 using CD4093 cannot be turned off when not required without increasing the complexity of the circuit via pin 6 of IC1 segment marked IC1 - B as an "enable" signal.
Other considerations:
1. T1 base current may be reduced using a higher value R1 to reduce IR LED no-signal intensity though it may not be possible to eliminate it totally.
2. Resistor R2 at IR LED driver T1 is not required at all and can be dispensed with.It does not serve the intended purpose due to factors listed above.
3. Components used were lying around in stock except for Tx/Rx modules. No calculations were done to arrive at values shown or selection.
Though the Rx module from DIGIMORE has a 434MHz oscillator, modules from other vendors having other oscillators do work. For e.g. an Rx module with 6.7458MHz crystal has been tested to be working properly.
Special mention: Thanks to Nuts & Volts Magazine for the modulator frequency calculation.
