Interested to make an accurate electronic thermostat for your refrigerator? The 3 unique solid state thermostat designs I have I have explained in this article will surprise you with their “cool” performances.
Design#1: Introduction
The unit once built and integrated with any relevant appliance will instantly start exhibiting an improved control of the system saving electricity and also increasing the life of the appliance.
Conventional refrigerator thermostats are expensive and not very accurate. Moreover these are prone to wear and tear and therefore not permanent.
A simple and much efficient electronic refrigerator thermostat device is discussed here.
What is a Thermostat
A thermostat as we all know is a device which is able to sense a particular set temperature level and trip or switch an external load. Such devices can be electromechanical types or more sophisticated electronic types.
Thermostats typically are associated with air conditioning, refrigeration and water heating appliances. For such applications the device becomes a critical part of the system without which the appliance may reach and start operating under extreme conditions and ultimately get damaged.
Adjusting the control switch provided in the above appliances ensures that the thermostat cuts off power to the appliance once the temperature crosses the desired limit and switches back as soon as the temperature returns to the lower threshold.
Thus the temperature inside refrigerators or a room temperature through an Air conditioner is maintained to favorable ranges.
The circuit idea of a refrigerator thermostat presented here can be used externally over a refrigerator or any similar appliance to control its operation.
Controlling their operation can be done by attaching the sensing element of the thermostat to the external heat dissipating grid normally situated behind most cooling devices that use Freon.
The design is more flexible and wide ranged compared to the built-in thermostats and is able to exhibit better efficiency.
The circuit can easily replace the conventional low tech designs and moreover it’s much cheaper compared to them.
Let’s understand how the circuit functions:
Circuit Operation

The diagram alongside shows a simple circuit built around the IC 741, which is basically configured as a voltage comparator.
A transformerless power supply is incorporated here to make the circuit compact and solid-state.
A bridge configuration comprising R3, R2, P1 and the NTC R1 at the input forms the main sensing elements of the circuit.
The inverting input of the IC is clamped at half the supply voltage using a voltage divider network of R3 and R4.
This eliminates the need of providing a dual supply to the IC and the circuit is able to produce optimum results even through single pole voltage supply.
The reference voltage to the non-inverting input of the IC is fixed through the preset P1 with respect to the NTC (Negative Temperature Coefficient.)
In case the temperature under check tends to drift above the desired levels, the NTC resistance drops and the potential at non-inverting input of the IC crosses the set reference.
This instantly toggles the output of the IC, which in turn switches the output stage comprising transistor, triac network, switching off the load (heating or the cooling system) until the temperature reaches the lower threshold.
The feedback resistor R5 to some extent helps to induce hysteresis into the circuit, an important parameter without which the circuit may keep flip-flopping quite rapidly in response to the sudden temperature changes.
Once the assembly is completed, setting up the circuit is very simple and is done with the following points:
REMEMBER THE ENTIRE CIRCUIT IS AT AC MAINS POTENTIAL, SO EXTREME CAUTION IS ADVISED WHILE GOING THROUGH THE TESTING AND THE SETTING PROCEDURES. USE OF A WOODEN PLANK OR ANY OTHER INSULATING MATERIAL UNDER YOUR FEET IS STRICTLY RECOMMENDED; ALSO USE ELECTRICAL TOOLS WHICH ARE THOROUGHLY INSULATED NEAR AND AROUND THE GRIPPING AREA.
How to Setup this Electronic Refrigerator Thermostat Circuit
You will need a sample heat source accurately adjusted to the desired cut-off threshold level of the thermostat circuit.
Switch on the circuit and introduce and attach the above heat source with the NTC.
Now adjust the preset so that the output just toggles (the output LED comes on.)
Remove the heat source away from the NTC, depending upon the hysteresis of the circuit the output should switch off within few seconds.
Repeat the procedure many times to confirm its correct functioning.
This concludes the setting up of this refrigerator thermostat and is ready to be integrated with any refrigerator or similar gadget for an accurate and permanent regulation of its operation.
Parts List
- R1=10k NTC,
- R2=Preset 10K
- R3,R4=10K
- R5=100K
- R6=510E
- R7=1K
- R8=1M
- R9=56 OHM/1watt
- C1=105/400V
- C2=100uF/25V
- D2=1N4007
- Z1 = 12V, 1 watt zener diode
Design#2: using IC LM324
Another simple yet effective electronic fridge thermostat circuit is I have explained below. The post is based on the request sent to me by Mr.Andy.
The proposed idea incorporates just a single IC LM 324 as the main active component. Let's learn more.
The email which I received from Mr.Andy:
Circuit Objective
- I am Andy from Caracas. I have seen that you have experience with thermostats and other electronic designs, so i hope you can help me. I need to replace the mechanical fridge thermostat which is not working anymore. I'm sorry i didn't write directly on the blog. I think it's too much text.
- I decided to build a different schematic.
- It is working well, but only for positive temperatures. I need the schematic to operate from -5 Celsius to +4 Celsius (to use VR1 to set the temperature inside the fridge in the range of -5 Celsius +4 Celsius as the old thermostat knob used to do).
- The schematic is using LM35DZ (0 Celsius to 100 Celsius). I’m using LM35CZ (-55 Celsius to +150 Celsius). To make the LM35CZ send negative voltage, I put an 18k resistor between pin2 of LM35 and the negative from the power supply (pin4 of LM358). (as in page 1 or 7(figure7) in the datasheet).
- https://www.ti.com/lit/ds/symlink/lm35.pdf
- Because i’m using a 5,2v stabilized power supply, i operated the following modifications:1.ZD1, R6 are out. R5 is 550 ohm.
- 2.VR1 is 5K instead of 2,2K (i couldn’t find a 2,2K pot)The design is not working at temperatures below 0 Celsius. What else should i modifiy?I did some measuring.
- At 24 Celsius, LM35CZ is giving 244mVAt -2 Celsius, LM35CZ is giving -112mV (at -3 Celsius is -113mV)At -2 Celsius the voltage between TP1 and GND cand be set from VR1 from between 0 to 2,07v Thank you!
Circuit Assessment:
The solution is probably much simpler than it may appear to be.
Basically the circuit is responding only to positive temperatures because it incorporates a single supply.
For making it respond to negative temperatures, the circuit or rather the op amps needs to be fed with dual supply voltages.
That will most certainly solve the issue without the need of modifying anything in the circuit.
Though the above circuit looks superb, new hobbyists may find the ICs LM35 and TL431 quite unfamiliar and difficult to configure.
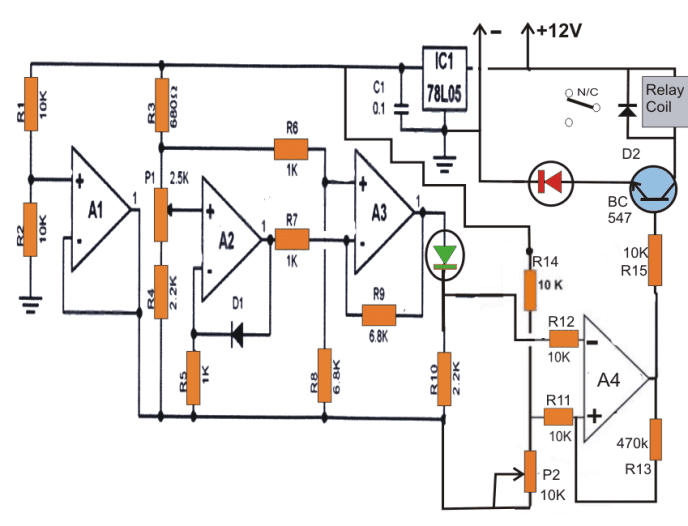
A similar type of circuit of an electronic fridge thermostat can be built using just a single IC LM324 and by an ordinary 1N4148 diode as the sensor.
The figure below shows the simple wiring done around a quad opamp IC LM324.
A1 produces a virtual ground to the sensing circuit op
amps, thus creates a dual voltage supply very simply avoiding complicated and bulky wiring.
A2 forms the sensing stage which utilizes the "garden diode" 1N4148 for doing all the temperature sensing.
A2 amplifies the differences generated across the diode and feeds it to the next stage where A3 is configured as a comparator.
The final result obtained from the output of A4 is finally fed to another comparator stage consisting of A4, and the subsequent relay driver stage.
The relay controls the fridge compressor On/OFF switching as per the settings of the preset P1.
P1 should be set such that the green LED just shuts off at -5 degrees or any other lower temperatures, as per the users demands.
Next P2 should be adjusted so that the relay just triggers at the above condition.
R13 should be actually replaced with a 1M preset.
This preset should be adjusted such that the relay just deactivates at around 4 degrees Celsius or any other closer values again depending upon the users preferences.

Design#3
3) The third circuit idea I have explained below was requested to me by one of the keen readers of this blog Mr.Gustavo.
I had published one similar circuit of an automatic refrigerator thermostat, however the circuit was intended to sense higher temperature level available at the rear side grid of refrigerators.
The idea was not quite appreciated by Mr Gustavo and he asked me to design a refrigerator thermostat circuit which could sense the cold temperatures inside the fridge, rather than the hot temperatures at the rear of the fridge.
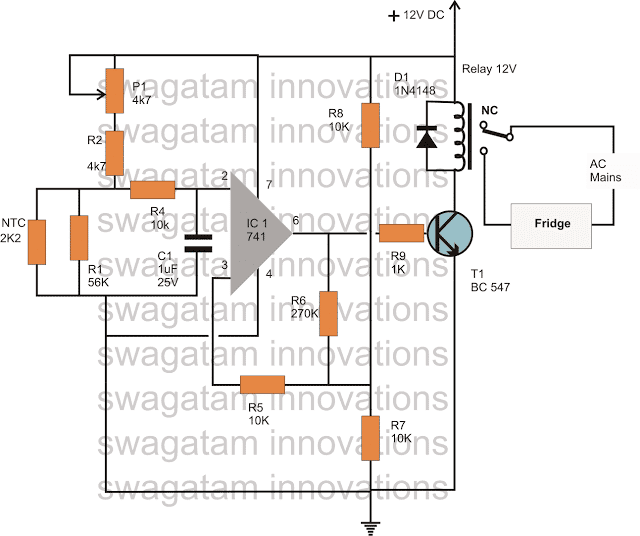
So with some effort I could discover the present CIRCUIT DIAGRAM of a refrigerator temperature controller, I have explained the idea with the following points:
How the Circuit Functions
The concept is not very new, neither unique, it's the usual comparator concept that has been incorporated here.
The IC 741 has been rigged in its standard comparator mode and also as a non inverting amplifier circuit.
The NTC thermistor becomes the main sensing component and is specifically responsible for sensing cold temperatures.
NTC means negative temperature coefficient, meaning the resistance of the thermistor will rise as the temperature around it falls.
It must be noted that the NTC must be rated as per the given specs otherwise the system will not functions as intended.
The preset P1 is used for setting the tripping point of the IC.
When the temperature inside the fridge falls below the threshold level, the thermistor resistance becomes high enough and reduces the voltage at the inverting pin below the non-inverting pin voltage level.
This instantly makes the output of the IC go high, activating the relay and switching OFF the fridge compressor.
P1 must be set such that the opamp output becomes high at around zero degree Celsius.
A little hysteresis introduced by the circuit comes as a boon or rather a blessing in disguise, because due to this the circuit does not switch rapidly at the threshold levels rather responds only after the temperature has risen to about a couple degrees above the tripping level.
For example suppose if the tripping level is set at zero degrees, the IC will trip the relay at this point and the fridge compressor will be also switched OFF, the temperature inside the fridge now starts rising, but the IC does not switch back immediately but retains its position until the temperature has risen at least upto 3 degrees Celsius above zero.

These were 3 accurate and reliable thermostat designs that can be built and installed in your fridge for the required temperature control.
If you have any further queries, you can express the same through your comments