To make this simple MPPT circuit we first modify a standard LM317 power supply circuit into a buck converter then configure it with a solar panel for implementing an MPPT function.
Modifying a LM317 Power Supply into an MPPT Solar Optimizer
In our previous article I have explained how a standard LM317 power supply could be transformed into an inductor based efficient variable buck converter power supply circuit.
In this article we analyze how the same circuit design could be enhanced into an effective MPPT circuit by a adding an LDR/LED optocoupler and an opamp voltage follower circuit stages.
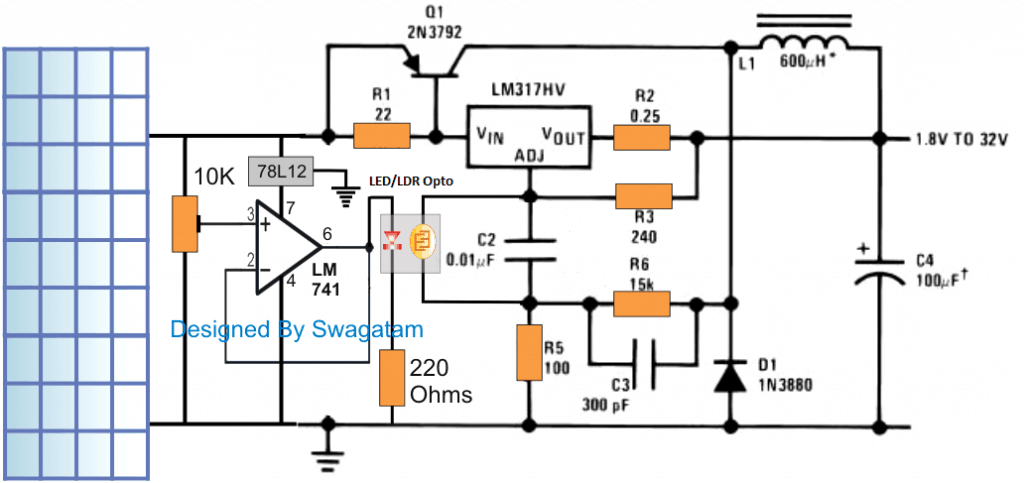
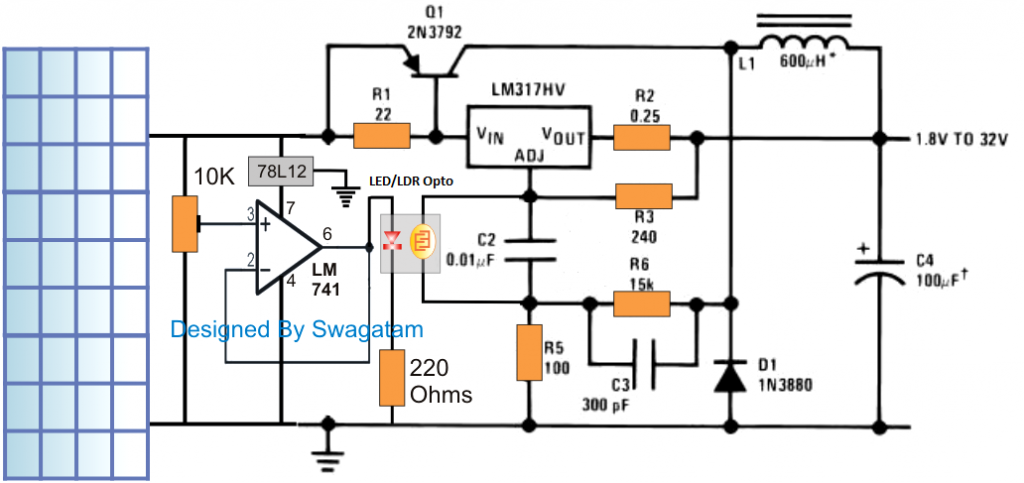
The complete circuit diagram of the proposed MPPT circuit using LM317 buck converter can be witnessed in the following image:

The figure illustrates the discussed MPPT circuit, the LM317 and its associated components form a basic buck converter circuit whose output can be varied by simply varying a resistor across C2.
In our previous power supply design we saw a pot being positioned in parallel with C2 for enabling the variable output voltage feature, however since the present design is supposed to perform an automatic MPPT, this pot could be seen replaced with an LDR/LED opto coupler.
How the Circuits Works
The LED LDR opto coupler is a simple homemade device wherein a red LED and LDR are sealed face to face inside a tiny light proof enclosure.
The LDR leads here can be seen connected in parallel with C2,while the LED is integrated with the output of an opamp voltage follower circuit stage.
The input of the opamp can be seen hooked up with the solar panel through a 10k preset.
The idea here is to make sure that as the solar panel voltage increases, the opto LED intensity also increases, which in turn causes the resistance of the LDR to drop.
The dropping resistance causes the buck PWM is narrow its pulses thereby preventing the output voltage to rise, but nevertheless ensuring a proportionate rise in current for the connected load.
In one of my earlier post we understood that in any buck converter design the output from the converter depends on the PWM and the input voltage.
That implies if the solar voltage tends to increase, the buck output could get affected and begin increasing proportionately. This could in turn cause overloading of the panel and degrade the efficiency of the panel.
The present LM317 MPPT design takes care of this situation through the LED/LDR device and the LM317 variable resistor feature, and combines the two features in conjunction with an opamp voltage follower to develop an effective self adjusting PWM based MPPT circuit.
The adjustment of the opamp 10k preset appears to be quite simple.
How to Adjust the LM317 MPPT Preset
At optimal sunlight, the 10k preset is adjusted such that the output from the buck converter produces a voltage on par with the load voltage specification.
For example suppose the load is a 12v battery, in that case the 10K preset is adjusted to produce around 14.4V.
Once this is done, from here on the output could be assumed to self adjust in response to the sun shine...meaning now as the sun shine increases the LM317 buck converter self adjusts and narrows the PWM at the base of Q1 inhibiting any rise in voltage, but in the process the inductor L1 and C4 makes sure that the excess sunshine is transformed into a proportionate amount of extra current for the battery to enable a faster charging.
Conversely if the sun shine deteriorates, the PWM tends to widen, causing the voltage for the battery to self adjust automatically maintaining the 14,4V level...... albeit with a proportionate amount of reduction in the current.
The self optimizing functionality is carried out throughout the day ensuring the most effective outcome from the panel for the connected load.
WARNING: THE ABOVE EXPLAINED SIMPLE MPPT CIRCUIT USING LM317 IS BASED ON THE AUTHOR'S ASSUMPTION AND SIMULATION, VIEWERS ARE ADVISED TO ASSESS THE CONCEPT THOROUGHLY BEFORE ATTEMPTING IT PRACTICALLY.
