In this article I have explained a few high frequency RF converter and preamplifier circuit designs which can be used for amplifying or enhancing the reception of an existing RF receiver.
All the RF amplifier circuits provided below are intended to be placed near an existing amateur radio receiver or a matching radio set in order to make the reception stronger and louder.
144 MHz RF Amplifier with Converter
In most 2 metre band ham receivers, the reception of the RF signals is generally implemented through a converter and short wave receiver, ideally suited to communications type.
A converter of this type usually comes with its personal RF amplifier, along with a fairly low frequency crystal controlled oscillator, accompanied by frequency multipliers.
This enables substantial sensitivity and superb frequency stability, although is a somewhat complex and costly product. Considering the fact that at this frequency the RF amplifier may not add a great deal of gain, and that tunable VHF oscillators are widely-used in numerous household VHF receivers, a much simpler circuit shown below can actually be very handy.

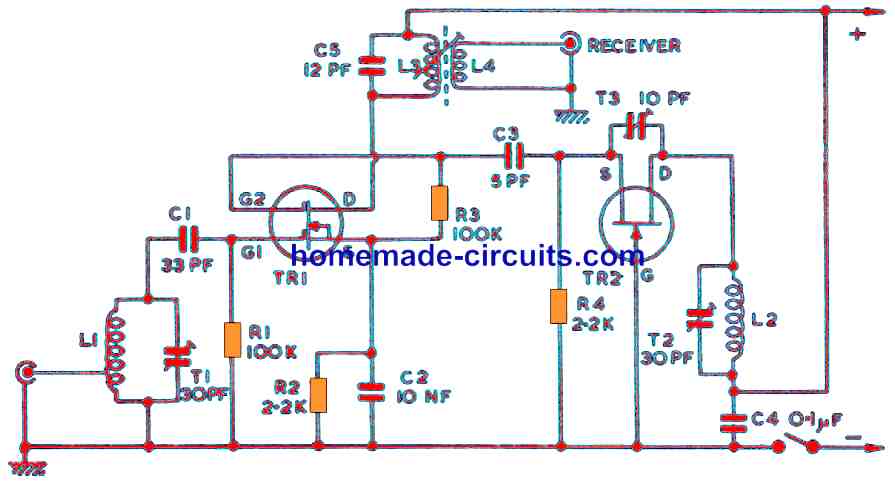
L1 is roughly tuned to the desired frequency band through T1, to enable the signal input to reach the gate 1 of FET TR1.
TR2 works like the local oscillator, and the functioning frequency in this design is fixed through the inductor L2 and trimmer T2. Oscillator function is implemented via C3 on the gate 2 of FET TR1.
The output frequency from the TR1 drain which forms the mixer stage causes the difference between frequencies of G1 and G2. Therefore when the signal at G1 is 144 MHz, and TR2 is adjusted to oscillate at frequency of 116 MHz, the output is set at 144 MHz - 116 MHz = 28 MHz.
In the same way, when the oscillator is fixed at 116 MHz, supplying an input with 146 MHz to gate G1 provides an output of 30 MHz. Consequently, 144- 146 MHz could be covered by adjusting the receiver from 28 MHz to 30 MHz. L3 is approximately adjusted to this band, and L4 connects the signal to the short wave receiver.
The oscillator may basically be adjusted over or under the converter's antenna circuit frequency, since it is the converter's difference between the signal input and oscillator frequencies that decides the output frequency of the converter . It is additionally feasible to select some other transmission bands and output frequencies, if coils L1, L2 and L3 are apprpriately customized.
How to Wind the Coils
L1 and L2 are identical with their winding specs, except that L1 consists of a tapping on one turn from its grounded end. Both the coils are built using five turns of 18 swg wire, self supporting, accomplished by making the coils over a 7mm diameter former. The distance between the turns are adjusted such that turns the total length of the cols are ½in or about 12 mm long.
L3 is wound using fifteen turns of 26 swg enamelled copper wire over a 7mm former equipped with an adjustable core.
L4 consists of four turns, wound over the L3 coil close to the earthed (positive line) end of L3.
2) 144 MHz RF preamplifier
This 144 MHz preamplifier can be applied to any 2 metre receiver gadget, or used just before the 144 MHz stage converter explained above.
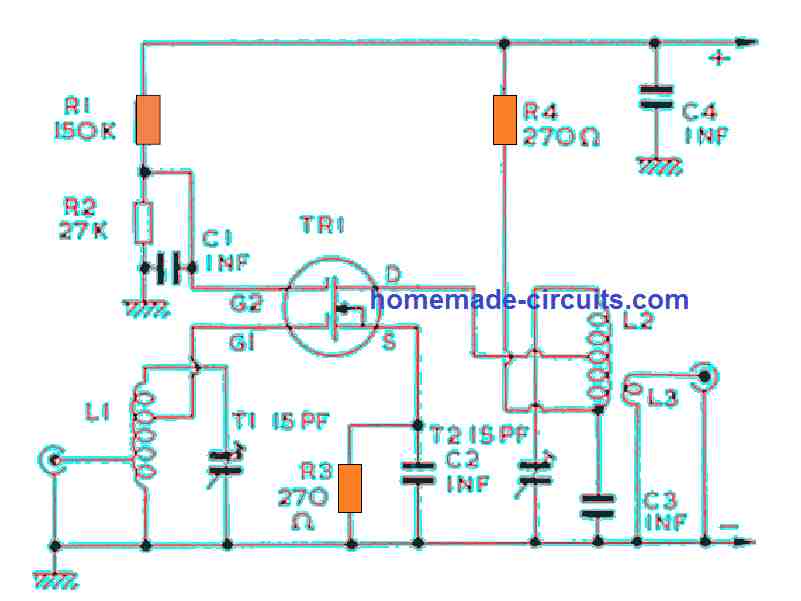
TR1 can be any RF dual gate FET.
Aerial input is applied to an intermediate tapping on inductor L1, which can be usually through a co-axial feeder. In a few conditions a small straight aerial or cord could be employed for getting ample signal power. A raised up antenna may normally improve the reception range.
However, an initial attempt could be to start with a simple dipole antenna design. This is often of rigid wire, which could be around 38½in long overall, with the connecting cable climbing down through the middle.
This kind of antenna may have lower directivlty therefore does not need to be adjusted, and could be elevated over a light-weight post or mast.
For receiving 144-146 MHz signal, L1 is permanently adjusted to approximately 145 MHz by means of T1. Input is applied to gate 1, via a 2nd tapping, and R3 using the by-pass capacitor C2 delivers biasing to the source terminal.
Gate 2 is controlled with a constant voltage extracted through the divider R1/R2. TR1 drain output is attached to the L2 tapping, tuned by trimmer T2.
To get a narrow range of frequencies like the 2 m Amateur band, adjustable tuning cannot be validated, particularly since L1 and L2 never tune finely.
L3 hooks up to any desired 2 m gadget, which may be typically a converter functioning into a lower frequency receiver.
Inductor Winding
L1 uses a 18 swg or similar firm wire, enameled or tinned copper, and is wound with five turns then tapped at one turn from the upper end, to connect with G1, and a couple of winding from the ground side end for connecting to the antenna. The L1 coil may be 5/16th in in diameter with turns spaced in a way that the coil is ½in long.
L2 is constructed in the identical manner having 5 turns, however this will be ¾in long and include a centre tap for feeeding the FET drain.
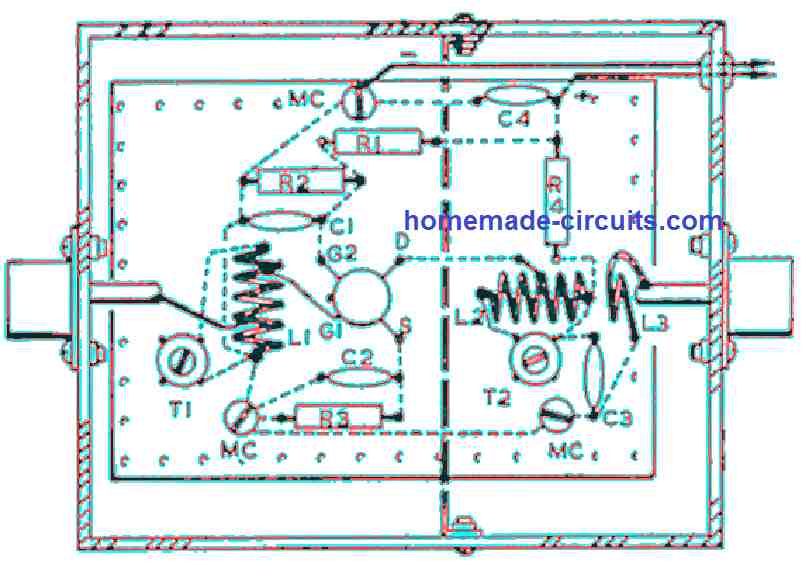
L3 is made up of a individual turn of insulated wire, wrapped around the bottom end of L2. While developing VHF units of this type, a design helping short radio frequency and by-pass return connections is going to be necessary, and Figure below exhibits a actual layout for the above schematic.
FM Booster
For capturing long-distance FM radio frequencies, or perhaps in regions of weak signal strength, VHF FM reception power could be enhanced through a booster or preamplifier. Circuits intended for these 70 MHz or 144 MHz could be designed for fulfilling this requirement.
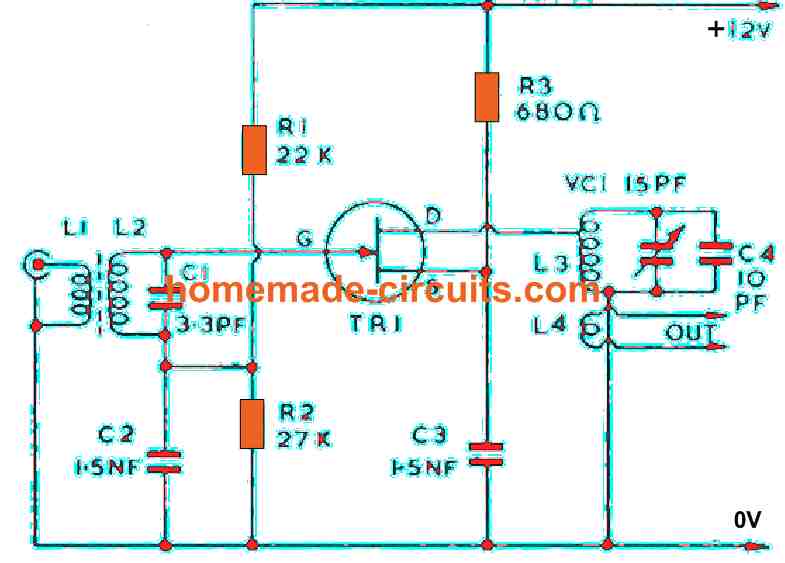
For any wide band reception for example around 88-108 MHz, performance drops down a lot at frequencies away at which the amplifier is tuned.
The circuit in I have explained below features an adjustable tuning for the drain coil, and in order to minimize unwanted effects, the less significant antenna circuit, which actually tunes flatly, is broad banded.
How to Wind the Coils
Coil L2 possesses 4 turns of 18swg wire over a powdered, iron VHF core, roughly 7mm in diameter.
L1 is wound over L2 winding with three turns which is likewise 18swg thick.
L3 simply can be an air cored coil, with 4 turns of 18swg wire, built over an air cored former 8mm in diameter. Its turns should be away from each other by distance equal to the thickness of the wire.
The coil tap on the FET drain is three turns from the grounded end of the coil.
L4 is one turn wound over L3 on the grounded end of L3.
C4 could be replaced with a trimmer, to enable a lot more manipulation for the ranges.
Values are selected for matching a BFW10 FET, the industry low noise, wideband VHF amplifier. Other VHF transistors may also work well.
How to Tune
The aerial feeder cable is connected to the socket associated with L1, and a short feeder through L4 is hooked up with the receiver aerial outlet.
In case the receiver has a telescopic antenna, connections should be loosely coupled with the L4 coil.
While implementing VHF amplifiers, it may be seen that tuning process is pretty flat, particularly where circuits are intensely loaded, just like the aerial inductor. Even in such conditions , an extensive peak offering optimal reception can e expected from this FM booster circuit.
It will likewise be observed that the gain offered by these kinds of amplifiers is not as good as with lower frequency RF amplifiers, which tends to drop down as frequency increases.
The issue is due to losses within the circuit, along with restrictions in the transistors on their own. Capacitors must be tubular and disc ceramic, or other kinds suitable for VHF.
70 MHz RF Amplifier
This RF circuit is principally designed to work with a 4 meter amateur band transmission. It possesses a grounded gate FET. This type of a grounded gate stage is highly stable, and does not require much care to avoid oscillations, apart from that furnished by a layout as described in the first RF concept.
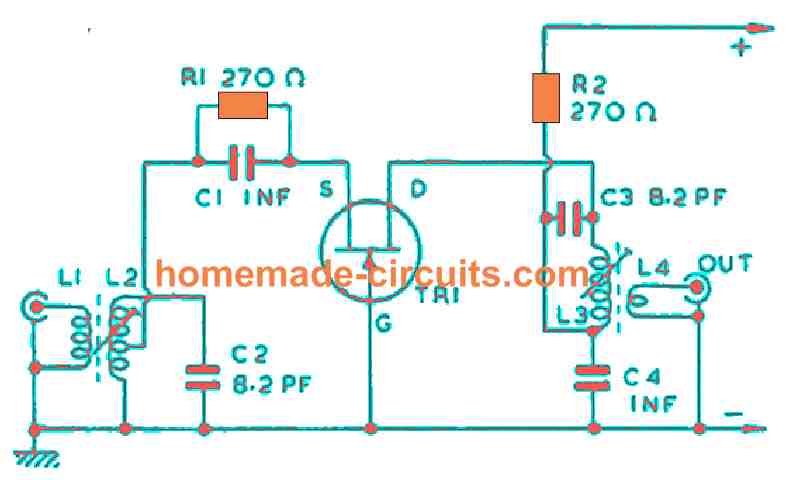
The gain from this design is lower compared to a grounded source stage type design. The L2 inductor tuning is quite flat. R1, together with the by-pass capacitor C1, is positioned for biasing the source terminal of the FET, and should be tapped down from the L2 since the input TR1 offers quite a low impedance in this RF circuit.
You are able to get a minor enhancement in results by tapping the down the FET drain via L3.
L2 and L3 are adjusted through their respective screws, which are air cored. The tuning is optimized by adjusting the cores associated with L2 and L3.
That said, permanent cores designed to suit 70 MHz RF converters, can be also used, and then C2 and C3 could be set up accordingly.
Inductor Details
L2 and L3 are constructed with 10 turns each using 26 swg enameled copper wire over a 3/16th in diameter (or 4mm to 5mm) cored formers.
L1 is wound over L2 on the grounded end of L2, firmly wrapped around L2.
L1 is built with 3 turns.
L4 is wound with a couple of turns, in the same manner coupled to L3.
TR1 can be a VHF type transistor having an top frequency limit of no less than 200 MHz. The BF244, MPF102, and comparable forms could be tried. To get most effective performance, you may try modifying R1 and the tap over L2, which are not very significant.
This RF circuit is conveniently designed with regard to 144 MHz receptions. Self supporting air cored coils, using parallel 10 pF trimmers, could subsequently be installed. L1/ L2 could be five turns overall, wound with 20swg wire and an external diameter of 8 mm. The space between the turns should be adjusted in a such a way that the coil is 10 mm long.
A tap derived for the aerial connection should be 1.5 turns from the upper end of L1, and the source tap via C1, R1 can be extracted from two turns from the grounded end of L2. L3 is implemented applying similar proportions.
The FET drain terminal could now be tapped with L3, 3 turns from the C4 end of this winding. L4 can be a one turn of insulated copper wire, tightly wound over L3.
As stated earlier, the grounded gate stage cannot be expected to boost signal strength to a level which is generally accomplished through circuits as described in the frist concept.
AM Radio Signal Booster
This simple AM booster can be used for boosting the range or volume of a domestic portable receiver by keeping the circuit near the desired MW receiver unit. Using an outstretched antenna, circuit now works with any small transistor portable or similar receiver providing excellent reception of signals which otherwise could be simply inaccessible.
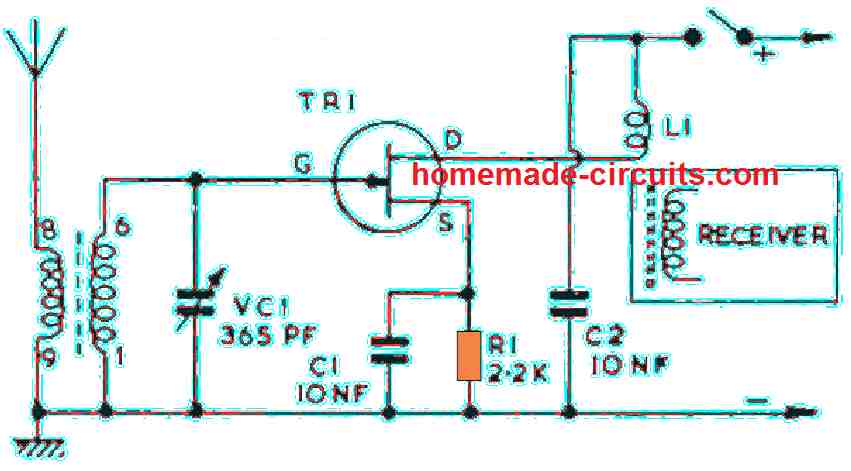
The booster may not be so useful for nearby stations or local channel reception, which doesn't actually matter since this MW booster is not supposed to be permanently installed with the radio receiver anyway.
The boosting range of this circuit is around 1.6 MHz to 550 kHz,
which could be tweaked to match the AM receiver band, simply by altering the position of the coil core.
How to Make the Antenna Tuning Coil
The coils is built over a 3/8 in diameter plastic former with internal threading for a suitable iron screw, so that it can be turned up/down with a screwdriver for adjusting the inductance.
The antenna side input coupling winding is 11 turns of wire, wound above the main winding.
The main winding connected across the VC1 and FET gate, is made using 30 turns.
Both the wires should 32 SWG thick.
L1 is built using 15 turns of insulated wire, over a 1 inch air core diameter.
How to Tune the AM Booster
Position L1 close to the antenna of any medium wave coil, outside the receiver. Tune the radio to a weak band or station. Now adjust the booster circuit's VC1 trimmer to get the most optimal volume from the radio. Simultaneously point and adjust L1 near the radio for getting the most effective coupling.
It will be essential to adjust VC1 along with the receiver's tuning, so that the scale of the VC1 can be calibrated in accordance with the radio's dial.
10 Meter RF Amplifier
The 10 meter RF amplifier design is rather simple. The fixed filter network placed at the output, helps eliminating noise by around 55 dB.
When the coils are built as per the specifications given in the parts list, then the filter is not going to necessitate tweaking or adjustments.
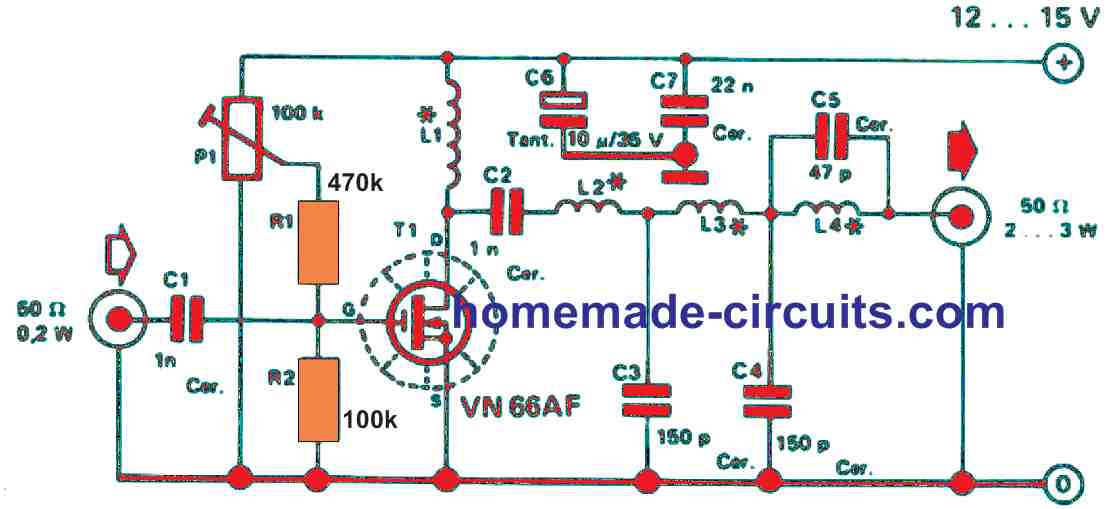
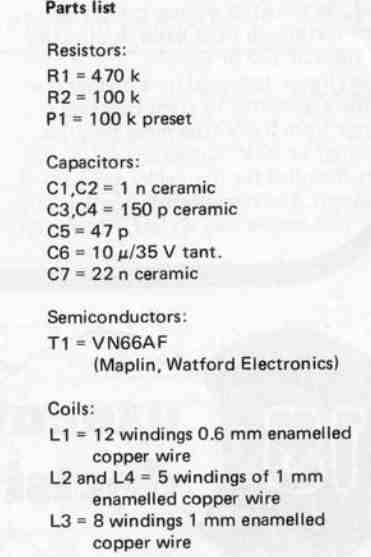
Of course skilled hands may want to play with the coil data, no issues since the suggested RF amplifier is highly adaptable to allow this. The amplifier is okay for the majority of of transmission primarily since the FET drain current is adjustable via the preset P1.
With regard to linear applications (AM and SSBI, the drain must be fixed at 20 mA. If intended for FM and CW, P1 must be tweaked to ensure that no quiescent currant is passing through the FET). If you want to apply for the original purpose, then the quiescent current must be set between 200 mA and 300 mA.
The ready made printed circuit board shown below guarantees fast and precise development.
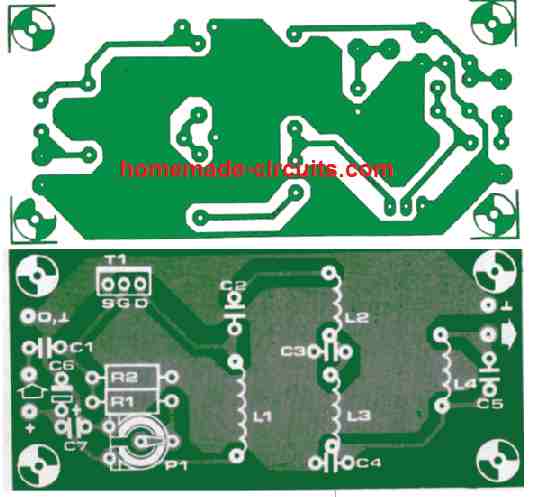
The coils must be wound onto aerial coil formers having 9 mm diameter. Always be careful that the windings is tightly wound without any spaces. Make sure you apply a heat sink for the FET.
RF Preamplifier for TV Signal
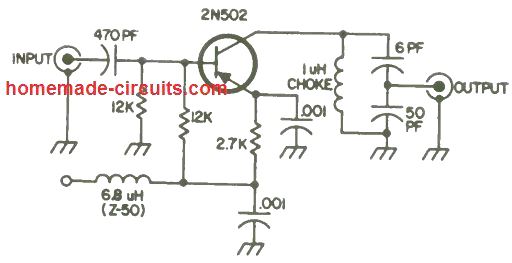
This RF preamplifier is designed for 6-meter frequency band. Meaning it is suitable for 60 to 70 MHz frequency which are generally used for TV signal transmissions. Tuning is not required, since the circuit has a broadband 10 MHz range.
RF Meter Circuit
Mixer-type Schottky diodes will be able to detect rf signals from approximately -35dBm and 20dBm. Response flatness is excellent of around 1GHz with a low-cost BA481 and even superior with increased frequency-response types; a general-purpose Schottky reads larger powers in a 50 ohms system through a lower frequency response. Due to the fact that the diode output is temperature dependent and fairly adjustable between manufactured batches.
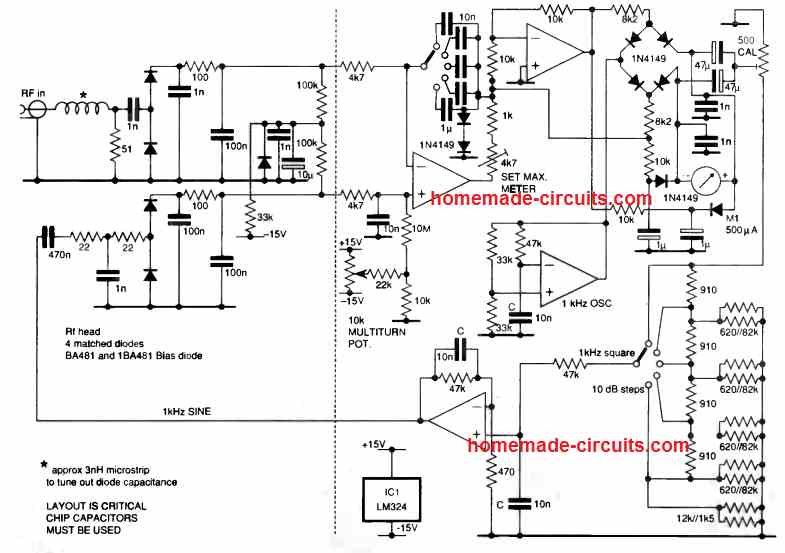
The circuit indicated employs a couple of matched up sensors, the 2nd one supplied with a 1kHz sinewave, fine-tuned in amplitude through the error amplifier circuit so that the outputs will be well balanced. A chopper made up of Four 1N4149 diodes delivers the 1kHz square, that is subsequently shaped into a sinewave through the op amp, and in addition gives a dc level relative to the amplitude.
This is an assessment of the rf input level and is displayed, in this instance, by a moving-coil meter marked in decibels, although this might quickly be made digital. Ranges of 10dB are determined in the 1kHz drive to include the 55dB dynamic range, and the error integrator capacitors are switched to deliver the appropriate time constant.
The circuit is naturally very linear. The 10kS2 multi-turn pot is used to set the meter at zero. Supplemental diodes around the meter overcome reverse polarity in the event the integrator is set too low below zero, because the chopper gives just forward drive for the meter.
On the integrator output, the 4.7k pot is used for setting up the maximum meter current. Precision to many hundred MHz is approximately 0.1dB, without depending on regulated power supplies. Capacitors designated C must be of the identical variety to complement temperature coefficients.
Broadband RF Amplifier Circuit
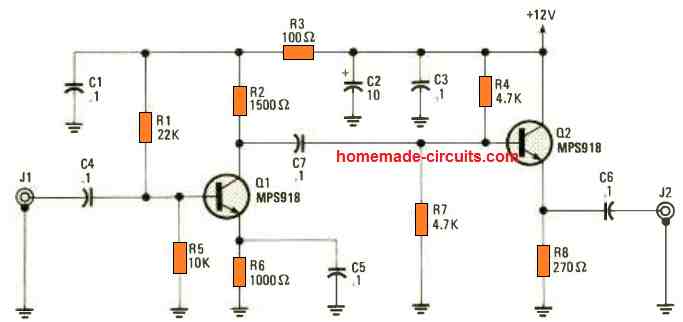
The Broadband RF Amplifier is straightforward, low-cost, and could be constructed totally using junk electronic components. The only safety measure that you need to take is to ensure that component pin lengths are maintained as small as is possible, and that Mylar type capacitors are employed for the bypass capacitors as pointed out.
70 MHz in in the military bands. 4 Meters is not in the amateur radio band. it goes from 6 meters / 50 to 54 MHz to the 2 meter band / 144 to 148 MHz.
It would also help to give the mix for the inductor cores and the required inductance.
Robert S
Extra class amateur radio
BSME, MSEE
Using A NTE312 for the oscillator in the converter circuit as the others seem to be discontinued. Can’t get it to oscillate. any ideas ?
Yes, it can be used.
Probably an easy question. I am a ham radio operater who lives in a forest of pine trees. What I’m wanting to do is
(1) Put an HF Pre Amp on my tower/pole at the antenna; I’ve found some that claim 20 DB Gain (1.8 to 30 MHZ)
(2)I’d run coax or wire down the tower/pole to get power for the HF Pre Amp
Question is how do I switch the pre amp off when I want to transmit 100 Watts ? I see some info on the web but it’s mostly convoluted.
I know that the HD TV antennas with 150 Mile range do this on the receive side.
Any ideas/? Thoughts Thanks in advance. Rick
Sorry, no ideas, my RF knowledge is not too great so can’t figure it out!
Treat it the same as if you were using an SDR. You need to tap into the switching from x-mit to receive. There are circuits where it can be a standalone circuit and not have to tap into the radio but that requires proper filtering.
https://www.sdrplay.com/community/viewtopic.php?t=3840
Not sure if this is the the place to ask this question, but I listen to ham radio and I have a problem with some hearing. I’m constantly turning the volume up and down because one persons voice is louder then the others voice. I was wondering if you have any circuits that can be used between the antenna and radio or the between the speaker jack and the speaker that would make all the voices closer to the same volume. I’ve had training in electronics when I was younger and I’m an electrician now but I’m trying to get back into electronics for a hobby before I become retirement age.
Thanks for any help you can give.
Unfortunately I do not have the circuit that you are looking for, if I happen to find one will surely update it here for you!
İn Broadband RF Amplifier Circuit what is the capacitors value
which capacitor…mostly they are 0.1uF
Would help an amateur if the FET part numbers were included !!