This comprehensive solar charge controller is designed to effectively charge a big 12 V 100 Ah battery with utmost efficiency. The solar charger is practically foolproof in terms of battery over charge, load short circuit, or over current conditions.
By Vismit Singh
The key elements of this 100 Ah solar regulator circuit are, obviously the solar panel and the (12 V) battery. The battery here works as an energy storage unit.
Low voltage DC lamps and stuff like that could be driven straight from the battery, while a power inverter could be operated to convert direct battery voltage into 240 V AC.
Nevertheless, all these applications are generally not the topic of this content, which focuses on hooking up a battery with a solar panel. It may appear too tempting to connect a solar panel directly with the battery for charging, but that's never recommended. An appropriate charge controller is crucial for charging any battery from a solar panel.
The primary importance of the charge controller is to reduce the charging current during peak sunlight when the solar panel resources higher amounts of current beyond the required level of the battery.
This becomes important because charging with high current might lead to critical harm to the battery, and might certainly decrease the battery's working life expectancy.
With no charge controller, the danger of overcharging the battery is usually impending, since the current output of a solar panel is directly determined by the level of irradiation from the sun, or the quantity of incident sunlight.
Essentially, you will find a couple of methods for governing the charging current: through series regulator or a parallel regulator.
A series regulator system is usually in the form of a transistor which is introduced in series between the solar panel and the battery.
The parallel regulator is in the form of a 'shunt' regulator attached in parallel with the solar panel and the battery. The 100 Ah regulator explained in this post is actually a parallel type solar regulator controller.
The key feature of a shunt regulator is that it doesn't require high amounts of current until the battery is fully charged. Practically speaking, its own current consumption is so less that it can e ignored.
Once the battery is fully charged, however, the excess power is dissipated into heat. Specifically in bigger solar panels, that high temperature requires a relatively huge structure of the regulator.
Along with its real purpose, a decent charge controller additionally provides safety in many ways, together with a protection from deep discharging of the battery, an electronic fuse and a dependable safety towards polarity reversal for the battery or the solar panel.
Simply because the whole circuit is driven by the battery through a wrong polarity safeguard diode, D1, the solar charging regulator continues to work normally even when the solar panel is not supplying current.
The circuit makes use of the unregulated battery voltage (junction D2 -R4) along with a extremely precise reference voltage of 2.5 V. that is generated using zener diode D5.
Since the charging regulator by itself performs perfectly with a current lower than 2 mA, the battery is barely loaded during night time, or whenever the sky is cloudy.
The minimal current consumption by the circuit is achieved by using power MOSFETs type BUZ11, T2 and T3, whose switching is voltage dependent, this allows them to function at practically zero drive power.

The proposed solar charge control for 100 Ah battery monitors the battery voltage and regulates the conduction level of transistor T1.
The bigger the battery voltage, the higher will be the current passing via T1. As a result, the voltage drop around R19 becomes higher.
This voltage across R19 becomes the gate switching voltage for MOSFET T2, which causes the MOSFET to switch harder, dropping its drain-to-source resistance.
Due to this the solar panel gets loaded more heavily which dissipates the excess current through the R13 and T2.
Schottky diode D7 protects the battery from accidental reversal of the + and - terminals of the solar panel.
This diode additionally stops flow of current from the battery into the solar panel in the event the panel voltage falls under the battery voltage.
How the Regulator Works
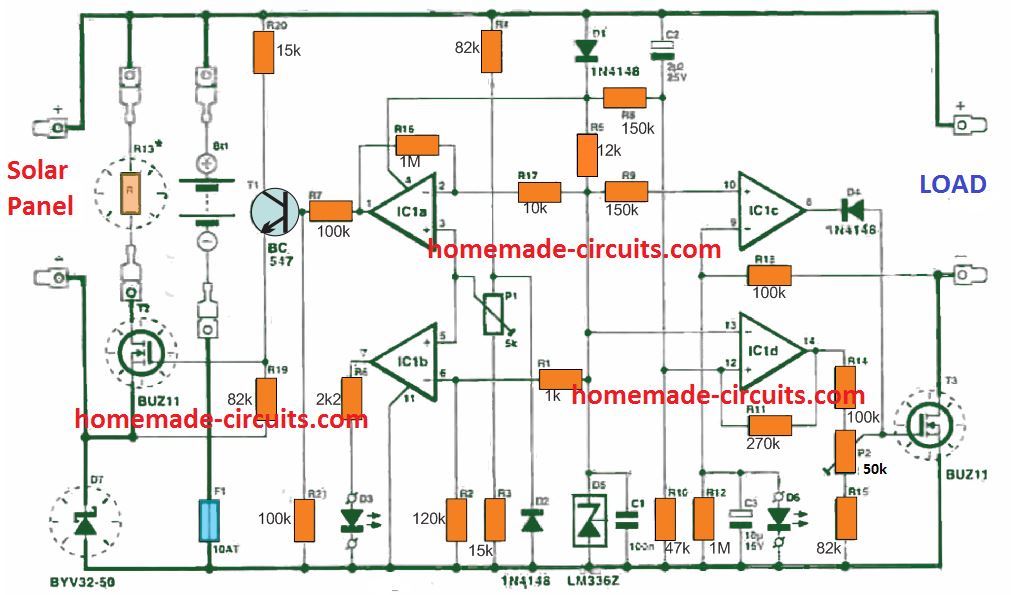
The circuit diagram of the 100 Ah solar-charger regulator can be seen in the figure above.
The primary elements of the circuit are a couple of 'heavy' MOSFETs and a quadruple op amp IC.
The function of this IC, could be divided into 3 sections: the voltage regulator built around IC1a, the battery over-discharge controller configured around IC1d and the electronic short-circuit protection wired around IC1c.
IC1 works like the main controlling component, while T2 functions as an adaptable power resistor. T2 along with R13 behaves like an active load at the output of the solar panel. The functioning of the regulator is rather simple.
A variable portion of the battery voltage is applied to the non-inverting input of control op amp IC1a through voltage divider R4-P1-R3. As discussed earlier, the 2.5-V reference voltage is applied to the inverting input of the op amp.
The working procedure of the solar regulation is quite linear. The IC1a checks the battery voltage, and as soon as it reaches the full charge, it switches ON T1, T2, causing a shunting of the solar voltage via R13.
This ensures that the battery is not over loaded or over charged by the solar panel. Parts IC1b and D3 are used for indicating the 'battery charging' condition.
The LED illuminates when the battery voltage reaches 13.1V, and when the battery charging process is initiated.
How the Protection Stages Work
The opamp IC1d is set up like a comparator to monitor the battery low voltage level, and ensure protection against deep discharge, and MOSFET T3.
The battery voltage is very first proportionately dropped down to around 1/4 of the nominal value by resistive divider R8/R10, after which it is compared with a reference voltage of 23 V obtained via D5. The comparison is carried out by IC1c.
The potential divider resistors are selected in such a way that the output of IC1d dips lower once the battery voltage falls below a approximate value of 9 V.
MOSFET T3 subsequently inhibits and cuts off the ground link across the battery and the load. Due to the hysteresis generated by the R11 feedback resistor, the comparator doesn't change state until the battery voltage has reached 12 V again.
Electrolytic capacitor C2 inhibits the deep-discharging protection from getting activated by instantaneous voltage drops due to, for example, the switching on of a massive load.
The short-circuit protection included in the circuit functions like an electronic fuse. When a short-circuit accidentally happens, it cuts off the load from the battery.
The same is also implemented through T3, which shows the crucial twin function of the MOSFET T13. Not only does the MOSFET work as a short circuit breaker, its drain-to-source junction additionally plays its part like a computing resistor.
The voltage drop generated across this resistor is scaled down by R12/R18 and subsequently applied to the inverting input of comparator IC1c.
Here, as well, the precise voltage furnished by D5 is utilized as a reference. For so long as the short-circuit protection remains inactive, the IC1c continues to provide a 'high' logic output.
This action blocks D4 conduction, such that the IC1d output solely decides the T3 gate potential. A gate voltage range of around 4 V to 6 V is attained with the help of resistive divider R14/R15, enabling a clear voltage drop to be established over the drain-to-source junction of T3.
Once the load current gets to its highest level, the voltage drop rises quickly until the level is just sufficient to toggle IC1c. This now causes its output to become logic low.
Due to this, now diode D4 activates, allowing the T3 gate to be shorted to ground. Due to this now the MOSFET shuts down, stopping the current flow. The R/C network R12/C3 decides the reaction time of the electronic fuse.
A relatively sluggish reaction time is set in order to avoid incorrect activation of the electronic fuse operation due to occasional momentary high current rise in the load current.
LED D6, in addition, is employed as a 1.6 V reference, making sure C3 is not able to charge above this voltage level.
When the short-circuit is removed and the load detached from the battery, C3 is discharged gradually through the LED (this can take up to 7 seconds). Since the electronic fuse is designed with a reasonably sluggish response, doesn't mean that the load current will be allowed to reach excessive levels.
Before the electronic fuse can get activated, the T3 gate voltage prompts the MOSFET to restrict the output current to the point as determined through the setting of preset P2.
In order to ensure nothing burns or fries, the circuit additionally features a standard fuse, F1, that is attached in series with the battery, and provides reassurance that a probable breakdown in the circuit would not trigger an immediate catastrophe.
As an ultimate defensive shield, D2 has been included in the circuit. This diode safeguards the IC1a and IC1b inputs against damage, due to an accidental reverse battery connection.
Selecting the Solar Panel
Deciding on a most suitable solar panel is, naturally, dependent on the battery Ah rating that you intend to work with.
The solar-charging regulator is basically designed for solar panels with a moderate output voltage of 15 to 18 volts and 10 to 40 watts. These kinds of panels typically become suitable for batteries rated between 36 and 100 Ah.
Nevertheless, since the solar-charging regulator is specified to provide an optimum current draw of 10 A, solar panels rated at 150 watts may well be applied.
The solar charger regulator circuit can be also applied in windmills and with other voltage sources, provided that the input voltage is in the 15-18 V range.
Most of the heat is dissipated through the active load, T2/R13. Needless to say, the MOSFET should be effectively cooled through an heatsink, and R13 should be rated adequately for withstanding extremely high temperatures.
The R13 wattage must in accordance with the rating of the solar panel. In the (extreme) scenario when a solar panel is hooked up with a no-load output voltage of 21 V, and also a short-circuit current of 10 A, in such a scenario T2 and R13 starts dissipating a power equivalent to the voltage difference between the battery and the solar panel (around 7 V) multiplied by the short circuit current (10 A), or simply 70 watts!
This might actually occur once the battery is completely charged. The majority of power is released through R13, since the MOSFET then offers a very low resistance. The value of the MOSFET resistor R13 could be quickly determined through the following Ohm's law:
R13 = P x I2 = 70 x 102 = 0.7 Ohms
This sort of extreme solar-panel output could seem unusual, however. In the prototype of the solar-charging regulator, a resistance of 0.25 Ω/40 W had been applied consisting of of four parallel attached resistors of 1Ω/10 W. The necessary cooling for T3 is calculated in the same way.
Supposing that the highest output current is 10 A (that compares to a voltage drop of approximately 2.5 V over the drain-source junction), then a maximum dissipation of about 27W must be evaluated.
To guarantee adequate cooling of T3 even at excessive background temperatures (e.g., 50 °C), the heat-sink must use a thermal resistance of 3.5 K/W or less.
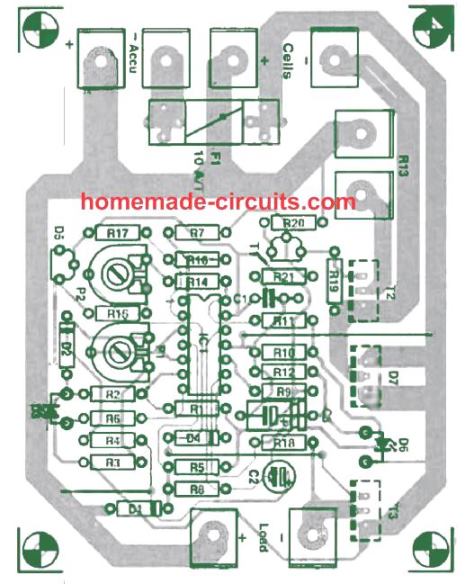
Parts T2, T3 and D7 are arranged at one particular side of the PCB, facilitating them to be easily attached to a single common heatsink (with isolation components).
The dissipation of these three semiconductors must, thus, be included, and we in that case want a heatsink having a thermal specs of 1.5 K/W or higher. The type described in the parts list complies with this prerequisite.
How to Set Up
Thankfully, the 100 Ah battery solar regulator circuit is pretty easy to set up. The task does, nonetheless, demand a couple of (regulated) power supplies.
One of them is adjusted to an output voltage of 14.1 V, and coupled to the battery leads (designated 'accu') on the PCB. The second power supply must have a current limiter.
This supply is adjusted to the open-circuit voltage of the solar panel, (for instance 21 V, as in the earlier stated condition), and coupled to the spade terminals designated a 'cells'.
When we adjust the P1 is appropriately, the voltage should decrease to 14.1 V. Please do not worry about this, since the current limiter and D7 guarantee that absolutely nothing can go bad!
For an effective adjusting of P2 you must work with a load that is a little bit higher than the most heavy load that may possibly occur at the output. If you wish to extract the maximum from this design, try picking a load current of 10 A.
This could be accomplished using a load resistor of 1Ω x120 W, made up of, for instance, 10 resistors of 10Ω/10 W in parallel. Preset P2 is in the beginning spun to 'Maximum (wiper towards R14).
After that, the load is attached to the leads designated 'load' on the PCB. Slowly and cautiously fine tune P2 until you achieve the level where T3 just turns off and cuts off the load. After the removal of the load resistors, the 'load' leads can be short-circuited momentarily to test that the electronic fuse functions correctly.
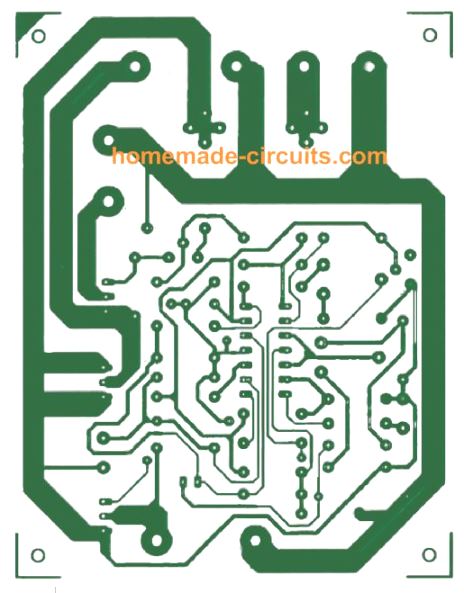
PCB Layouts


Parts List
Resistors:
R1 = 1k
R2 = 120k
R3,R20 = 15k
R4,R15,R19 = 82k
R5 = 12k
R6 = 2.2k
R7,R14,R18,R21 = 100k
R8,R9 = 150k
R10 = 47k
R11 = 270k
R12,R16 = 1M
R13 = see text
R17 = 10k
P1 = 5k preset
P2 = 50k preset
Capacitors:
C1 = 100nF
C2 = 2.2uF/ 25V radial
C3 = 10uF/ 16V
Semiconductors:
D1,D2,D4 = 1N4148
D3,136 = LED red
D5 = LM336Z-2.5
D7 = BYV32-50
T1 = BC547
T2,T3 = BUZ11
IC1 = TL074
Miscellaneous:
F1 = fuse 10 A (T) with PCB mount holder
8 spade terminals for screw mounting
Heatsink 1.251VW
okay let’s take the battery to be 12 100ah and the load is much after sunset and for the side of the solar panel let’s try to say like it’s 100w but I’m requesting if 100w panel can’t make the 100ah battery we can add a small solar panel to help the 100w solar panel, please try to design it the way you will make it simple and better. thank you
To charge a 12V 100 Ah battery optimally from a solar panel, you will need a minimum voltage and current of 20V and 20 amp respectively.
So, 20 * 20 = 400 watts, so you may need to put 4 * 100 watt panels in parallel.
it’s okay you try to draw a simple diagram of a charge controller for that
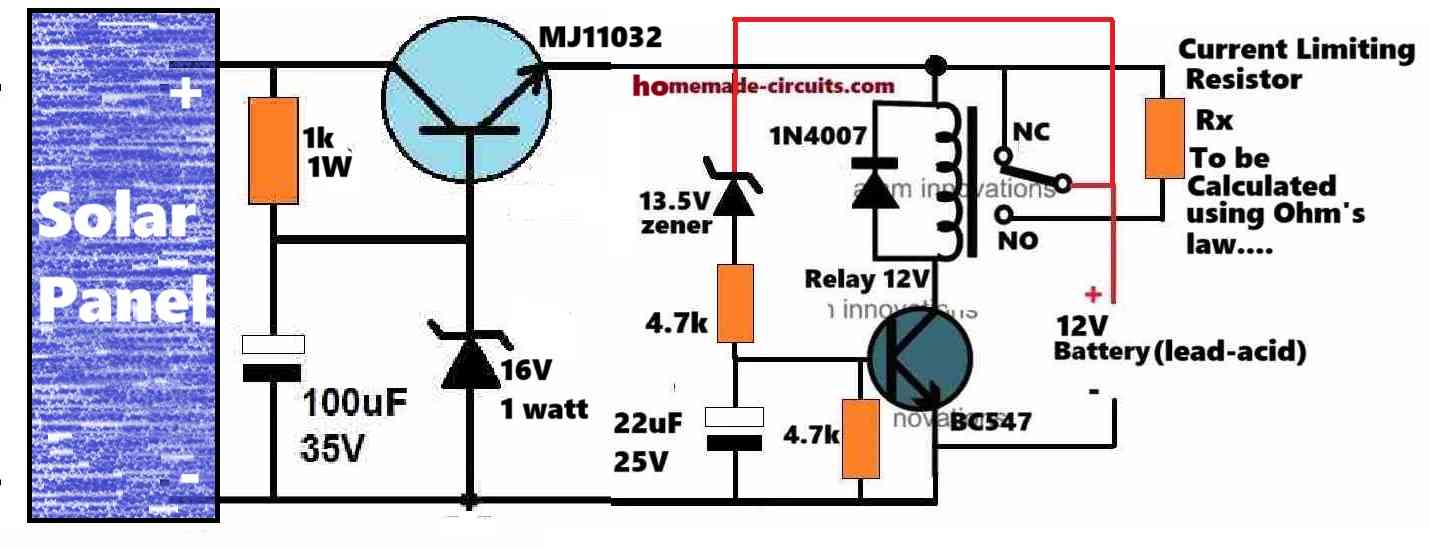
Sure, you can try this simple design:
" rel="ugc">
swagatam please if it’s possible try to modify the upper diagram and make it simple a little bit, here in Africa it will mean joining a 50w panel and 100w panel , so please try to modify it I wish there was a way you would try to multiply the current of 100w solar panel to charge 100ah battery in 1 day but please try to see what you can do
Hi Rashid, the above circuit indeed looks unnecessarily complex, i can make it much simpler, however for this you will have to provide me with all the necessary specifications, for example the solar panel wattage and voltage specs, the battery voltage specs, external load specs, if any. should the external load be ON all the time or only after sunset when the battery is fully charged, etc?
Hi Swagatam,
I have made the provided charging control circuit on the board. Please guide on how to connect battery and load to the circuit. Should the load, battery and panel be connected in parallel?
Thank you Maryam, for your interest in this project.
As you can see in the diagram, the solar panel is connected at the extreme left end side of the circuit.
The battery is connected just beside the transistor T1, BC547, also at the left side of the diagram..
The load is connected at the extreme right end side of the diagram (LOAD).
Please let me know if you have any further issues with the circuit.
I need some help, how many Watts are the resistors : ? WHAT ABOUT DIODES?
All resistor are 1/4 watt unless specified. Diodes are as given in the diagram.
Hi Dear Swagatam,
Thank you for your benefit post. I have a question:
I decide to simulate your proposed solar charge controller circuit using proteus, but BYV32-50 is not available in its library.
please help me to solve my problem.
Thank you.
Hi Dear Maryam,
Actually I don’t use softwares to test my circuits, instead I use my knowledge to simulate it in my brain and then test it by building it practically. So it can be difficult for me to solve your proteus problem.
If you are finding this design difficult you can try the following easier one:
Solar Water Heater Circuit with Battery Charger
Thank you so much for your valuable response. Please help me find a device with similar functionality to BYV32-50.
You can search online for a “100 V 20 amp schottky diode”, you should be able to find many good options.
Can i use lm385z-2.5 ?
Yes you can.
Hi Swagatam, I made the
Solar Charge Controller for 100 Ah Battery project. It’s working. I used C2 capacitor 2.2uF/50V. I tested it with a 10W solar panel. I can send you pictures of the project. Thank you.
That’s great Reis, I am glad you build it successfully. You can send the pictures to my email hitman2008 @ live.in
Merhaba Swagatam,
Öncelikle teşekkür ediyorum. Bu projenin (100 Ah Akü için Solar Şarj Kontrol Cihazı) uygulaması yapıldı mı?
Endişeliyim. LM 336Z-2.5 Adjust ayağı (1 nolu pin) boşta duruyor.
D7 = BYV32-50 yerine hangi diyotu kullanabilirim.
Teşekkürler
Thank you Reis,
yes it is a tested design. The diode D5’s ADJ pin is intentionally not used to create a precision 2.5 V fixed reference zener diode.So it is not a problem.
For D7 you can use any 20 amp 50 V ultra fast rectifier diode.
Merhaba, devrede D5 (LM336Z) bağlantısı doğrumu.
yes D5 connection is correct.
great series on Buck Converter circuits!
Have you done anything with the UC3843 module?
Something that would be suitable with the higher wattage panels with a variable charge voltage for Lead Acid or similar at 12-48 volt banks.
Thanks
Doug
Thank you for liking the article. I have not yet studied the UC3843, but I would definitely want to investigate this very useful concept.
Hi Swagatam,
Thank you for the post. I have a question:
I can see the points for the solar panel, then the battery point I can see, what is the load point for? Is is to the inverter or what?
Hi Joe, the load can be an inverter or any appliance
Nice one and well explained please what changes can I make to use it for 200ah battery and above thanks. Abbey.
Thank you, check if the BUX11 are rated to handle 25 amp current, then you can use this circuit with a 25 Ah battrey also, without any changes.
Hi
As I am very interested in building at least 3 of the above solar charge controller for 100 A/Hr. batteries, I am requesting you to send me the Gerber files for the PCB.
Can you also tell me the inductance value of L1 in the schematic as this information seems to be missing in your synopsis.
Thanks very much for your great website.
Best regards
Ivor Barnett PhD – Holophony, BSc. Hon. Electronic Eng.
Hi, Glad you liked the project….But sorry I do not have the gerber files of the PCB for this project!
Where is L1? I cannot find any L1 in the schematic.
1) Does this 100Ah circuit support batteries rated less than 100Ah, e.g. 20Ah, 40Ah, 80Ah, etc. My application requires 40 Ah battery. In above case, which changes are required for desired rated battery charging??
2) How much DC load can be connected to 100Ah battery circuit ??
3) How much DC load can be connected to 40Ah circuit if designed with reference to above one??
1) It can be used for any battery below 100 Ah, provided the solar panel current is rated at 15% of the battery Ah value
2) You can connect a 10 to 15 amp DC load
3) for 40 Ah battery the max load should not exceed 5 amps