In this post I have explained a porch light circuit with programmable timer controller which enables the connected LEDs to light up or shut off after some delay, as preferred by the user, thus it's not entirely dependent on the solar panel parameters. The idea was requested by "Unknown".
Technical Specifications
It'd be neat if you devised a circuit that could:
1. Detect Darkness
2. Wait an adjustable amount of time, say 1-3 hours
3. energize a light, or relay
4. Stay on for an adjustable amount of time 3-8 hrs
That'd be a huge improvement over typical solar porch lights, as they typically come on too early, and stay on too long.
Thanks

Circuit Description
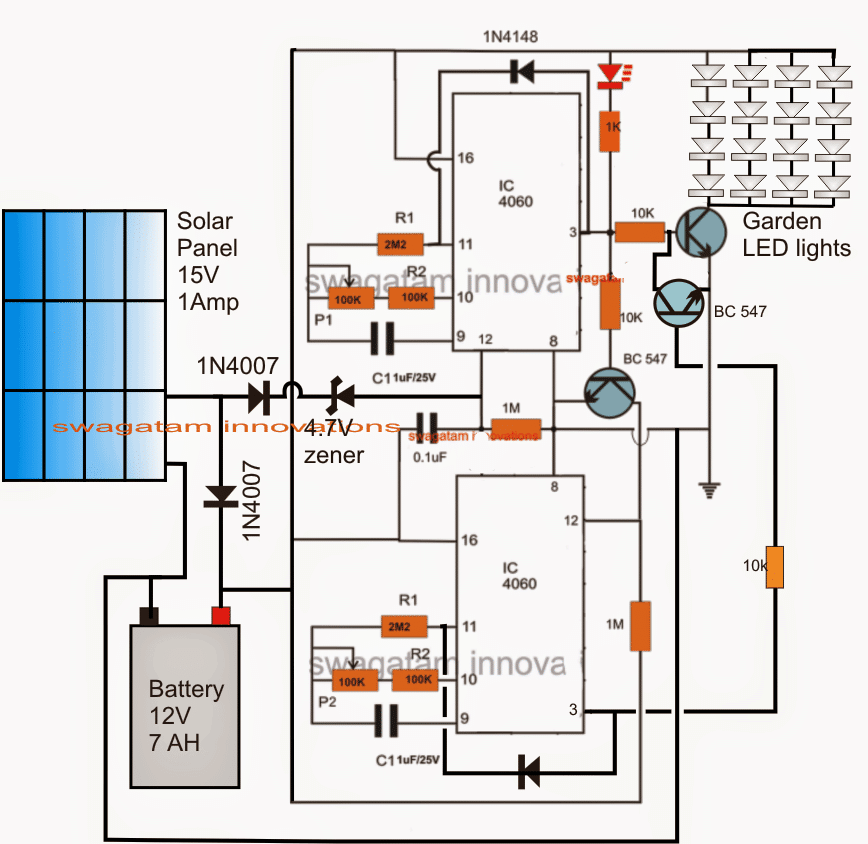
Referring to the proposed solar outdoor light circuit diagram, we see a couple of IC 4060 timer stages interlinked together to form a set of sequential programmable timers.
During day time when the solar panel is active, the connected battery is allowed to charge through it, while the 4060 timers are held inactive due to the presence of the positive voltage from the panel to pin12 of the upper 4060 IC.
When darkness sets in, depending upon the selection of the zener diode between the solar panel positive and pin12 of the upper 4060 IC, the voltage is brought down to zero allowing pin12 to get a resetting zero logic via the connected 1M resistor.
Once this happens the upper IC 4060 begin counting and after a predetermined delay set by its pin9 capacitor and pin10 pot, its pin3 goes high.
The BC547 connected with this pin3 now activates all the connected LEDs illuminating them after the desired period of time has elapsed. The 1N4148 diode connected across this pin3 and pin11 of the upper 4060 freezes the IC counting process and latches the LEDs permanently ON.
However, in this situation, the lower BC547 also gets triggered and resets pin12 of the lower IC 4060 which in turn begins counting, and identically after a set period of time determined by its own pin9 capacitor and pin10 pot values switches ON its pin3.
This high from pin3 of the lower IC 4060 latches itself due to the presence of the 1N4148 diode across its pin3 and pin11, and it also grounds the base of the LED BC547 driver such that all LEDs shut off.
The entire solar porch light timer circuit now latches in this position until the next morning, when the rising positive voltage from the solar panel yet again resets the upper IC pin12 and the entire circuit. The circuit stays inactive until dark.
The cycle thus keeps repeating as explained above.
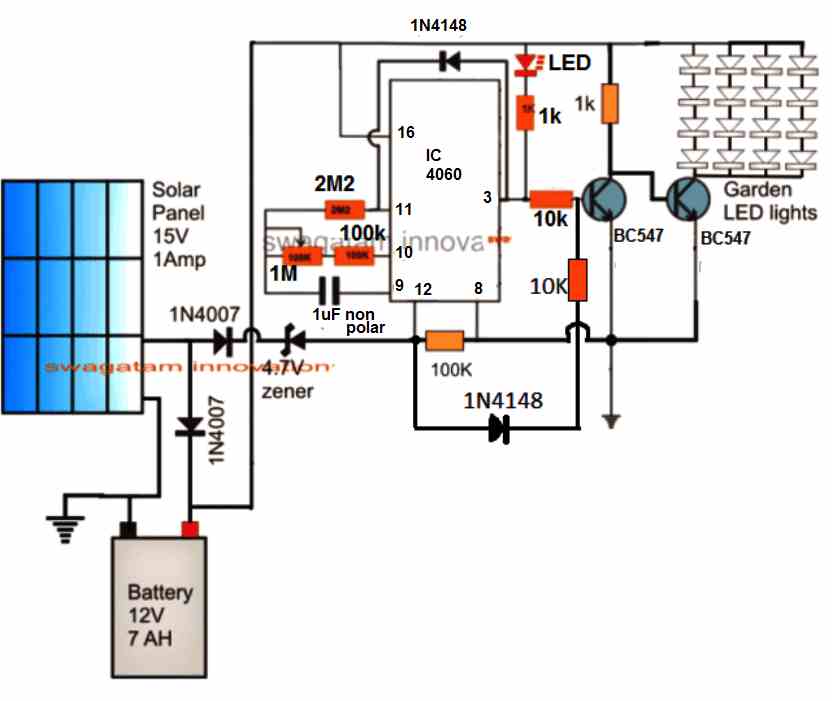
Single Adjustable Delay OFF Solar Timer Circuit
The above explained design can be simplified to obtain an adjustable delay switch OFF after the LEDs are switched ON in the evening.
Circuit Diagrams

Simple Porch Light Circuit using IC 555
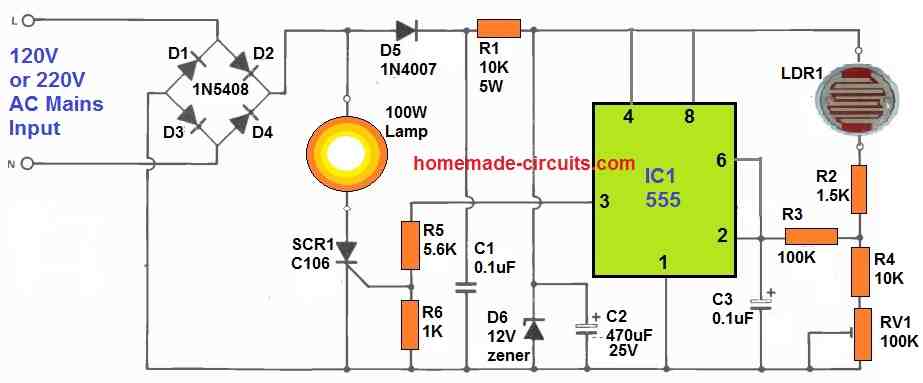
The circuit design for the simple automatic porch light circuit is shown in the following figure.

The system's sensor is the Light Dependent Resistor LDR1. The quantity of light falling on it determines its resistance; higher the light, lower will be the resistance. IC1 is utilised as a hysteresis level detector.
The 555 has 2/3Vcc and 1/4Vcc resistance levels built in. The output, pin 3, flips low whenever the voltage on pins 2 and 6 increases beyond 2/3Vcc, and high whenever the value falls under 1/4Vcc.
The preset RV1 is set such that it is turned on at the desired light level. A 10 second time constant is formed from R3 and C3.
This 10 second is the time it takes for the voltage on pins 2 and 6 to increase to 2/3Vcc, assuming C3 charges from 0 V, and it's added to help prevent unwanted triggering from things like approaching car headlights or kids with flashlights!
The circuit is powered by D1-D5, R1, and is controlled by D6.
Supply DC smoothing is provided by the capacitor C2.
The thyristor SCR1 controls the outside light. A thyristor had been adopted over a triac since it is easy to trigger and does not create radio frequency interference in this setup.
The downside of this technique is that it necessitates the use of a diode bridge (D1-D4), which should be correctly rated to handle the lamp current.
When testing early versions, it was discovered that mains transients may cause the light to flicker as soon as it approached the lower (switch on) threshold level.
D5, R1, C1, and C2 are all part of a thorough filter circuit. Any high frequency spikes on the mains supply will travel via D1 -D5 and be isolated from the supply's negative side by C1.
C1 has a lower impedance than R1 and hence has a lower impedance. C2 would try to discharge through R1 and the light circuit if the mains voltage failed or dropped for a few cycles. For this brief period, D5 and C2 keep supply high, with D5 being reversed biased.
The sensitive gate type C106D thyristor was employed in this simple porch light circuit. Between the SCR gate and cathode, you'll need an 0.8 V, with a gate current of 20 mA.
The output of the 555 is used to activate it. R5 and R6 create a voltage divider network, resulting in a cathode to gate voltage of roughly 2 V, which is adequate for effective triggering.
Whenever the 555 output drops low, R5 guarantees that the gate recovers to the very same voltage as the cathode, guaranteeing that the thyristor stays untriggered.
By lowering the value of R1 to 4k7 (2 W), the circuit may be changed for 115 V operation. The rest of the components are the same.
However, due to the lower supply voltage, the maximum wattage that may be switched is decreased to 250 W, with a maximum current of 2 A flowing via the diode bridge D1-D4 and thyristor SCR1.
