

An electronic device or circuit which detects and indicates the various fuel levels in a fuel tank without a physical contact, through ultrasonic waves, is called an ultrasonic fuel level sensor
In this post I have explained how to build a simple fuel tank level indicator circuit using Arduino and ultrasonic sensors.

In every vehicle the fuel tank is probably the most important part of the entire system, since the vehicle's operation critically depends on the presence of the tank fuel.
This also means that monitoring the fuel level in the tank becomes an essential factor for the owner or the driver of the vehicle.
Although, most vehicles are already equipped with an advanced digital fuel sensor indicator device, building your own circuit can be a lot of fun and satisfaction.
Warning: This project is only for experimental purpose. It must be done under expert supervision, if actual fuel is used for the tank fluid.
In this article I have explained how to build an LED based fuel indicator circuit using GSM wireless ultrasonic sensors and Arduino.
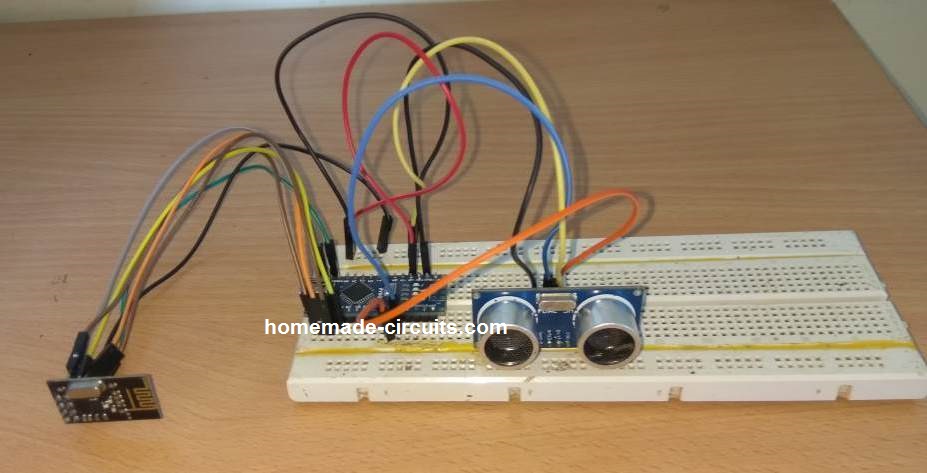
Ultrasonic Fuel Sensor Transmitter
To build the transmitter circuit, you will need the following modules:
- Arduino NANO - 1no
- Ultrasonic sensor module HC-SR04 - 1no
- nRF24L01 wireless Tx/Rx module - 1no
After programming the Arduino, the modules will have to wired as shown in the following diagram:

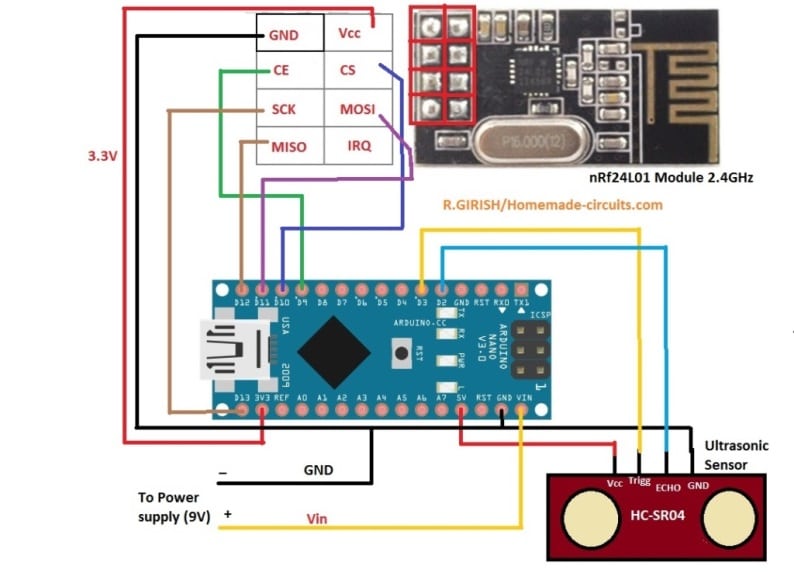
The white table at the top left shows how the pinouts of the nRF24L01 module needs to be connected with the Arduino board.
How it Works
As we can see, there are a pair of ultrasonic sensors in the module. One senor sends the ultrasonic frequency or the wave towards the fuel surface. The waves collide with the fuel surface and reflect back towards the module. The reflected ultrasonic waves are captured by the second sensor unit, and sent to the Arduino.
The Arduino compares the reflected ultrasonic time with the reference time of the tank "full height" and creates an estimation of the instantaneous height or the level of the fuel.
The information is then encoded and forwarded it to the nRF24L01 wireless module. The nRF24L01 module finally converts the code into RF signal and transmits it into the atmosphere for the receiver unit to capture the signal.
How to Mount the Sensors
Once assembled, the ultrasonic sensor will need to be installed on the fuel tank in the following manner:

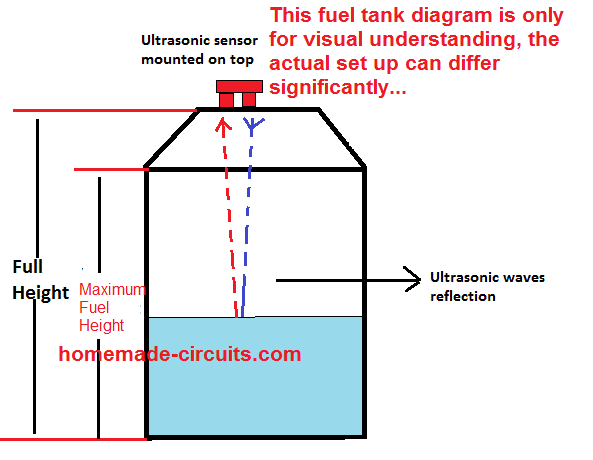
The ultrasonic sensor will need to be installed by inserting the sensing heads through perfectly dimensioned holes, and sealed with appropriate sealing agent.
We can see the tank is specified with two measures, one is the full height, and the other is the maximum or the optimal fuel height inside the tank.
You will have to note these two measures as these will be required to be entered in the program code for the Arduino.
Ultrasonic Fuel Sensor Receiver
For making the fuel sensor receiver you will require the following materials:
- Arduino NANO - 1no
- Ultrasonic sensor module HC-SR04 - 1no
- nRF24L01 wireless Tx/Rx module - 1no
- LEDs as shown in the following diagram - 4nos
- Piezo buzzer - 1no
- 330 Ohm 1/4 watt resistors - 4nos
Circuit Diagram
After programming the various modules may be connected in the following manner:

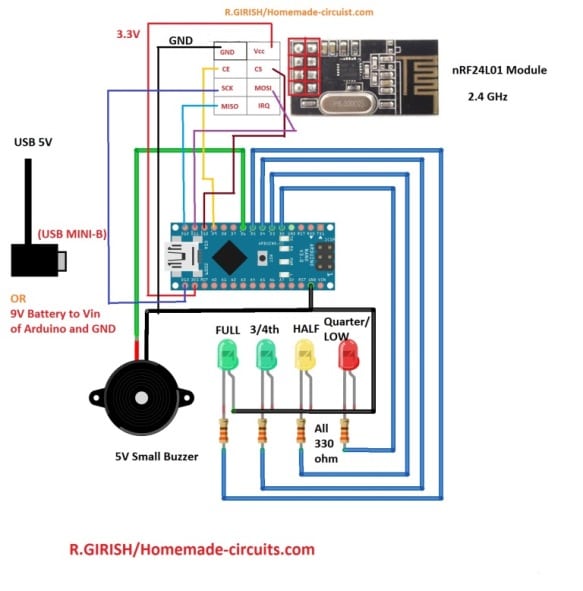
Here, the nRF24L01 wireless works like a receiver. The antenna captures the RF content transmitted by the transmitter circuit, and sends it to the Arduino. As per the program code, the Arduino analyzes the varying ultrasonic time, and translates it into an incrementing digital output.
This digital output which corresponds with the instantaneous height or the level of the fuel is fed into an LED array. The LEDs in the array respond and illuminate sequentially enabling a direct visual indication of the fuel level to the owner.
The green LEDs indicate a healthy condition of the fuel content. The yellow LED indicates that the vehicle needs a refueling quickly, while the red LED indicates a critical situation, regarding the fuel about to finish. The buzzer now starts buzzing creating the necessary warning alarm.
Program Code
The complete program code for the transmitter and the receiver can be found in the following link:
https://github.com/Swagatam1975/Arduino-Code-for-Fuel-Sensor
You'll need to Change the two example values in the code with the values that you measured for your fuel tank:
// ------- CHANGE THIS -------//
float water_hold_capacity = 1.0; // Enter in Meters.
float full_height = 1.3; // Enter in Meters.
// ---------- -------------- //