This universal automatic battery charger circuit is extremely versatile with its functioning and can be adapted for all types of battery charging and even for solar charge controller application.
Universal Battery Charger Main Features
A universal battery charger circuit must have the following main features included in it:
1) Automatic battery full charge cut-off, and automatic low battery charging initialization, with corresponding LED indicator warnings.
2) Adaptable to all types of battery charging
3) Adaptable to any given voltage and AH rated battery.
4) Current controlled output
5) Step charging 3 or 4 step (optional)
Out of the above 5 features the first 3 are crucial and become the mandatory features for any universal battery charger circuit.
However along with these features an automatic battery charger must also be extremely compact, cheap, and easy to operate, otherwise the design could be quite useless for folks with less technical knowledge, making the "universal" tag get nullified.
I have already discussed many diversified battery charger circuits in this website, which includes most of the salient features that may be essentially required for charging a battery optimally and safely.
Many of these battery charger circuits used a single opamp for simplicity sake, and employed a hysteresis option for implementing an automatic low battery charging restoration process.
However with an automatic battery charger using hysteresis in opamp adjusting the feedback preset or variable resistor becomes a crucial procedure and a little complicated affair especially for the newcomers..since it requires some relentless trial and error process until the correct setting is finalized.
Additionally setting up of the overcharge cut-off also becomes a tedious process for any newcomer who may be trying to achieve the results quickly with his battery charger circuit.
Using Fixed Resistors instead of Pots or Presets
The present article specifically focuses on the above issue and replaces the pots and presets with fixed resistors in order to eliminate the time consuming adjustments and to ensure a hassle free design for the end user or constructor.
I have already discussed one earlier article which elaborately explained hysteresis in opamps, we are going to use the same concept and formulas for designing the proposed universal battery charger circuit which will hopefully solve all the confusions related to the building of a customized battery charger circuit for any unique battery.
Before we move ahead with an example circuit explanation, it would be important to understand why hysteresis is required for our battery charger circuit?
It's because we are interested to use a single opamp and use it for detecting both the lower discharge threshold of the battery as well as the upper full charge threshold.
Importance of Adding a Hysteresis
Normally, without hysteresis, an opamp cannot be set for triggering at two different thresholds which may be quite wide apart, therefore we employ hysteresis to get the facility of using a single opamp with a dual detection feature.
Coming back to our main topic regarding designing an universal battery charger circuit with hysteresis, I have explained how we can calculate the fixed resistors, so that the complex Hi/Lo cut off setting up procedures using variable resistors or presets can be eliminated.
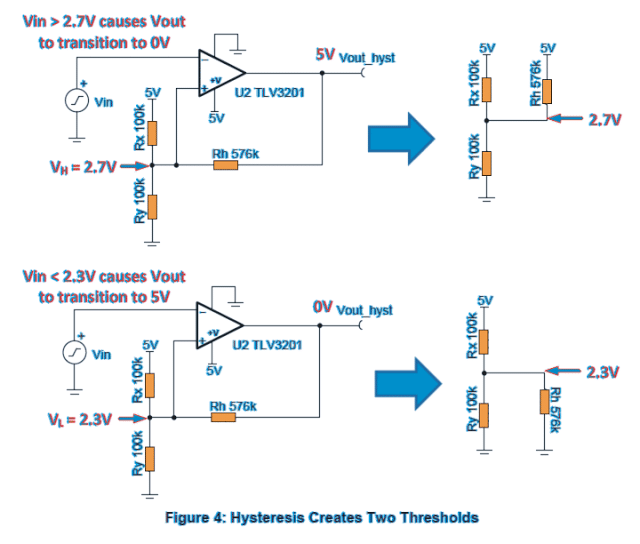
To understand the basic operations of hysteresis and its related formula we first need to refer to the following illustration:
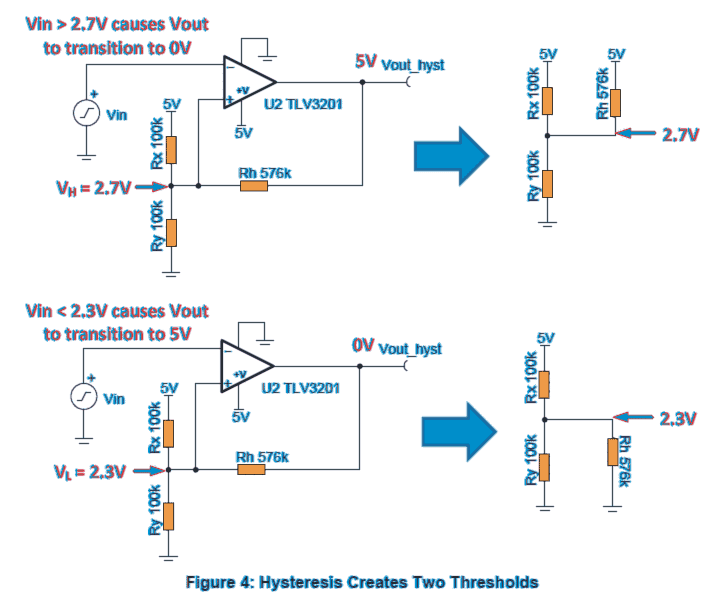
In the above example illustrations, we can clearly see how the hysteresis resistor Rh is calculated with respect to the other two reference resistors Rx and Ry.
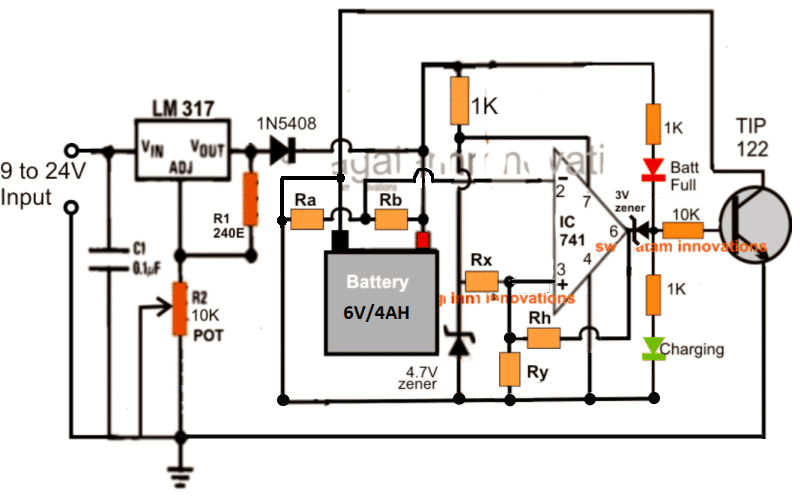
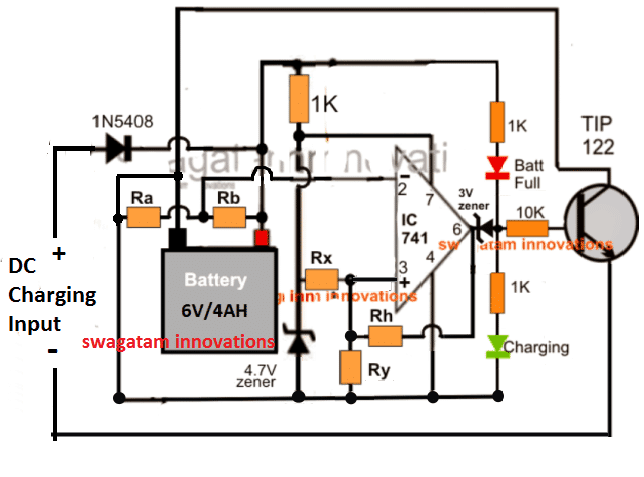
Now let's try to implement the above concept into an actual battery charger circuit and see how the relevant parameters may be calculated for getting the final optimized output. We take the following example of a 6V battery charger circuit
In this solid state charger diagram, as soon as pin#2 voltage becomes higher pin#3 reference voltage, the output pin#6 goes low, switching OFF the TIP122 and the charging of the battery. Conversely as long as pin#2 potential stays below pin#3, the output of the opamp keeps the TIP122 switched ON and the battery continues to charge.
Implementing the Formulas in a Practical Example
From the formulas expressed in the previous section we are able to see a couple of crucial parameters which needs to be considered while implementing it within a practical circuit, as given below:
1) The reference voltage applied to Rx and the opamp supply voltage Vcc must be equal and constant.
2) The selected upper battery full-charge switch off threshold and the lower battery discharge switch ON threshold voltages must be lower than the Vcc and the reference voltages.
This looks a little tricky because the supply voltage Vcc generally is connected with the battery and therefore it cannot be constant, and also it cannot be lower than the reference.
Anyway, to tackle the issue we make sure that the Vcc is clamped with the reference level, and the battery voltage which needs to be sensed is dropped to a 50% lower value using a potential divider network so that it becomes less than the Vcc, as shown in the above diagram.
The resistor Ra and Rb drop the battery voltage to a proportionate 50% lower value, while the 4.7V zener sets the fixed reference voltage for Rx/Ry and the Vcc pin#4 of the opamp. Now things look ready for the calculations.
So let's apply the hysteresis formulas to this 6V charger and see how it works out for this example circuit:
In the referred 6V circuit above we have the following data in hand:
Battery to be charged is 6V
Upper cut off point is 7V
Lower restoration point is 5.5V.
Vcc, and reference voltage is set to 4.7V (using 4.7V zener)
We select Ra, Rb as 100k resistors to reduce the 6V battery potential to 50% less value, therefore the upper cut off point 7V now becomes 3.5V (VH), and the lower 5.5V becomes 2.75V (VL)
Now, we need to find out the values of hysteresis resistor Rh with respect to Rx and Ry.
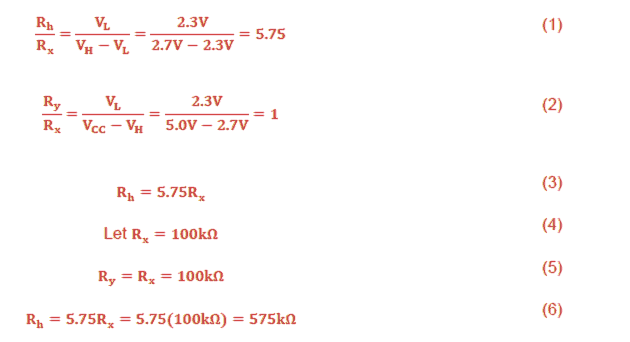
As per the formula:
Rh/Rx = VL / VH - VL = 2.75 / 3.5 - 2.75 = 3.66---------1)
∴ Rh/Rx = 3.66
Ry/Rx = VL / Vcc - VH = 2.75 / 4.7 - 3.5 = 2.29----------2)
∴ Ry/Rx = 2.29
From 1) we have Rh/Rx = 3.66
Rh = 3.66Rx
Let's take Rx = 100K,
Other values like 10K, 4k7 or anything could do, but 100K being a standard value and high enough to keep the consumption reduced becomes more suitable.
∴ Rh = 3.66 x 100 = 366K
Substituting this value of Rx in 2), we get
Ry/Rx = 2.29
Ry = 2.29Rx = 2.29 x 100 = 229K
∴ Ry = 229K
The above results can be also achieved using a hysteresis calculator software, just by clicking a few buttons
That's it, with the above calculations we have successfully determined the accurate fixed values of the various resistors which will make sure that the connected 6V battery automatically disconnects at 7V, and restarts charging the moment its voltage drops below 5.5V.
For Higher Voltage Batteries
For higher voltages such as for achieving 12V, 24V, 48V universal battery circuit, the above discussed design may be simply modified as given below, by eliminating the LM317 stage.
The calculation procedures will be exactly the same as expressed in the previous paragraph.
For high current battery charging, the TIP122 and the diode 1N5408 may need to be upgraded with proportionately higher current devices, and change the 4.7V zener to a value that may be higher than 50% of the battery voltage.
The green LED indicates the charging status of the battery while the red LED enables us to know when the battery is fully charged.
This concludes the article, which clearly explains how to make a simple yet universally applicable battery charger circuit using fixed resistors to ensure extreme accuracy and foolproof cut offs across the set threshold points, which in turn ensures perfect and a safe charging for the connected battery.
